If you get a message saying Recall is now saving snapshots, but there are no snapshots saved on your Windows 11 computer, then this post will help you. Recall Snapshot captures snapshots of your activity and, based upon that, creates a searchable timeline of your action.

Recall is now saving snapshots
A timeline of your activities will appear as you use your PC. Come back soon to review your snapshots.
Recall is now saving snapshots – But no snapshots saved
If you get a message saying Recall is now saving snapshots, but there are no snapshots saved on your Windows 11 computer, follow these solutions and workarounds:
- Reboot your computer and try
- Toggle the Save snapshots option
- Check the registry entry
- Check storage space available
- Make sure that you have permission over Recall folders
- Enable Secure Boot
- Check in Clean Boot
Before you proceed, make sure that your PC meets the minimum Hardware Requirements for Recall in Windows 11.
Recall NOT saving snapshots
1] Reboot your computer and see
First, we need to restart the system. Restarting will allow Recall to remove all the glitches that could have caused this issue. However, if restarting des not help, move to the next solution.
2] Toggle the Save snapshots option
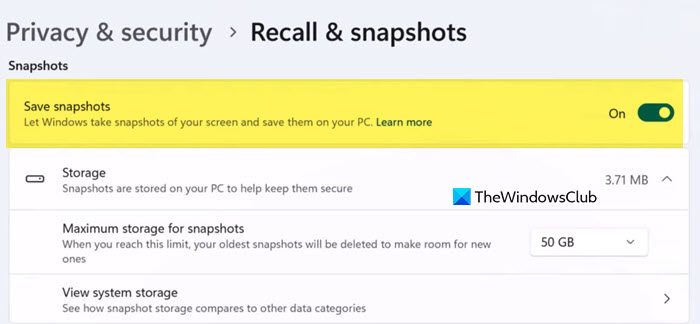
Another method to eliminate the glitch is by turning off the option to save the snapshot and then turning it back on. There is a chance that even though this option is enabled, Windows can not register it. So, follow the steps mentioned below to do the same.
- Open Settings by Win + I.
- Now, go to the Privacy & Security tab.
- Then, search for the Recall & Snapshots option and click on it.
- You then have to disable the toggle for Save Snapshots from the Snapshots section.
- Wait for a few seconds. If possible, reboot the system and then turn the feature back on.
Once done, check if the issue persists.
3] Check the registry entry
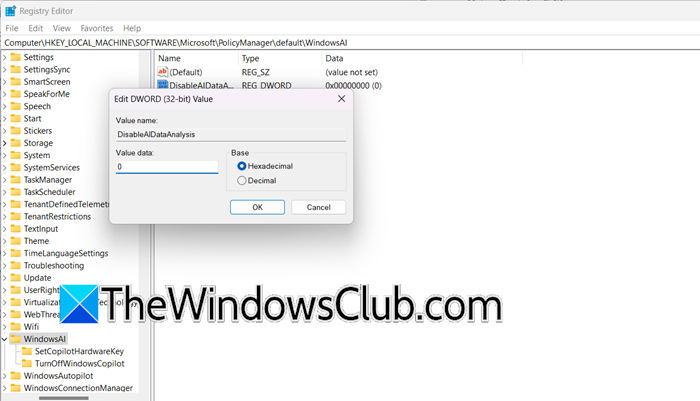
If you have configured a particular setting from the registry, then you will fail to override it from Settings. So, we need to check the registry settings and make some changes if required. However, before editing the registry, you must take its backup.
To check Recall settings in the Windows Registry, follow the below steps.
- Open the Registry Editor.
- Then, go to File > Import, select a location, and save the file.
- Now, go to
HKEY_LOCAL_MACHINE\SOFTWARE\Microsoft\PolicyManager\default\WindowsAI. - Check if DisableAIDataAnalysis is set to 1 – which means it is disabled. Set it to 0 to enable snapshot saving.
Once done, reboot your computer and check if the issue is resolved.
4] Check storage space available
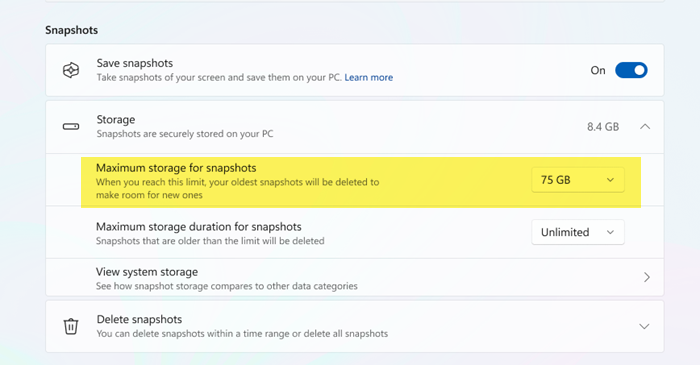
When you go to Settings > Privacy & security > Recall & snapshots, you will get an option to configure Maximum Storage for snapshots. Once your snapshot’s size reaches the limit, the older snapshots will be deleted.
Increase this limit and see if it helps. Go to the same settings panel, and then use the drop-down menu to increase Maximum Storage for snapshots.
Once done, check if the issue is resolved.
5] Make sure that you have permission over the Recall folders
The ImageStore folder, located at %LOCALAPPDATA%\CoreAIPlatform.00\UKP, contains the screenshots taken by Recall.
We need to check and make sure that you have full control over the folder, if not, it will fail to save the snapshots. You have to right-click on the ImageStore folder, go to Properties > Security, and then make sure that you have Full Control. Also, do the same with the UKP folder.
Does this help? If not, reverse the changes.
6] Enable Secure Boot
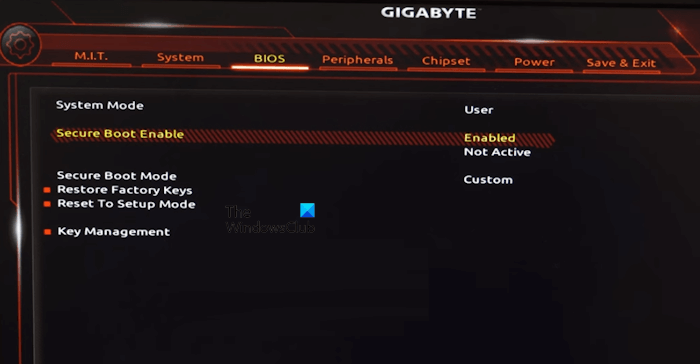
To take a Recall snapshot, your computer must be enabled for Secure Boot. This ensures that your computer boots up with trusted system firmware. To enable Secure Boot, follow the steps mentioned below.
- Go to Settings > System > Recovery > Advanced Startup.
- Click on the Restart Now button.
- Now, once your computer starts, go to Troubleshoot > Advanced Options.
- Select UEFI Firmware Settings to reach BIOS.
- Look for Secure Boot under the Security / Boot / Authentication Tab.
- Set it to Enabled.
- Save and Exit.
Finally, check if the issue persists.
7] Check in Clean Boot
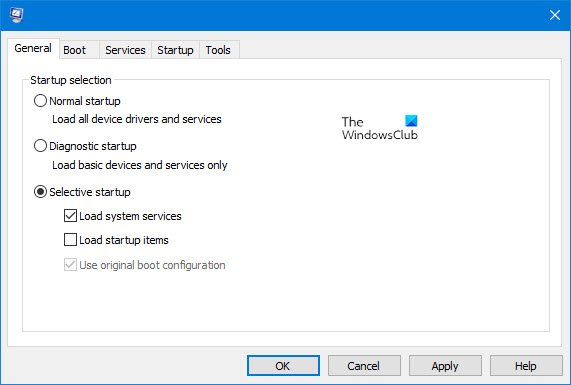
You may encounter this issue because of a third-party service interfering with Recall Snapshots. In that case, we need to start the system in the Clean Boot state and then check if it’s saving. If the snapshots are getting saved, we need to identify and disable the problematic processe process manually. If the program related to that process is unimportant, we can even remove it.
Hopefully, you can resolve the issue using the solutions mentioned in this post.
Recall snapshots are no longer being saved
If Recall displays a message Snapshots are no longer being saved, wait for a few minutes and see, and if you still do not see them saved, reboot your computer and see.
Read: How to use OpenRecall on Windows 11 (Recall alternative)
Where are Recall snapshots stored?
Recall snapshots are stored locally on your device. Specifically, they are saved in a folder within the CoreAIPlatform.00 directory. To access the ImageStore folder that contains the screenshots taken by Recall, navigate to %LOCALAPPDATA%\CoreAIPlatform.00\UKP.
Read: How to download and install Recall on an unsupported computer
How do I turn off Recall?
To turn off Recall, open Settings, and then go to Privacy & Security > Recall & snapshots. And then disable the Save Snapshots option. Alternatively, set the registry key HKEY_LOCAL_MACHINE\SOFTWARE\Microsoft\PolicyManager\default\WindowsAI/DisableAIDataAnalysis to 1.
Also Read: How to Uninstall Recall feature in Windows 11.
Leave a Reply