VLC Media Player contains a pack of useful features. Whatever media file you may have, VLC Player helps you to play that file. Apart from playing any file format, we also know that we can stream videos using VLC Player. Now, we are going a step forward and will use the most interesting feature of this player. We can record desktop screen using VLC Player easily. Though there are many screen recording software available, this comes in handy when you need to record the screen immediately with your installed VLC Media Player on Windows 11/10.

VLC Media Player allows us to record the screen to the maximum extent possible, and it does so at a good level compared to other screen recording software. In this article, I will explain step-by-step how to record a desktop screen using VLC Player easily.
Record Desktop Screen Using VLC Player
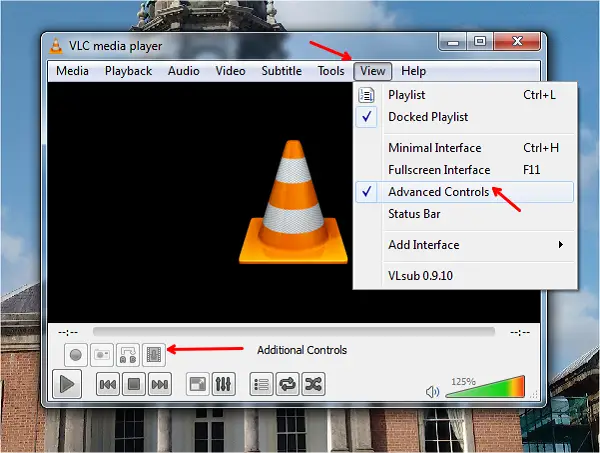
First, open VLC Player, click on the “View” tab, and select “Advanced Controls.” You will now see some additional controls displayed on the player.
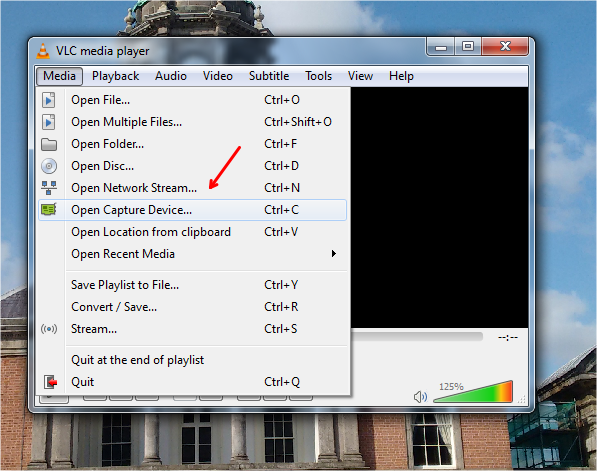
Click on “Media” and on “Open Capture Device” option.
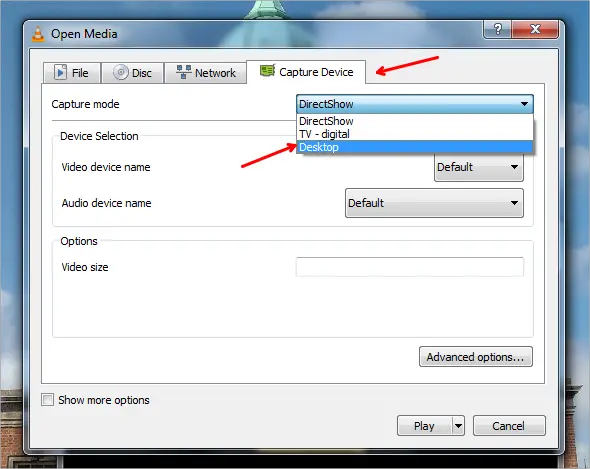
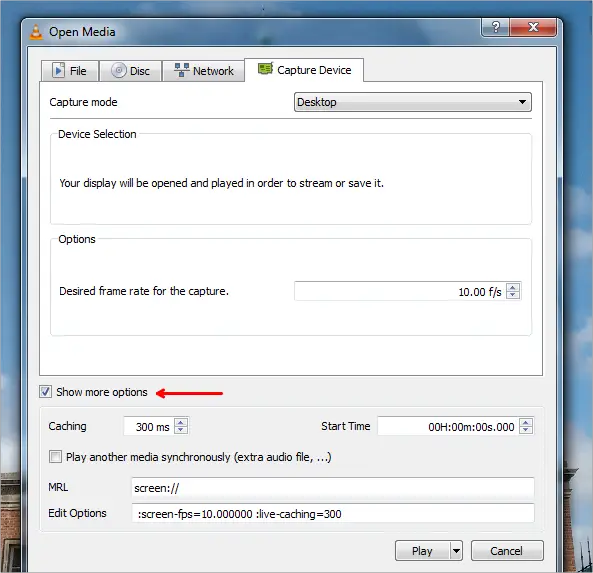
It opens “Open Media” dialog box with “Capture Device” tab being opened by default. Select “Desktop” option from the “Capture mode” dropdown box.
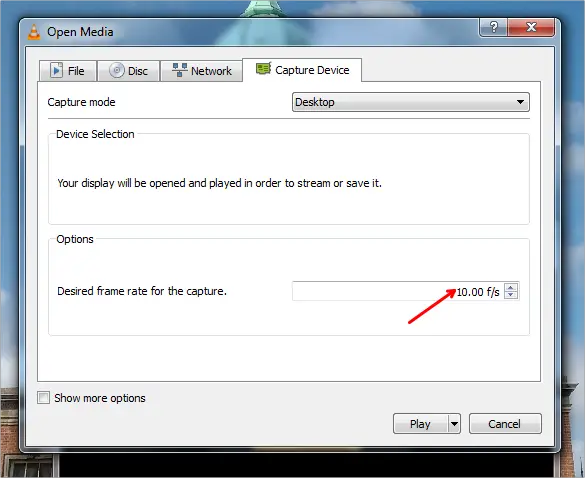
Set the “Desired frame rate for the capture” to 10.00 f/s.
To make it clear, VLC only allows us to capture the screen, and it does not record the audio or voice automatically during this activity. But do not worry. We have the option to add the recorded voice voice as well. Select the “Show more options” check box and you can see some more options.
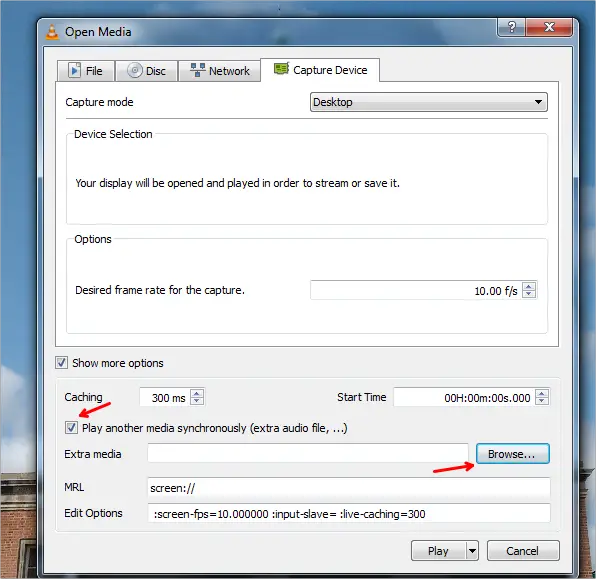
You need to record the voice before adding it. Then, click on the “Play another media synchronously” check box and browse to the audio file with your recorded voice.
Click on the down arrow associated with the “Play” button and select “Convert”.
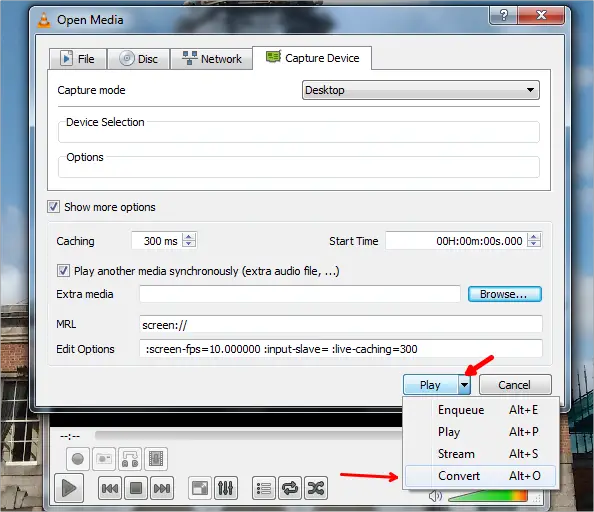
“Convert” dialog box gets opened. Click on the “Create a new profile” button.
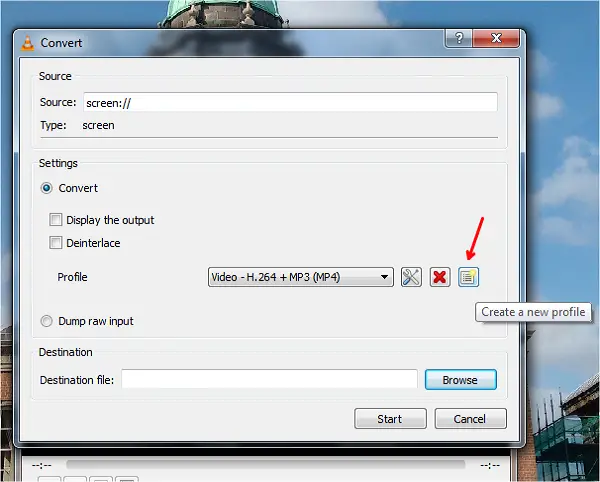
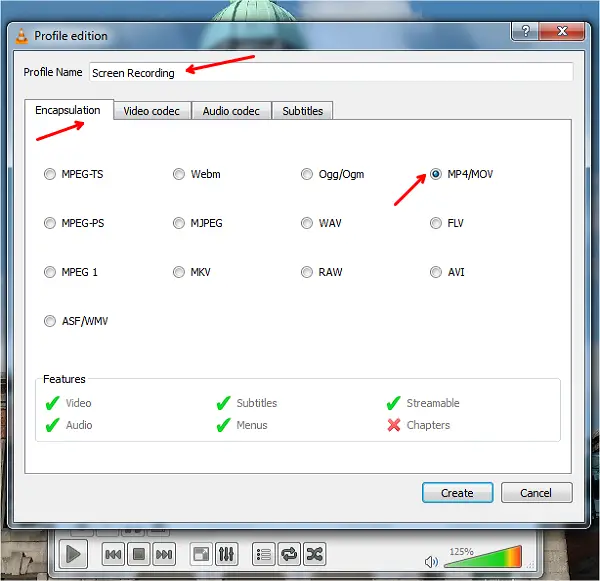
The “Profile edition” dialog box opens up with the “Encapsulation” tab being opened by default. Enter the “Profile Name” and select “MP4/MOV” radio button.
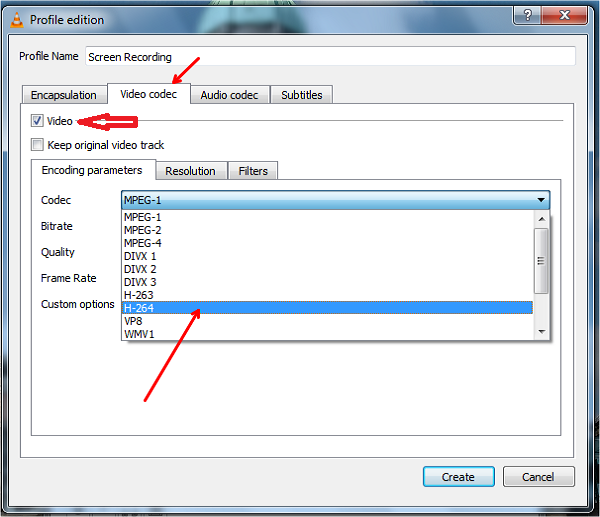
Tap on the “Video codec” tab and check the option “Video”. Under “Encoding parameters” tab, choose “H-264” option from “Codec” dropdown box and click on “Create” button.
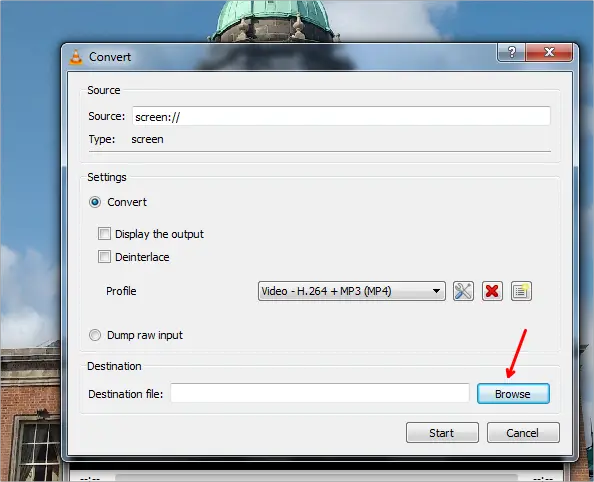
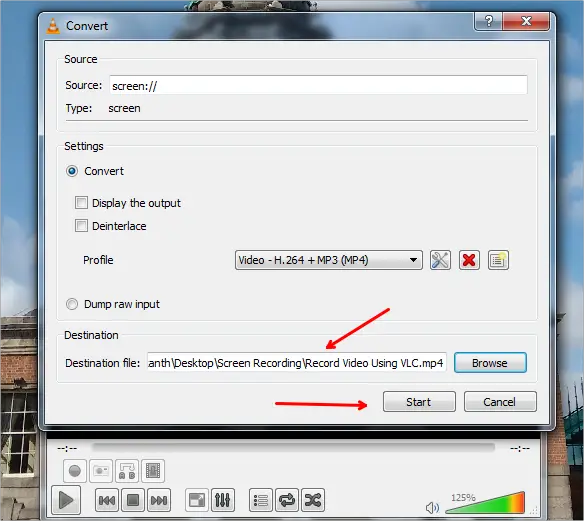
Now, you are taken back to the “Convert” dialog box and click on “Browse” to set the location of the “Destination file” to save the recorded video.
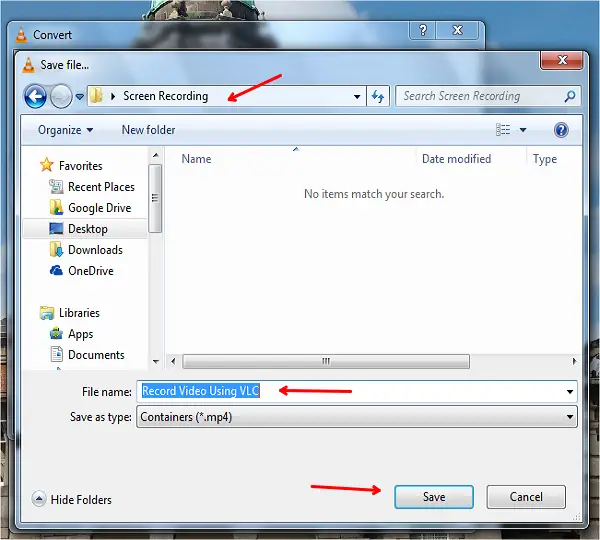
From the “Save file” dialog box, choose the destination path, enter the “File name” and hit “Save” button.
The desired destination path is shown, and click on the “Start” button.
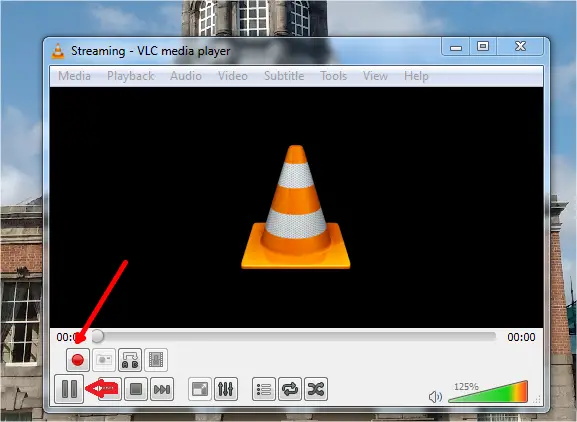
Now, whatever you are doing is being recorded by VLC Player which can be confirmed by the red colored recording button. You can pause the recording by clicking on the play button.
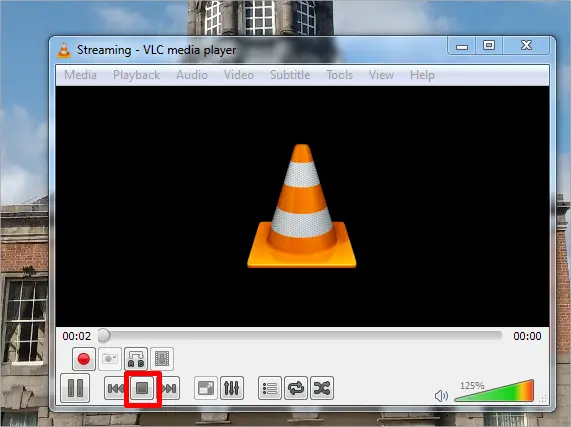
Once you are done with the recording, click on the Stop playback button.
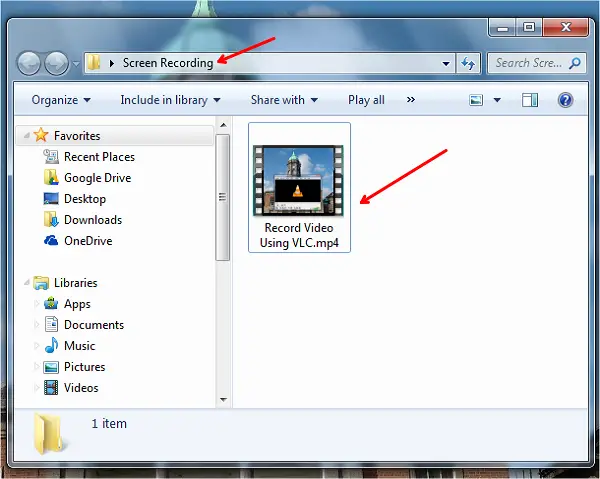
Head to your destination folder, and you’ll see the recorded video there. Double-click it to start playing the video.
This is the way to record desktop screens using VLC Player on your Windows PC.

Thx, great job, the knowledge was missing for this for me.
Happy that you liked it :)
Thanks for your sharing! Amazing function!
In fact, many free tools now are not available like Screenr and some other recorders will add limits when recording such as recording time or watermarks. It is quite hard to find a really reliable tool. VLC is a really robust one!
Happy that you liked it ! :)
Cool, I never thought that VLC could have such useful function. I will try it later. Aside from using VLC, ShowMore is another good choice to do screen recording, it’s my first choice, it’s free and even allows for editing. http://showmore.com/
does thiis work? It stopped working for me when I upgraded vlc pllayer seemed te removed that functionality? Are you using an old version?
Great guide. I don’t know VLC can record computer screen. In my mind, it’s just a good video player. Thanks for sharing your experience. I used to create screencast with acethinker screen grabber, worked like a charm. Share it here as an alternative to VLC player.
This way is still working, even with the latest version of VLC. Besides, you might try acethinker screen recorder, It is a free web-based tool that lets you record your screen right from your browser. It doesn’t require you to install any additional plug-ins or add-ons.
can you clarify what you do to record the sound? Do is just select desktop or what file do you refer to in the instructions? I am windows 10 and I followed this, but I all I got was the record button showing up(greyed out) but nothing happening. tks
Great guide. I don’t know VLC can record computer screen. In my mind, it’s just a good video player. Thanks for sharing your experience. I used to create screencast with acethinker online screen recorder, free and works like a charm. Share it here as an alternative to VLC player.
It just crashes whenever click start
yeah! good job but no audio.
I like to record desktop audio together with it.
Is that possible?
I can use desktop mode but i cant see my desktop icons. Any idea? I have Windows 10.
Thanks, that’s helpful. I couldn’t get VLC media player to screencast using the GUI so this is nice, but what I strongly don’t like is that your instructions show you having to record the audio separately. Is there not an easy way to have the microphone be “live” while I’m screencasting and record the two together, like Screencast-O-Matic? Otherwise, this is kind of a useless program compared to OBS or even ShareX. :(
Cheers,
Doug
The instructions seem to indicate we have to record audio separately. This is useless to me unless there’s a way to live record the sound. Also, the screencast doesn’t record my mouse movements nor can I easily add highlighting effects like with Screencast-O-Matic. :(
Cheers,
Doug
Exactly! At this point, I’ll either try and get ShareX working to record audio + video, though I’m told ShareX isn’t good for recording screencast videos with audio of more than 2-3 minutes, or try out OBS. If that fails, I guess I’ll stick to Screencast-O-Matic – the best so far. :)
Cheers,
Doug