There are situations where Windows 11 or Windows 10 PC will not boot no matter what you do. In this situation, the only thought would be to recover important data. This post looks at solutions that can help you recover files when Windows 10 won’t boot.
Can you recover data if your Windows PC is not booting?
Yes, it is possible as long as the storage device or hard disk is working. If the computer cannot boot, it could be because of corrupt system files, missing MBR, or anything that is stopping the BIOS to boot into the OS.
How to recover files when Windows 11/10 won’t boot
An easy method would be to connect the hard disk to another computer either directly or through an adaptor. When the OS on the computer detects the HDD, you will be able to access all the files on the computer. All you need to is copy the files. However, this may not be possible for everyone, so that we will use the Advanced Recovery method. The steps involved are:
- Create a Bootable Windows USB Drive
- Boot into Recovery Environment
- Use Command Prompt to Recover Data.
To recover files using this method, you need an external storage or USB drive to copy the files.
1] Create a Bootable Windows USB Drive
To create a bootable Windows USB, you will need a minimum of an 8 GB USB drive. Next, download the Windows Media Creation Tool.
When you run the installation file, you will have the option to create an ISO or bootable media. Choose the latter. Make sure there are no important files on the USB drive.
2] Boot into Recovery Environment

Next, boot into the BIOS or UEFI, and locate the option which allows you to change the order of the boot device. Make sure the USB/Flash device is set as a first boot device. Plugin the UBS drive, save, and exit from the BIOS/UEFI.
Once the PC detects the bootable USB drive, you should see a Windows Installation screen. Go ahead with that, but choose the option—Repair your computer—available at the bottom left of the Windows setup screen.
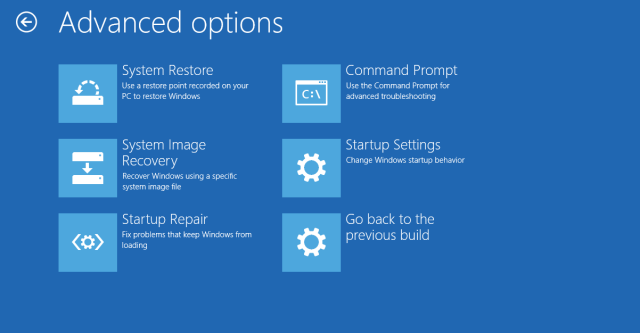
This will open the Advanced recovery. Click on Troubleshoot > Advanced options > Command Prompt.
3] Use Command Prompt to Recover Data

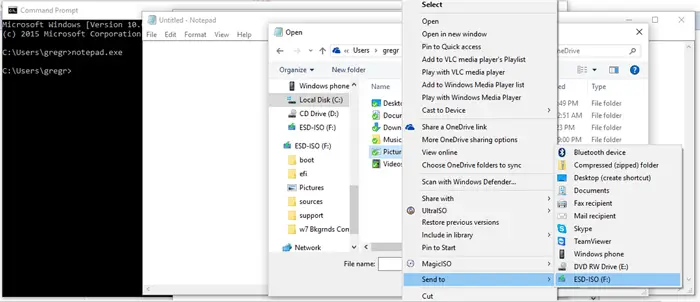
(Image Source – Microsoft Answers)
Once the prompt appears on the screen, type notepad.exe and press the Enter key. While the Advanced recovery is not supposed to offer any UI, Notepad works, and what is even more surprising is when you click on File > Open, it will also reveal the Windows Explorer.
While you don’t get a full-view Windows explorer, this compact view should be enough for you to recover files. Locate the files using this, and when you find it, right-click on it, and use Send to option to copy it to the storage device. You can also use CTRL + C / CTRL + V to copy-paste the files. However, the former method will be a lot faster.
If the file is hidden, make sure to first unhide using the command prompt and then copy it. Note that there will be no progress bar and the computer may look frozen.
Read: How to recover Windows files with Linux Live CD/USB
Can you recover data from a dead computer?
Yes, you can recover data from a dead computer using a different operating system to access your files if the computer can power on. Alternatively, you can remove the hard drive and connect it to another system as an external drive. Specialized data recovery software can also help in retrieving the data.
Can you recover data from a bricked laptop?
Yes, you can recover data from a bricked laptop by removing its hard drive and connecting it to a functioning computer using an enclosure or adapter. This process allows the laptop’s hard drive to be accessed as an external drive, enabling you to retrieve and copy important files to another device or external storage.