You have got your shiny new Windows 11/10 computer. You have been using it for a while now, and it’s all fine and dandy. Then, without any sign, your hard disk drive or solid-state drive goes south. The bummer is that you haven’t backed up to OneDrive or any other cloud storage service or an external device. Of course, you can take your device in, if it’s still covered by warranty, and get a replacement, but the warranty won’t recover your files. So what do you do?
If your Windows computer’s hard disk drive or solid-state drive has failed, you can retrieve your files and data using Linux Live CD/USB.
Let’s get started by listing the tools you’ll need:
- A Linux Live .ISO file.
- A free program called Rufus – Reliable USB Formatting Utility with Source
- An empty USB/CD to put the Linux Live ISO on (you’ll achieve the same thing using a USB or CD, just change the boot priority to whichever medium you choose)
- Another USB drive to put your recovered files on.
Note: The USB drive for your recovered files needs to be formatted to FAT32.
Recover Windows files with Linux Live USB/CD
Linux is an open-source operating system (OS). A Live CD or Live USB provides a way to use an OS on a computer, without installing it on the computer. Once you’ve created the Live USB, you insert it into your turned off computer, start the computer and set it to boot from the USB. The Linux operating system and all its programs stay on the USB. They don’t install on your computer, but it will give you access to any hard drives that are on your computer.
How to get the Linux Live ISO file
There are several System Rescue Disks out there, and in this post, we’ll be referring to Ultimate Boot CD. It is free to download and comes with many programs and tools for drive cloning, data recovery, memory and CPU testing, and BIOS.
Once you have downloaded UBCD and Rufus (the easiest and fastest way to make bootable USB drives), you can now follow the steps below to create a Bootable Linux USB Drive.
How to create a Bootable Linux USB Drive
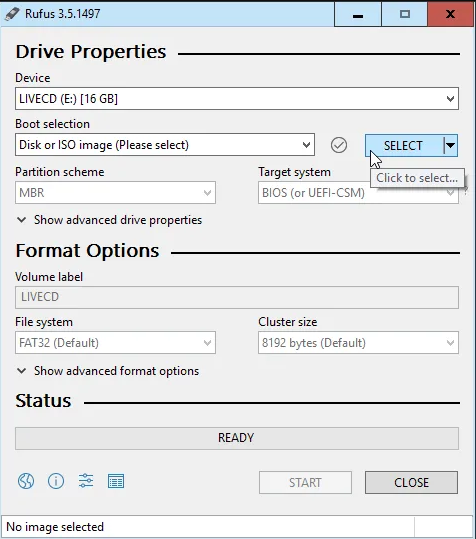
- Open the already downloaded Rufus.
- Ensure you have the correct USB drive selected. This process will completely erase the USB drive. Rufus will already be set to the right setting you need. Click on the SELECT button to choose our UBCD .ISO (see screenshot below).
- When the file explorer opens, navigate to where you saved the UBCD .ISO and double-click on it to select it.
- Now, click on the START button.
- You’ll receive a prompt that all the data on the USB drive that you selected, “…WILL BE DESTROYED.”
- Click on OK to continue.
Rufus will start to make the bootable USB drive. You’ll see a progress bar under the Status section of the Rufus interface.
When the status bar says READY, click on CLOSE (see screenshot below). Your UBCD bootable USB drive is now ready.

You can now proceed with the steps below to retrieve your files with the USB drive.
How to boot your computer with the Linux Live USB Drive to recover your files
There are several ways to boot with a USB drive depending on your computer. Basically, when you turn the computer on, you’ll have to press a specific key, or combination of keys, to boot into BIOS, and change the default boot drive to your USB.
Once you’ve rebooted your computer with UBCD, you’ll see a text-based menu. Use your arrow keys to go down to Parted Magic and hit Enter key to select it.
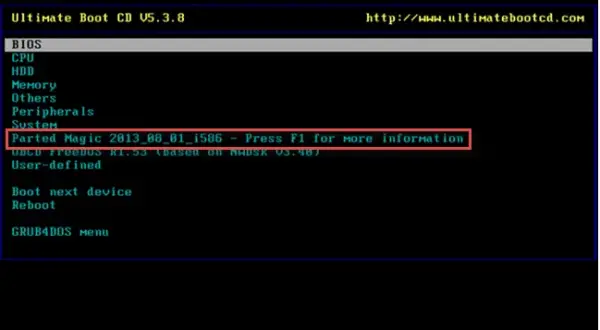
You’ll be presented with a text menu to choose either;
- Default settings (Runs from RAM) or
- Live with default settings.
If one doesn’t work, try the other. You’ll now see a desktop environment (see screenshot below).
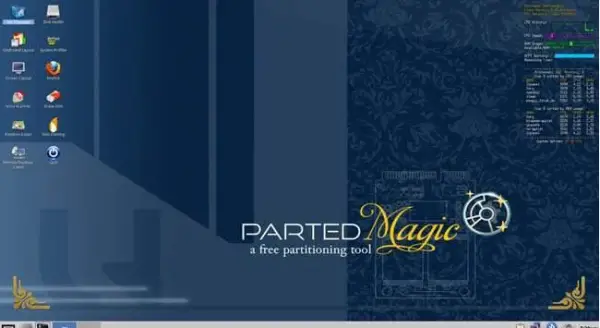
At the top-left corner, you’ll see File Manager. That’s the UBCD equivalent of Windows Explorer—Double-click on that to open it.
You’ll see several drives on the left-side of the File Manager. You’ll be looking for a folder called Windows.
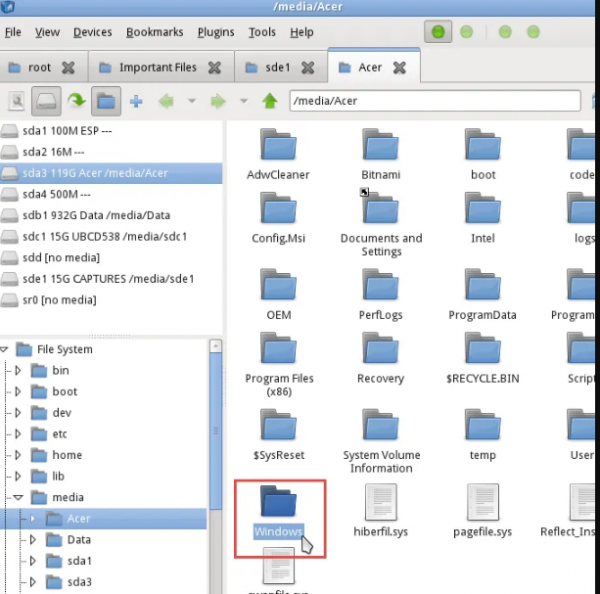
Now explore the folder to find the files. Click through Users > Your Account where Your Account is your account’s username.
In there, you’ll see My Documents, My Pictures, Desktop, etc. That’s where you’ll find the files you want to recover. Select the files/folders, right-click, and copy them – just like you would in a Windows environment.
Then from the left pane, identify and select your other USB drive, right-click and paste on the right pane.
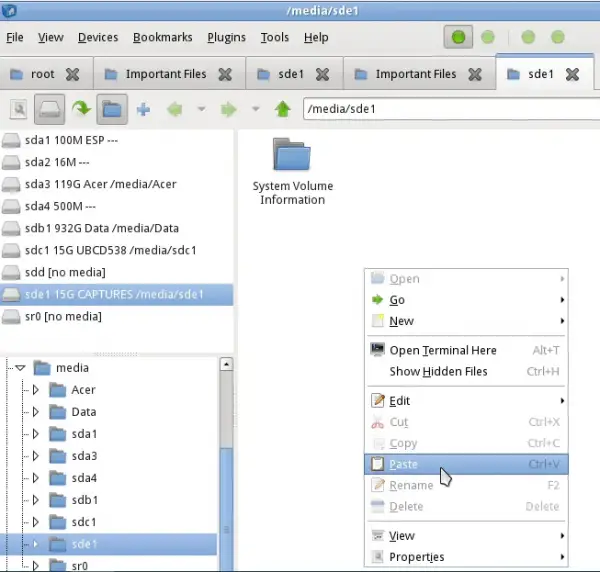
You now have your files on your USB drive.
Exit File Manager and click on the Start menu button in the bottom-left corner of the desktop environment.
Click on Logout. A prompt will open, click on Turn Off Computer.
You can now safely stow your USB with your recovered files!
Read: How to recover files when Windows computer won’t boot.
Leave a Reply