Recovery Drive is a special partition on the hard drive, which usually contains all the required files that can fully restore your Windows PC in case your system becomes unstable for any reason. It is essential; why so? The answer is pretty simple! Unfortunately, if your PC ever experience hardware failure or any major issue, a recovery file will help reinstall Windows. However, if you are receiving Recovery Drive is full in Windows message, then this post will help you resolve it.

Why is the Recovery Drive Full?
A recovery drive should not usually be visible, but if you can see it, it should never be used. Windows don’t make any change in the drive, but If the Recovery Drive is full, open in File, explore and locate your personal files, and remove it.
Recovery Drive is full in Windows 11/10
If you see Recovery Drive is full warning in Windows11/10, that means the Recovery disk has no space left. This can be very annoying as you will get the warning frequently, but the good thing is you can fix this issue in several ways. This could happen even when the Recovery drive is not full.
- Remove or Remove Recovery Drive from File Explorer
- Extend Recovery Partition with Disk Management
- Disable System Protection
- Run Disk Cleanup
- Delete Recovery Drive
In this post, you will get a complete guide on using these solutions to get rid of the recovery drive full issue. To do this, it’s always advisable to backup your stored information. In case the process stops in between, it can result in loss of data. Let’s discuss this more in detail.
1] Hide or Remove Recovery Drive from File Explorer
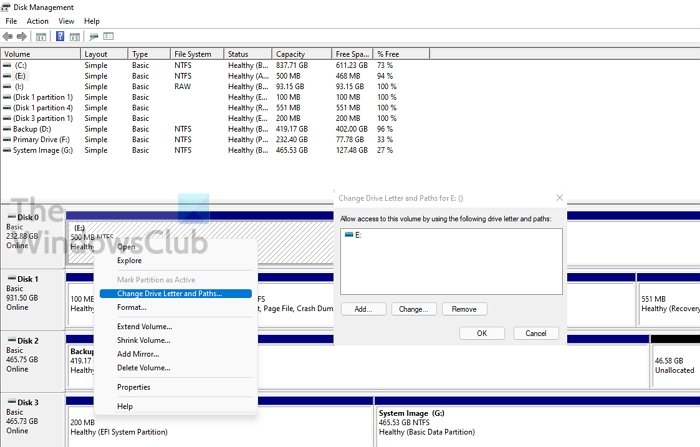
One of the best ways to avoid the Recovery Drive full warning is to use the Remove Drive letter from File Explorer. This will not delete the drive or its data. It will only remove the drive letter.
- Click on Start, type diskmgmt.msc, and Enter to open Disk Management.
- Near the bottom half of the window, you will find the list of drives. Locate the drive letter you want to remove from the list, then click left to select it.
- Once it’s highlighted, right-click it and select the Change Letters and Paths.
- A new window will appear with the same drive letter chosen; click the Remove button to remove the drive letter from the Windows File Explorer.
- You will get the warning—Some programs that rely on drive letters might not run correctly; are you sure to remove this drive letter? Click Yes!
- Close the disk management window and go to the PC/My Computer; you will find the drive letter removed from there.
No more warning about disk space.
Read: How to use Recovery Drive to restore Windows 11/10
2] Extend Recovery Partition with Disk Management
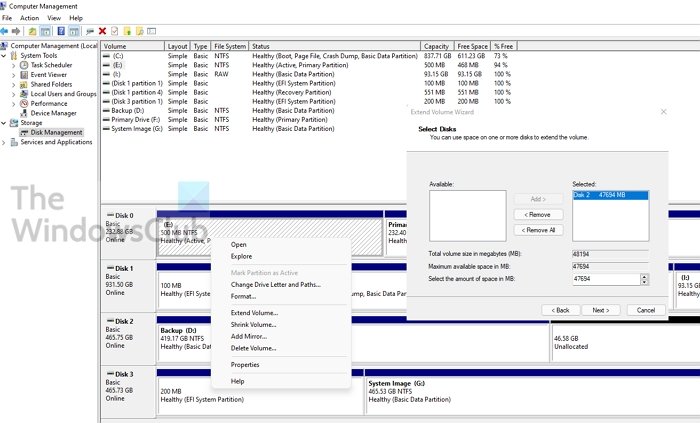
Extending the recovery partition is the best and safe way to clear the low disk space warning from your system. You can easily increase the space of the Recovery Partition with the help of the in-built Disk Management utility.
- Use Win+R in Windows to open the Run prompt
- Type compmgmt.msc in it and press the Enter key
- Select Disk Management under Storage
- Now open the Disk Management from Storage.
- Please right-click on the Recovery Partition, and choose to Extend it.
- It will launch the Extend Volume Wizard, where you can select the disk and from where space can be taken.
- Select it, and click to add it. Then fill in the final size and click Next
Post this; it will go through a long process to clear out the physical space and then add it to the recovery partition.
That said, you should know that if you want to extend partition space, you need free space on the same disk. Even if you have enough space on the second disk, it is impossible to extend or add a partition. If it is absolutely necessary, you can use the Shrink volume feature to free some space next to the recovery and then merge or extend the partition.
Read: How to increase WinRE partition size using command line in Windows 11
3] Disable System Protection
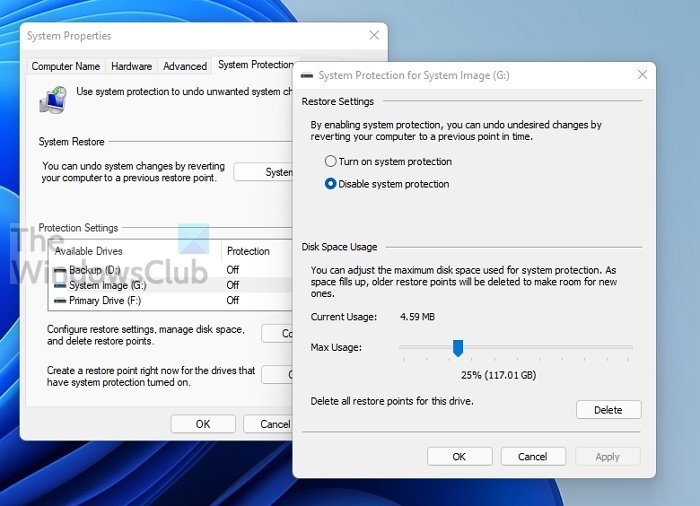
To avoid low disk space on the recovery drive warning of Windows 10/11, you can disable the system protection.
- Press the Windows key and type System Restore. Click on it when it appears in the result.
- It will display the list of drives with protection ON. Select the RECOVERY drive, and click on the Configure button.
- This will reveal the System protection for the selected drive. You have a couple of options to recover space.
- Disable system protection
- Reduce the amount of space allocated
- Delete all restore points.
System Restore is not needed for Recovery Partition, so you can choose to disable it. Ensure to delete the existing restore points.
Read: We can’t create a Recovery drive on this PC, Some required files are missing.
4] Run Disk Cleanup to free up Disk Space on Recovery Drive
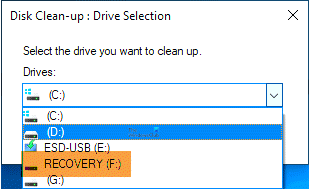
Whenever your Recovery Drive runs out of space, you can run the in-built disk cleanup program to scan the drive and delete unnecessary files.
- Press “Win+ R” to open the Run, type cleanmgr on the Run box, and press Enter to open the cleanup program.
- Now select the Recovery drive from the drop-down, and click “OK.”
- Then the program will scan and let you know how much space can be freed up.
- Choose unnecessary files, and click OK to free up space on the recovery drive in Windows.
You need to be careful what you delete here.
Read: How to create a System Recovery Drive in Windows 11/10
5] Delete Recovery Drive
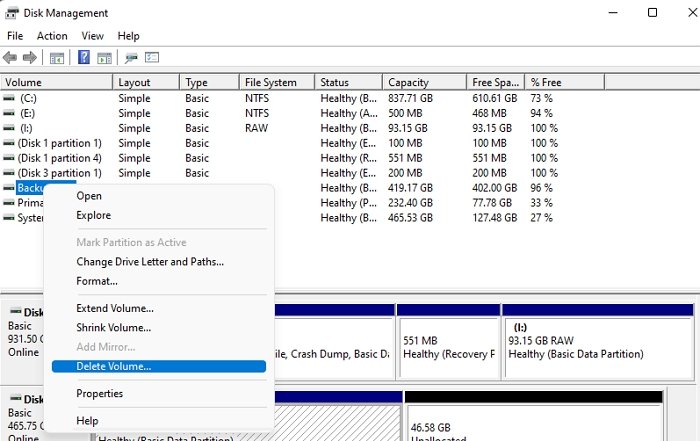
Deleting the Recovery Drive is another option for you to avoid recovery drive is a full warning. However, make sure to take a backup partition before using this method.
- Press the Start button, and type Disk Management.
- Click on the Create and format hard disk partitions
- Select the Recovery partition, right-click on the selected drive volume and click on the Delete Volume option.
- Confirm, and it will delete the recovery partition.
This post will show you in detail how to delete Recovery Partition in Windows.
What happens if I delete the Recovery Drive?
Many people usually ask, “can they delete the recovery drive,” the answer is yes! You can delete a recovery drive without any issue. Deleting a recovery drive will never affect your operating system. Still, keeping the Recovery Drive is always recommended because it will help recover if it crashes, reinstall OEM drivers, etc.
Read: We can’t create the Recovery drive, A problem occurred while creating the recovery drive.
How to clean up Recovery drive?
- Open the RECOVERY partition
- Show Hidden and Protected operating system files
- Delete the contents on $RECYCLE.BIN folder
- Also identify other files you can delete
- Press Shift + Delete to permanently remove the files.
- Now Run cleanmgr as administrator and use it as described above in the post.
Does it matter if the recovery drive is full?
If the Recovery Drive has the required percentage of free space, it only helps during the recovery process. Low disk space can cause serious issues when using System Recovery, so it’s always recommended not to store files on the recovery drive.
Can I compress my recovery drive?
While you can compress to get more space, it is highly recommended not to do so. If you have an SSD, compressing will crash your computer. It will also reduce the life of the SSD. The better option is to remove all personal files you have stored in it or add more space to it.
Why is Extend Volume option greyed out?
There can be multiple reasons for the Extend Volume option to be greyed out:
- There is no unallocated space on your drive
- You need disk space right next to the drive you want to extend.
- The targeted partition should be in NTFS or Raw file system.
- The partition capacity has reached the 2TB limit on the MBR disk. You will need to convert Disk from MBR to GPT.
Recovery Drive doesn’t need a lot of space, they need is enough space so it can function properly when used. The safest approach is to remove any of your personal files and make the drive invisible so no one is able to use it.
I hope the post was easy to use.
Leave a Reply