In this post, we will show you how to enable or disable Remote Desktop Connection and how to use Remote Desktop to connect to another computer over the internet.
The Remote Desktop Protocol in Windows 11/10/8/7 provides a graphical interface to the user when he connects his or her computer to another computer over a network connection using the Remote Desktop Connection client software. At the same time, the other computer must be running the Remote Desktop Services server software.
Windows Remote Desktop Connection enables people to connect any Windows PC with another through a network. It is the new age device sharer that helps you view and access another computer without being physically present there. The desktop and folders and files of the host computer will be visible to the connected computer. This feature makes life easier for system admin, tech support teams, and end-users trying to work from home or access personal home devices from work.
Enable or Disable Remote Desktop Connection in Windows 11/10 via Control Panel

Follow the given steps to turn on the feature with Control Panel.
- Open Control Panel from the Start Menu.
- Select Security and System.
- Now, click Allow Remote Access.
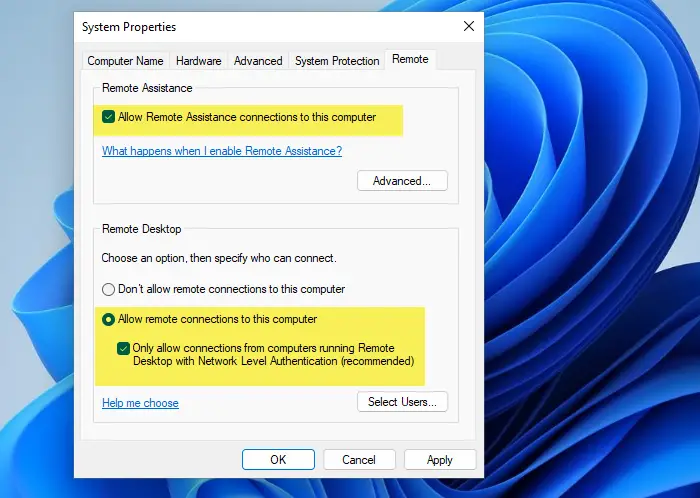
- Go to the Remote tab, tick Allow Remote Assistance connections to this computer, and Allow Remote Connections to this computer.
Let us see this in detail.
Open System Properties box via the Control Panel. Or else, open a command prompt window, type SystemPropertiesRemote.exe and hit Enter to open the Remote tab of the System Properties box.
Under Remote Desktop, you will see three options:
- Don’t allow remote connections to this computer
- Allow remote connections to this computer.
Additionally, you will also see the following option:
- Allow connections only from computers running Remote Desktop with Network Level Authentication (recommended).
1] The ‘Don’t allow remote connections to this computer’ option
This will hide your PC from all computers using Remote Desktop Connections. You, too, cannot use your device as a host until you change the visibility.
Related: How to increase the number of Remote Desktop Connections in Windows.
2] The ‘Allow remote connections to this computer’ option
This option, as appears in Windows 11/10/8.1, enables users to connect to your PC irrespective of which version their PC is running. This option also enables a third-party Remote Desktop, say, a Linux device, maybe, to connect to your device. In Windows 7, this is called ‘Allow connections from computers running any version of Remote Desktop’. Naming on Windows 7 is better explained.
Troubleshoot: Remote Desktop connection issues on Windows.
3] The ‘Allow connections only from computers running Remote Desktop with Network Level Authentication’ option
This is what you need to use if the client computer has the Remote Desktop Connection client. Remote Desktop Client 6.0 made this more exclusive.
Select the desired option and click on Apply.
To enable Remote Desktop Connection select Allow remote connections to this computer. Moreover, it is recommended that you Allow connections only from computers running Remote Desktop with Network Level Authentication only.
To disable Remote Desktop Connection select Don’t allow remote connections to this computer.
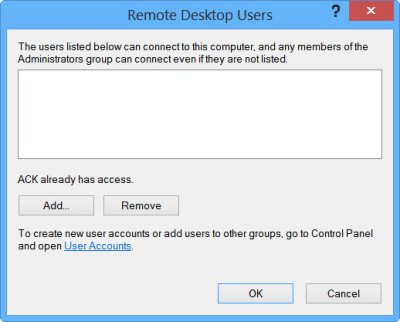
If you do not wish to share your administrator credentials with others, click Select Users to add users.
 Once this is done, you or the users will now be able to connect using the Remote Desktop Connection to your computer.
NOTE: There are over 10 other ways you can enable the Remote Desktop Connection in Windows.
IMPORTANT: Make note of the name of this PC under How to connect to this PC. You’ll need this later.
TIP: Microsoft Remote Desktop Assistant tool will help you make your PC ready to use Remote Desktop applications.
Fix: Your computer can’t connect to the remote computer
How to access or open RDP in Windows 11/10
1] From the Search box
Take your cursor to the search box and type in Remote. Locate and click on Remote Desktop Connection.
2] From the Start Menu
- Click the Windows icon.
- Scroll down the app list then select Windows Accessories > Remote Desktop Connection.
3] From the Command Prompt
- Click on the Search box, type cmd, and choose Command Prompt.
- In the Command Prompt window, type
mstsc.exeand hit Enter.
4] From Power Shell
- Right-click on the Windows Start icon and select Windows PowerShell.
- Type
mstscin the PowerShell window and hit Enter.
5] From the Run dialog box
- Press Win+R to show the Run dialog box.
- Type in mstsc, then click Ok.
TIP: You can now also give or take Tech Support remotely using Quick Assist in Windows.
How to add users to Remote Desktop User Group

To add users to the Remote Desktop User Group, follow the given steps.
- Open Settings by Win + I.
- Click System.
- Scroll down a bit and click Remote Desktop.
- Click Remote Desktop users.
- Click Add.
- Type the name of the user and click Check Names.
- Finally, click Ok.
Read: How to enable Remote Desktop without Password in Windows
How to use Remote Desktop Connection in Windows 11/10 computer
1] On your local Windows 11/10 PC:
- In the search box type Remote Desktop Connection, and then select the result.
- In Remote Desktop Connection, type the name of the PC you want to connect to, and then select Connect.
2] On your Windows, Android, or iOS device:
- Open the Microsoft Remote Desktop app, and add the name of the PC that you want to connect to.
- Select the remote PC name that you added, and then wait for the connection to complete.
Also read: How to use Remote Desktop over LAN on Windows
PS: To learn how to use Remote Desktop to connect to a Windows PC, visit this post titled – Set up & use Windows Remote Assistance.
It is recommended to select the users you want to share admin info with. Share your device info only with trusted users on familiar devices.
You might want to have a look at these posts too:
It’s quite little different than Windows 7
The bottom section is not showing up for me. All I see is the check box for remote assistance. what am I doing wrong?
Is is grayed out? Maybe your administrator has disabled this feature – or maybe some (security) software has disabled it.
I have the same issue, the entire lower pane is blank under the advanced settings for remote assistance…. It is not grayed out, it is completely missing, just white space.
This feature is only available in Windows 8.1 Pro, not the base (non-pro) version.
bummer that explains it. thanks
Try this Ammyy Admin
The software doesn’t require installation and registration. You can connect to any PC which is behind NAT.
How do I go to the program in Win 8? In Windows 7 you type in Remote Desktop in the Search Bar from the Start Menu. there is no start menu in 8.
Go to the start screen and start typing. The search bar will appear …
I got it. In the beginning the Remote Desktop Licensing feature would come up. But when the login portal finally came up I pinned it to my Task Bar. Thank you.
You can easily control and access your computer as long as you wish by using Windows built-in Remote Assistance application…
Remote Computer Access
Oh please – you’re not that stupid………………RDP Server, as you well should know, is not available in all versions of Windows – been like that for decades.
Where can I find a remote desktop software? I am looking for a free version.
Thanks!
You may find some free one’s here: https://www.thewindowsclub.com/tag/remote.
Thank you, Anand.
I chosed TeamViewer. I was looking for a step-by-step guide on how to use it in Windows 7. I was tried many times, but I get nothing. No works.
It’s that guide good? http://remotedesktop.co/how-to-setup-remote-desktop-connection-on-windows-7/
Thanks.
FUCK
I got the same issue and tried many things until i found this easy and simple solution https://www.youtube.com/watch?v=8erl42Zv5nA
TeamViewer is only free for non business/commercial use.
I have a family member who has hacked all my accounts and computers I’ve went threw several different ones but being that he has no life and lives next door in a uhaul truck camper thing, but he gets these programs online to remote into my computers and controls what I can access and adds things that I don’t even realize are not standard basic windows 10 features and or programs or settings can some one help me