In this article, you will learn four different methods to remove a VPN on Windows using Network Connections, Windows Settings, Command Prompt, and Windows PowerShell.
A VPN connection is a great mechanism for online privacy and connecting to a remote computer. It completely protects data from the intrusive eyes of Intruders on the Internet. Thus, this tool creates a secure connection that protects your credentials and other sensitive information from being stolen by unsuspected users.
But despite having so many benefits of this application, here the question arises: do you need to keep using VPN all the time? The answer is “No”. It depends upon your requirement and the situation you are facing right now.
If you already have a slow Internet connection then you should remove it from your device because VPNs are not nice with cellular connections.
How to remove a VPN connection in Windows 11/10
This article includes four methods that will help you to remove a VPN in Windows 11/10. To get it started, follow the suggestions below:
- Through Network Connections.
- Using Windows Settings.
- By using Command Prompt.
- Using Windows PowerShell.
Let us now read them in details:
1] Through Network connections
You can use the Control panel to remove the VPN connection. Follow the instructions given below to do so:

Click Start and then type “Control Panel”. When you will see it at the top of the results, click on it to open the Control Panel in Windows 10.
Select Network and Internet > Network and Sharing Center.
On the left pane, select the Change adapter settings option.
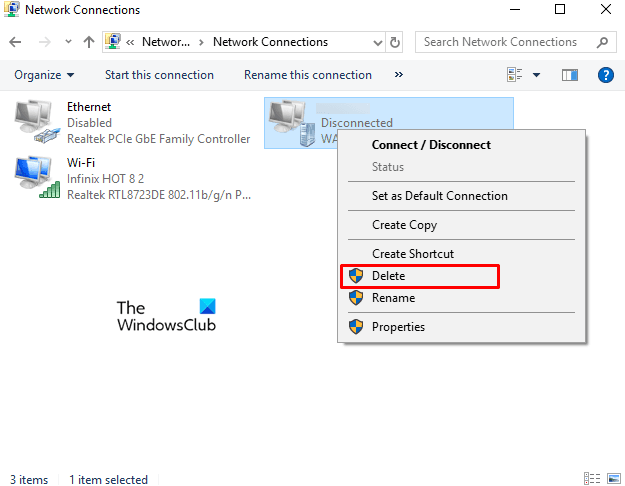
Then right-click on the VPN connection you want to remove and click the Delete option from the context menu. Click Yes to confirm the removal.
2] Using Windows Settings
Alternatively, you can use the Windows Settings to remove the VPN Connection using the below instructions:

First of all, open Windows Settings using the Windows+I keyboard shortcut.
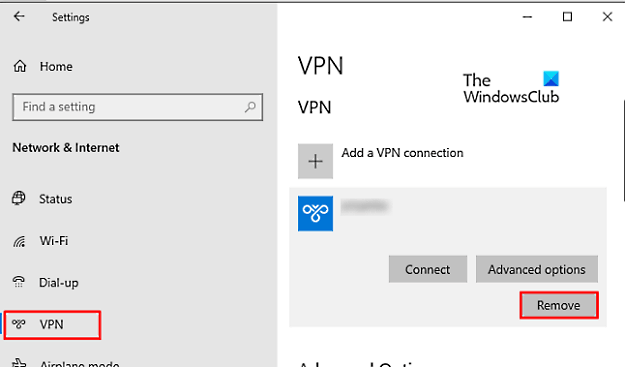
Click on the Network & Internet section then go to the VPN tab from the left sidebar.
Move to the right pane, and select the VPN connection you want to remove. Now click on the Remove button and then hit the Remove button again to confirm it.
3] Using Command Prompt
Command Prompt is an essential tool that helps in several tasks. You can use this platform to remove the VPN connection on your Windows 10 device. Here are the steps to do so:
To get it started, open the Command Prompt window as an administrator first.
In the elevated window, type the command given below and hit Enter to enlist the added VPN connections.
rasphone -R "Name"
Note: Don’t forget to replace the Name with the VPN connection you want to remove.
Once the process is complete, close the Command Prompt window.
This way, you can remove the VPN connection.
4] Using Windows PowerShell
Another command-line method you can use to remove the VPN Connection using Windows PowerShell. Following are the instructions to do so:
First of all, right-click on the Windows icon and then open Windows PowerShell (Admin).
In the elevated PowerShell prompt, type the following command and hit Enter.
Get-VpnConnection
This will show you all the details about the added VPN connections on your device. Now, type the command below to delete the desired VPN connection.
Remove-VpnConnection -Name "Name -Force"
Note: In the above command line, don’t forget to replace the Name with the name of the VPN connection you want to remove.
You can close the PowerShell window once you remove your VPN network successfully.
That’s it.
Leave a Reply