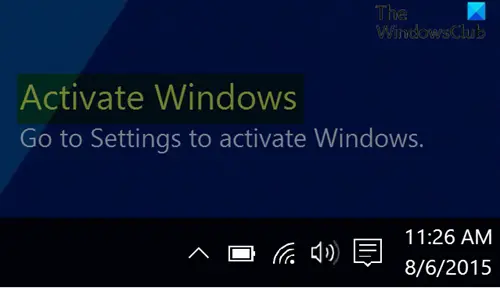
Windows Activation watermark appears on the desktop if you don’t activate your copy of Windows 10 once the 90-day trial period is over. It may also happen that you are still seeing this watermark even when you have activated your Windows. In this post, we will offer some suggestions to remove Activate Windows watermark on the desktop in Windows 11/10.

Remove Activate Windows watermark on the desktop
To permanently remove the Activate Windows watermark on the desktop in Windows 11/10, you can try any of the following methods:
- Purchase an activation key
- Modify the Start registry key
- Create and run a batch file
- Modify the PaintDesktopVersion registry key
Let’s see a description of these methods.
1] Purchase an activation key
According to Microsoft Windows 10 software license terms; Section 5, you are authorized to use Windows 10 only if you are properly licensed and the software has been properly activated with a genuine product key or by other authorized methods. So, if you do not have a license key, you should buy one and then activate your copy of Windows 10.
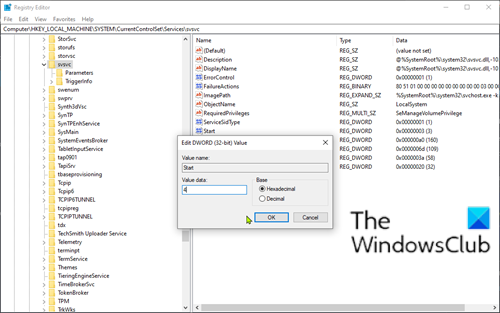
2] Modify the Start registry key

Since this is a registry operation, it is recommended that you back up the registry or create a system restore point as necessary precautionary measures. Once done, you can proceed as follows:
- Press Windows key + R to invoke the Run dialog.
- In the Run dialog box, type
regeditand hit Enter to open Registry Editor. - Navigate or jump to the registry key path below:
Computer\HKEY_LOCAL_MACHINE\SYSTEM\CurrentControlSet\Services\svsvc
- At the location, on the right pane, double-click the Start entry to edit its properties.
- In the properties windows, set the Value data to 4.
- Click OK to save changes.
- Reboot your PC.
3] Create and run a batch file
Do the following:
- Press Windows key + R to invoke the Run dialog.
- In the Run dialog box, type
notepadand hit Enter to open Notepad. - Copy and paste the syntax below into the text editor.
@echo off
taskkill /F /IM explorer.exe
start explorer.exe
exit
- Save (preferably to the desktop) the file with a name and append the .bat file extension – eg; Remove_Watermark.bat and on the Save as type box select All Files.
- Now, you can run the batch file with admin privilege (right-click the saved file and select Run as Administrator from the context menu).
Once you run the batch file, the Activate Windows watermark will be removed from your desktop. But when you reboot your computer the activation message will pop up again. In this case, you can schedule the batch file to run automatically whenever Windows boots.
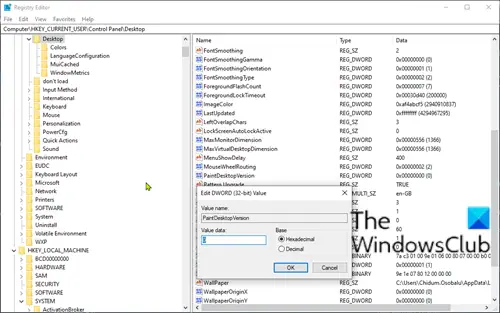
4] Modify the PaintDesktopVersion registry key

- Open Registry Editor.
- Navigate or jump to the registry key path below:
Computer\HKEY_CURRENT_USER\Control Panel\Desktop
- At the location, on the right pane, double-click the PaintDesktopVersion entry to edit its properties.
- In the Properties windows, set the Value data to 0.
- Click OK to save changes.
- Reboot your PC.
And that’s it on the ways to remove the Activate Windows watermark on the desktop in Windows 11/10!
How to remove Evaluation copy watermark on Windows 11 Insider Preview?
To remove the Windows Insider Evaluation copy watermark on Windows, you must open Registry, go to HKEY_CURRENT_USER\Control Panel\Desktop key, and set the value data of PaintDesktopVersion to 0.
Opting out of the Windows Insider Program will also remove it.
How to remove Test Mode watermark from Windows desktop?
To remove the Windows Test Mode watermark, open a Command Prompt as an Administrator and enter the following commands:
bcdedit.exe -set loadoptions ENABLE_INTEGRITY_CHECKS
Hit Enter. Now type:
bcdedit.exe -set TESTSIGNING OFF
Hit Enter.
Now read: How to check if the Windows Key is Genuine or Legit.