Here is a free tool that lets you remove Windows 11 annoying features. This tool is named LoveWindowsAgain. Though Windows 11 has many interesting features that include the new or redesigned Start menu, taskbar, File Explorer, better gaming experience, etc., there are some features or options that some of you might find annoying or not so useful. So, to disable or turn off such features with ease, this tool is handy.
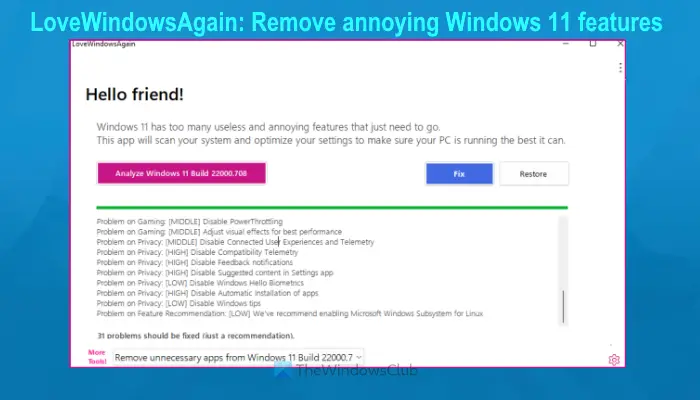
This tool can help you disable automatic installation of apps, get Windows 10 File Explorer back in Windows 11, disable snap layouts, hide Search icon from the taskbar, disable Game DVR, TPM 2.0 Check, uninstall Widgets, remove Microsoft XPS Document Writer, disable Suggested content in the Settings app, Telemetry, hide Most used apps in Start menu, remove Task view button from the taskbar, and more. You can apply all the fixes separately or in one go.
Remove Windows 11 annoying features
Before using this tool or applying any of the fixes provided by this tool, you should create a system restore point or backup Windows Registry as some fixes are applied by tweaking the Registry. Though the tool comes with an option to undo/restore the changes, it is good to have a system restore point or Registry backup. Let’s check how this tool can help you remove annoying features of Windows 11.
How to use this LoveWindowsAgain tool?
To use this tool, download its ZIP archive from github.com. Extract the ZIP archive and then execute its EXE file to launch this tool. The interface of this tool provides an Analyze button along with the Windows name and build you are using. Press that button and the tool will start analyzing your Windows 11 computer with all the default options.
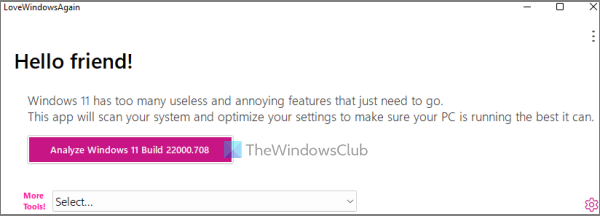
Once the analyzing process is completed, it will show the number of problems that are actually suggestions or recommendations for your Windows 11 computer. The problems are displayed based on the levels (low, high, and medium). You can apply all the fixes in one go using the Fix button.
Remove annoying Windows 11 features using Advanced mode
While applying all the recommendations at once is faster and looks more convenient, it is good to select and apply only those fixes that are actually needed by you.
For doing this, you can first select the Advanced mode option using the three vertical dots icon or the More options icon available in the top-right corner of the interface of this tool. Its More options icon also lets you select the Ignore low level problems option that will hide those recommendations that are less useful to remove. Once you have turned on such options, hit the Analyze button.
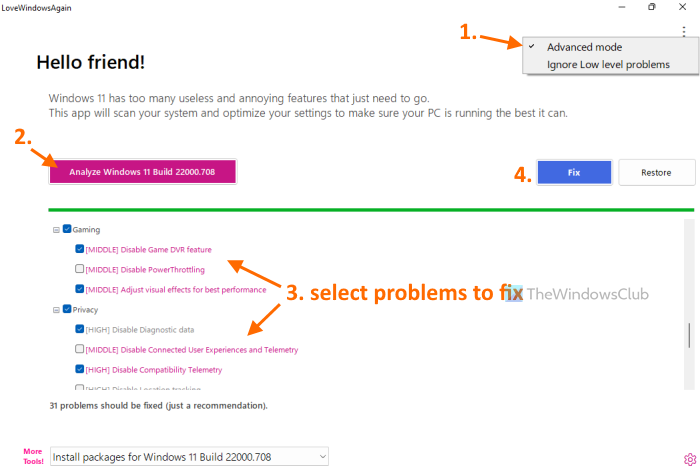
Now the tool will show a list of problems category-wise (as visible in the image above). It shows categories like Browsers, System, Explorer, Gaming, Privacy, Taskbar and Start Menu, etc. Each category contains suggestions that you can apply. For each suggestion or problem, a checkbox is there. Thus, you can select suggestions of your choice and then press the Fix button to apply those suggestions.
Once the problems are fixed, restart File Explorer to save the changes. If something wrong happens, you can select all the fixes again and use the Restore button available just next to the Fix button present on its interface to restore those fixes or options to the default state. Or else, it is even good to use the system restore point or Registry backup created by you.
So, this is how this tool can be helpful in removing annoying features or options that you don’t find useful in Windows 11.
All such options or features can also be turned off or disabled using Registry and/or Settings app of Windows 11 but that can be a time-consuming process and might be a bit difficult for some users. So those who want to remove such extra features of Windows 11 with just a few mouse clicks, this is a good tool to try.
Related: Set up and customize Windows 11 using ThisIsWin11 tool.
Apart from this main purpose that we explained above, this tool also helps to:
- Install packages for Windows 11
- Remove unnecessary apps from Windows 11.
You will find options for these two tools on the bottom left part of the interface of this tool. There is a drop-down menu for More Tools! section that helps you access these tools. Let’s check how to use these tools one by one.
1] Install packages for Windows 11
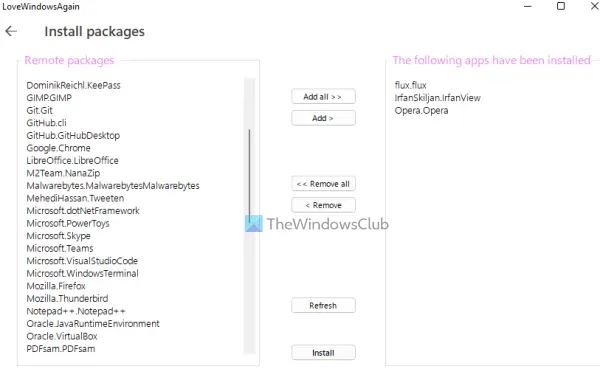
Using this tool, you can install the packages or third-party tools/programs on your Windows 11 computer at once that you might need daily.
On the left part of this tool, a list of all the available packages is visible. The packages include Microsoft PowerToys, Notepad++, Skype, LibreOffice, Discord, etc. You can select all the packages or add packages of your choice that you want to install. All the selected packages are visible in the right section of this tool.
Once you have added all the tools you need, just hit the Install button. It will silently install all those programs on your computer.
2] Remove unnecessary apps from Windows 11
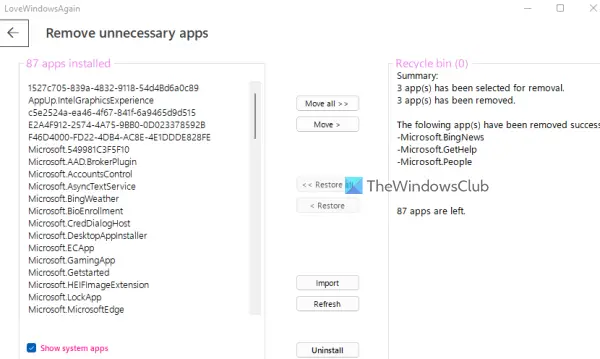
This tool might be very useful for you as it helps to uninstall pre-installed Microsoft Store apps. Along with the installation of Windows 11 OS, Microsoft installs many apps that are of less or no importance to many users. This tool helps to get rid of such apps. Apart from that, it is helpful to remove system apps or built-in Microsoft Store apps (including those apps that don’t provide any uninstall button or option). While the tool is good for this purpose, there are some system apps like Microsoft Edge, UI.Xaml, etc., which can’t be removed with it.
When you will open this tool, it will show a list of pre-installed apps that it can remove on the left section. You can also select the Show system apps option to view built-in apps in that list. After that, select apps that you want to remove, and move them to the right section using the available button.
Once the apps are added to the right section, click on the Uninstall button, and the tool will remove those apps one by one silently.
TIP: 10AppsManager is a tool to uninstall, reinstall preinstalled Windows Store apps
How do I fix Windows 11 bugs?
There are some known problems, fixes, and issues with solutions for Windows 11 that help users when they are not able to use Windows 11 as expected. When users upgrade to Windows 11 or install a fresh copy of Windows 11, they face issues like slow boot time, not being able to use the printer, unable to download apps from Microsoft Store, high CPU and memory usage, blank screen, blank widgets, and many other bugs. Thankfully, some handy solutions are there to fix such issues as adding the required Registry entries, signing in to Microsoft account, setting the accurate date and time, disabling unnecessary startup apps and programs, etc. The solutions should be applied based on the problem you’re facing.
TIP: Ultimate Windows Tweaker 5 for Windows 11 offers includes over 200 tweaks to help you tweak the OS.
Can I revert back to Windows 10 from Windows 11?
Yes, it is possible to roll back or go back from Windows 11 to Windows 10. If you don’t like the redesigned Start menu, File Explorer, or taskbar, or your system is not working properly or you’re having any kind of trouble using the Windows 11, then you can simply revert back to Windows 10 using these steps:
- Open the Settings app (Win+I hotkey) of Windows 11. It will open with the System category
- Access the Recovery page using the right section
- Click on the Go back button and follow the next process to go back to Windows 10.
You will have 10 days to revert back to Windows 10 after upgrading to Windows 11 because the Go back button will vanish after that time period. Do not worry, even if you have crossed 10 days mark, you can still downgrade to Windows 10 by downloading Windows 10 ISO from Microsoft and then creating a bootable USB using that ISO.
Hope it is helpful.
Read next: Windows 11 hidden features you didn’t know exist.