Users on Windows 11/10 may notice that the same Drive letter may get listed twice while opening the File Explorer – Once under This PC and again separately as a Removable Drive. At times, even the Hard Drives appear twice. If you’re seeing duplicate drives in File Explorer, you can stop Windows 11/10 from showing the USB drive twice, by following this tutorial.

Remove duplicate Drive Letter entry from Explorer
If your Drives appear twice in the Navigation Pane of Windows 11/10 Explorer you may try these suggestions. Please note that the method involves introducing changes in the registry editor. Serious problems might occur if you modify the registry incorrectly by using it. So create a system restore point before proceeding further.
In the search box of the Windows taskbar type regedit, and then press Enter key to bring up the Registry Editor. Alternatively, press Win+R to bring up the Run dialog box, type ‘regedit’ and hit Enter key.
In the Registry Editor, navigate to the following Path:
HKEY_LOCAL_MACHINE\SOFTWARE\Microsoft\Windows\CurrentVersion\Explorer\Desktop\NameSpace\DelegateFolders
Under DelegateFolder key you should find the following key –
{F5FB2C77-0E2F-4A16-A381-3E560C68BC83}
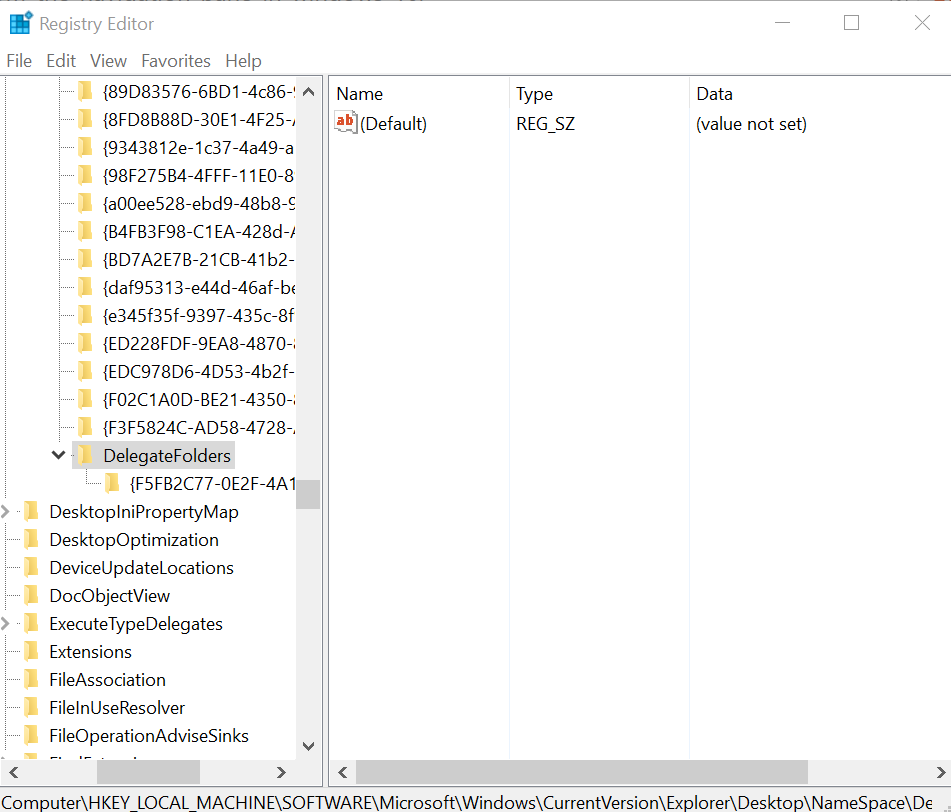
Right-click on the above-mentioned key and then click the Delete button to delete the key. When prompted with a confirmation dialog, click Yes button to delete the key.
Deleting the key should remove extra USB drive entry from File Explorer in Windows 11/10.
If you are running Windows 11/10 64-bit, do the same thing here:
HKEY_LOCAL_MACHINE\SOFTWARE\Wow6432Node\Microsoft\Windows\CurrentVersion\Explorer\Desktop\NameSpace\DelegateFolders
However, if you still notice the drive entry appearing twice, simply sign out from your account and sign in, or restart Windows Explorer once again. To do so, open Task Manager, click More details, find the General tab, under it locate Windows Explorer entry, right-click on the entry and then click Restart.
Let us know if the method worked for you by writing in the comments section below.
How do I remove phantom drive letter in Windows 11?
To remove a phantom drive letter in Windows 11, press Win + X and select Disk Management. Locate the phantom drive, right-click, and choose ‘Change Drive Letter and Paths.’ In the dialog box, select the assigned letter and click ‘Remove.’ This action will remove the drive letter, effectively hiding the phantom drive.
How do I get rid of extra drives in Windows?
To remove extra drives in Windows 11/10, open File Explorer, right-click on the drive you want to remove and select “Eject.” Alternatively, use “Disk Management” to unassign drive letters. Navigate to ‘Disk Management’ via the Start menu, find the drive, right-click, and choose “Change Drive Letter and Paths” to remove the letter.

Awesome! That was annoying me.
Didn’t work for me. I’ve not only had this issue, but another one that is connected – folders opening twice (those that are listed twice)
It works, great!
ok i have had this issue with win 10, however i have this happening with a win 7 computer any suggestions
July 11th 2017 – still works with the latest version of windows. Thank you.
This worked for me, thank you. No wonder the term “Windows Annoyances” was made up many years ago.
Sorry, did not work for me. Deleted the F5FB2C77……. file, opened Task Manager, restarted Windows Explorer as suggested, duplicate drives still there. Restarted Windows 10 – Duplicate drives still in File Explorer.
Worked a treat! Thank you.
Fantastic – – thank you! :)
Same as me. Also didn’t work for me in last update of windows 10 PRO (06/19/2018)
I’ve tried everything but nothing is working…