If you have noticed, when you sign in to your Windows 11/10 computer, the login screen displays your email address below your name. Now many of you may not want your Microsoft Account email ID to be displayed so openly where anyone can see it. If you are one of those who want to hide it, then this post will show you how to remove the email address from the login screen using Settings, Registry or Group Policy Editor.
Remove email address from Windows 11/10 login screen
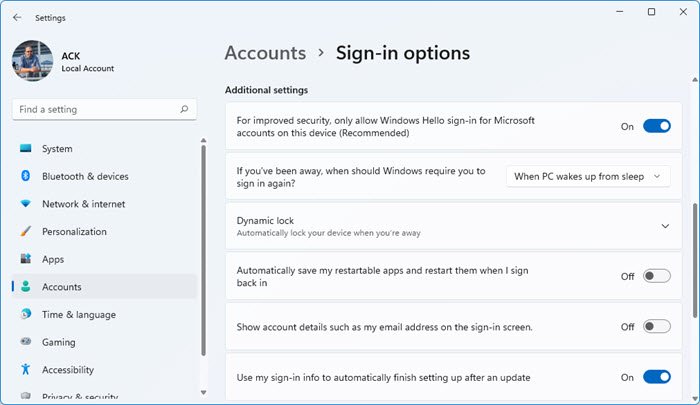
In Windows 11, do the following:
- Press Win+I to open Settings
- Click open Personalization
- Select Accounts from the left side
- Select Sign-in options from the right side
- Now locate Show account details such as my email address on the sign-in screen and sitch the toggle to Off.
In Windows 10, open the Start Menu and click on the Settings icon to open Windows 10 Settings. Next, click on Accounts and then select Sign-in options from the left side.
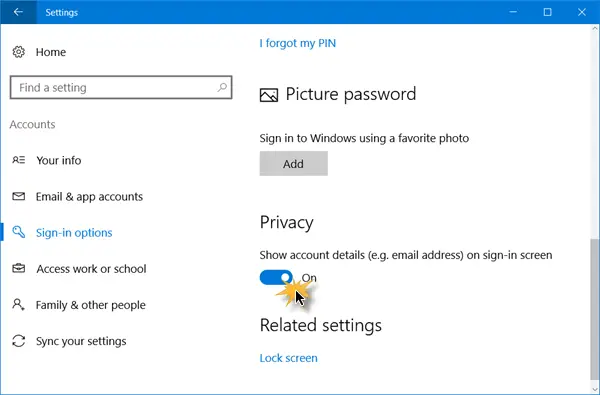
Here, under Privacy, you will see a setting Show account details (eg email address) on sign-in screen.
Toggle the switch to the Off position.
That is all you need to do.
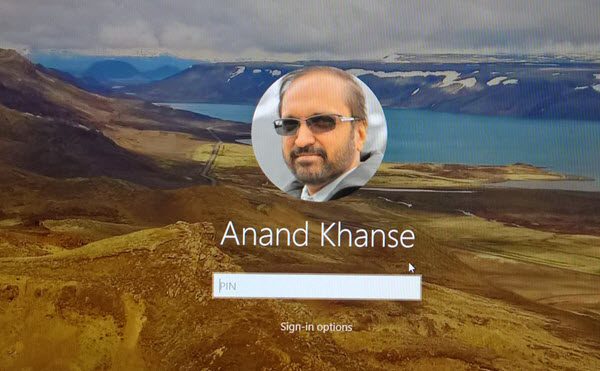
Now the next time you sign in, you will see that the email address has been removed.
Hope this helps.
Block users from showing email address on the Sign-in screen using Registry Editor
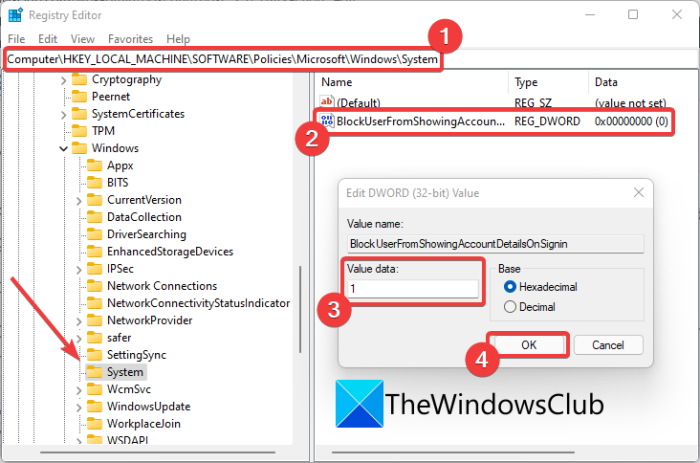
Here are the main steps to block users from showing the email address from the login screen in Windows 11/10 using the Registry Editor app:
- Open the Registry Editor app.
- Navigate to a System key.
- Create a new DWORD named BlockUserFromShowingAccountDetailsOnSignin.
- Set the value of this DWORD accordingly.
- Close Registry Editor and reboot your PC.
Let us discuss the above steps in detail now!
Firstly, open the Run dialog box by pressing the Windows + R hotkey and then type regedit in it. And then, press Enter to launch the Registry Editor app. Now, navigate to the following key in the address bar:
Computer\HKEY_LOCAL_MACHINE\SOFTWARE\Policies\Microsoft\Windows\System
Next, right-click anywhere on the right-hand side pane and then select the New > DWORD (32-bit) Value option to create a new DWORD. You need to name this newly created DWORD as BlockUserFromShowingAccountDetailsOnSignin.
After that, double-click on the newly created DWORD and then set its value according to your requirement. In case you want to block users from showing the email address on the sign-in screen, set its value to 1.
Note: If you want to allow users to show the email address on the login screen, set its value to 0 or delete the previously created DWORD named BlockUserFromShowingAccountDetailsOnSignin.
Finally, you can close Registry Editor and then reboot your PC to save changes.
After you use this method, users won’t be able to show the email address on the login screen no matter what they have chosen in the Settings app.
Block users from showing account details using Group Policy
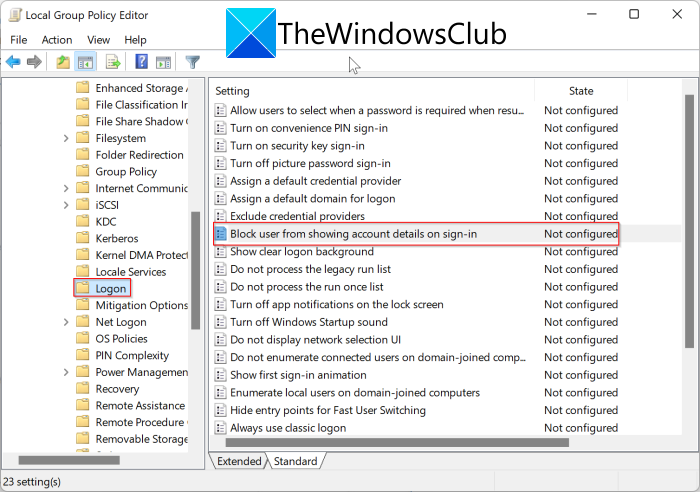
You can block users from showing account details on the login screen using Group Policy using the below steps:
- Open the Local Group Policy Editor.
- Navigate to Logon policy.
- Click on the Block user from showing account details on sign-in policy.
- Choose the Enabled option.
- Click on the Apply > OK button.
- Reboot your PC to see changes.
Firstly, open the Local Group Policy Editor by evoking the Run dialog box (Windows + R) and entering gpedit in it. Next, you need to go to the following address in the Group Policy Editor:
Computer Configuration > Administrative Templates > System > Logon
On this location, you will find a policy named Block user from showing account details on sign-in at the right-hand side pane. Simply double-click on it to open its configuration.
After that, to block users from showing account detail on the sign-in screen, set the configuration of this policy to Enabled. Next, press the Apply > OK button to save changes to the selected policy.
Finally, you can reboot your PC to see the changes.
Note: In case you decide to let the users show the email address on the sign-in screen, you need to Disable the Block user from showing account details on sign-in policy using the same steps as above.
If you are security conscious, you may want to hide or remove the last username of the last logged-in user.
- This post will show you how to hide your email address in Windows Lock Screen, using Group Policy or Registry Editor.
- This post shows how to activate the Do not display last username setting in the Windows logon screen, using Group Policy and Registry Editor.
There are several such small tweaks that you can carry out to protect your privacy. This post will show you how to configure Windows Telemetry settings, whereas this post offers some great free privacy fixer tools that can help you address your privacy concerns.
How do I remove the local account from Windows login screen?
To remove local or specific user accounts from the Windows login screen, you can use a command in Powershell. Before that, you must know the exact username of the account you want to remove from the login screen. Then, you can use the following steps to remove that account from the sign-in screen:
Open Powershell as administrator.
Type the following command in Powershell:
net user [USERNAME] /active:no
Press the Enter button to execute the command.
In case you want to show the removed account on the login screen, use the below command:
net user [USERNAME] /active:yes
There are some more methods to hide specific accounts on the login screen in Windows 11/10 that you can check out.
Now read: Windows Login screen not appearing or Password box not showing up.

What I would like to know is, how to get my user photo to show up on the lock screen at start, like in your photo. This is on a regular desktop PC, not a tablet or whatever. All I get is the background picture and a generic white graphic instead of my user photo. The photo or avatar, icon whatever shows everywhere else.
My version of Windows 10 does not have those options from the Sign-in options screen.
This is odd. I don’t see that option on my W10 Pro or my W10 home machines. Is this author seriously giving recommendations based on W10 enterprise? If so, he needs to understand there are HUGE differences in privacy controls.
I thought it might be something along the lines of him using a different version of Windows than I which then made me think I have a bad version. But your comment has made me feel a lot better. Most of this guy’s guides don’t work when I follow them, not just this one. And yet this is a very successful website. It’s all very strange.
I use Windows 10 Anniversary Update Pro version. These screenshots are from there.
Open Settings > Accounts > Create your picture > Browse for one.
Had an account picture for ages, and as I said in my original post, it shows up everywhere associated with Microsoft stuff etc. etc., except, for the lock screen.!!!!!! Just a generic head icon (in white) with my account name etc. under it.
The same thing happened to me on my new Dell. Via the settings I mentioned, you can set your user pic on the lock screen manually.
Use home and pro version 1511 of W10. Less then 20 percent have the anniversary update. If they recently put that switch with 1607 then most users won’t see it. Less then 20 percent of machines are running 1607. MS pretty much stalled the rollout so they can fix the multitude of serious bugs. Seems having insiders do their testing did not pan out. MS better hire those testers back.
my new windows 10 home laptop doesn’t show that option to hide email. there is only change the password option. i did not know that when i setup cortana it will change my password and add a PIN. i have since deleted the PIN but can’t hide the email in login.
please help.
Hi – I have done what you say – toggled the switch to “off” but my email address still shows…
what i have to do if the name showing in the lock screen change into my full email address !!! i didn’t know how to fix it and bring the original name!!
Hello – I have done exactly as you recommended above to remove my son’s gmail address from my Windows 10 login screen (requiring his password). Sadly, it hasn’t fixed the problem. Do you have any other suggestions?
And how to delete the password from Windows 10 itself?
this fix does not work if the email showing is the mandatory email and account needed to set up windows 10. I changed toggle to off and nothing!!!
It doesn’t show the privacy option on my computer
you can delete account with email adress without password….. stupid thread .
In my settings the Privacy setting is off, but the mail adress is still on the screen.
Windows version 1803