When copying files to a USB drive or SD card, if you receive a— Media is Write Protected —message, then this post will help you resolve the problem. The same problem can occur when deleting a file or overwriting a file on the media.
What is Write-Protection?
Write Protection is a feature available in some of the USB/SD devices which makes sure the files are not accidentally deleted or modified. That way, any original file on the drive remains safe and nobody else is also able to delete the files.
What is the Media is write protected error in Windows 11?
The Write-protected error is common. It prevents you from modifying, deleting, or formatting a storage device due to its protected status. There can be several reasons you see this error, such as physical controls on some types of media, BIOS settings, modified settings within Windows, or corruption affecting the device. Sometimes, the write-protected error could also appear due to incorrect hardware configurations.
Fix The media is write protected error in Windows 11
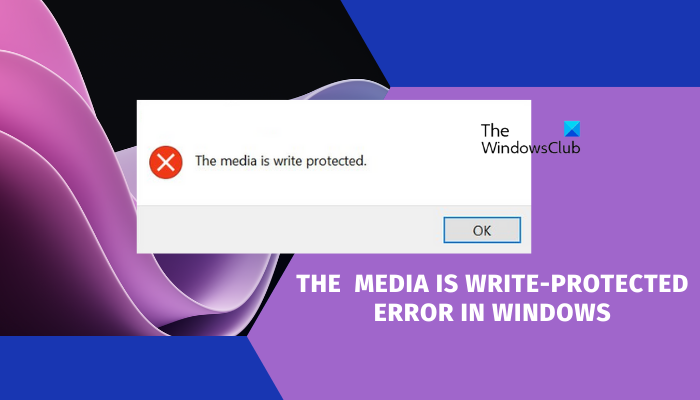
Follow these suggestions to disable USB Write-Protection:
- Turn of the hardware switch
- Use Diskpart to remove Read-only state
- Turn off BitLocker
- Disable Write protection using Registry
- Disable Write Protection using Group Policy
- Turn off write protection in BIOS settings
You will need an admin user account and a clear understanding of the Disk Part and BitLocker tool which we have suggested using.
1] Turn off the hardware switch
Some media devices come with a small notch or write protection switch which when pulled up, enables the write protection. They are marked clearly but could be too small to be noticed. While they are sturdy enough to be accidentally enabled, It is possible you have flicked the switch. Turn it off, and it will be able to remove write protection on a USB or SD card. Post this, you should be able to write on the disk.
Read: How do you remove the Write Protection on a Disk.
2] Use Diskpart to remove Read-only state
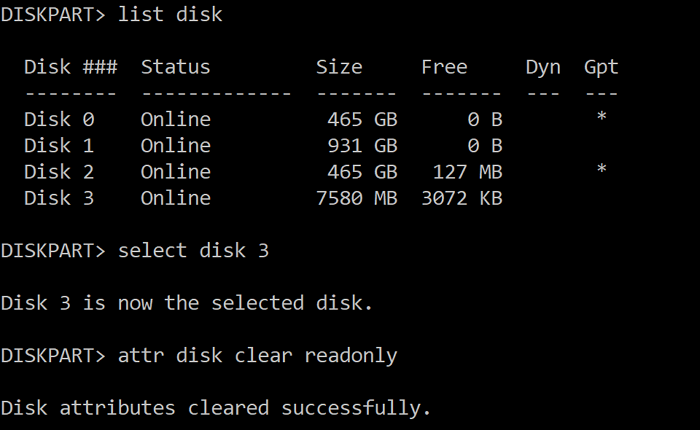
If it’s not a hardware lock, it is possible that the disk is in a read-only state. You can remove this by using the Diskpart tool to remove the read-only attribute. Follow the steps to remove the read-only state.
- Press Windows + R keys to open the Run prompt.
- Type cmd, and use Shift + Enter to open it with admin privileges
- Type diskpart and press Enter key
- Type list disk, and press Enter. It will reveal all disks on Windows PC.
- Select disk x and press the Enter key. The letter x is the number of your SD card
- Type attr disk clear readonly.
Try deleting a file, and you will know if the issue was resolved.
3] Turn off BitLocker
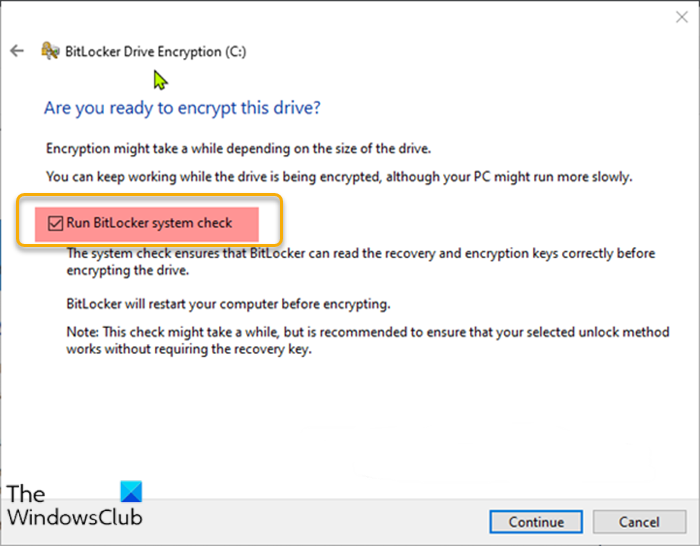
Bitlocker is a brilliant feature in Windows if you want to protect files and encrypt them. It is possible that you have enabled Bitlocker for the media or SD card, and forgotten about it.
Any drive which has Bitlocker enabled will display a lock when viewed on File Explorer. If that’s the case, right-click on it and choose to Turn off Bitlocker. Done that, you can not modify the files.
Depending on the storage size, decryption will take time. So wait it out, and then try to upset some files inside it. Remember Bitlocker is not a Write protection removal tool, it only works if the files have been encrypted earlier using Bitlocker.
Also, check out our detailed guide on how you can use Registry or Group Policy to enable disable the use of BitLocker on USB Drives.
Read: How to Enable or Disable BitLocker in Windows
4] Disable Write protection using Registry
Registry editing can be tricky. I strongly recommend you to take a backup or create a System Restore before using this method. If something goes wrong, you can always get back to the state where everything was working as expected. Follow these steps:
Use Win + R to open the Run prompt. Type Regedit and press Enter. If prompted by UAC, click yes. Once the Registry Editor is open, navigate to the following path.
Computer\HKEY_LOCAL_MACHINE\SYSTEM\CurrentControlSet\Control\StorageDevicePolicies
Double-click on the WriteProtect DWORD and change the value from “1” to “0” to remove the read-only state.
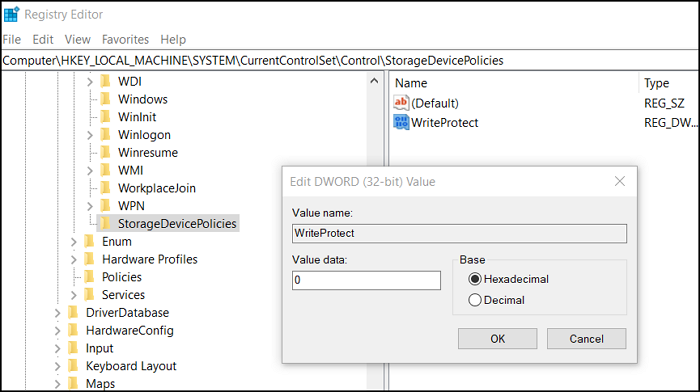
In case, you cannot find the StorageDevicePolicies folder, you will need to create it.
- Right-click on the Control folder, select New, and then Key
- Name the folder StorageDevicePolicies
- Right-click on the StorageDevicePolicies folder, and select New > DWORD
- Name it WriteProtect and press the Enter key.
- Double click the WriteProtect DWORD, and set the value as 0
You can follow our detailed post on how to disable or enable USB Read/Write protection.
5] Disable Write Protection using Group Policy
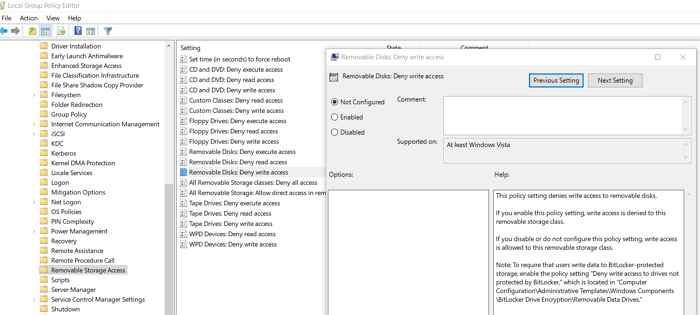
You can use this directly on Windows 10 Pro and Enterprise, and on Windows 10 Home by enabling the Group Policy.
Use Win + R to open the Run prompt, and type gpedit.msc, and press the Enter key. This will open Group Policy Editor.
In the editor, navigate to the following path
Computer Configuration > Administrative Templates > System > Removable Storage Access
Depending on which media device i.e. USB, CD, or Tape, you can change the Write access to disabled. Close the group policy editor, and you should be able to make the modifications without a problem.
6] Turn off write protection in BIOS settings
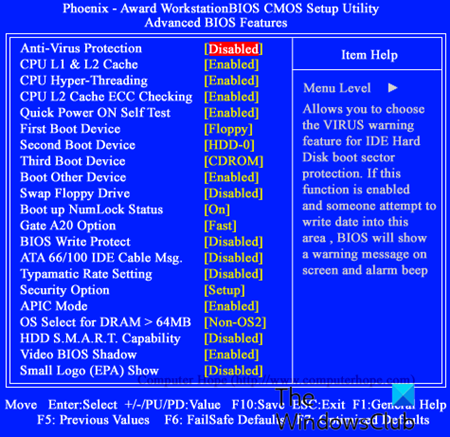
Besides, you may also receive the same error, when trying to turn off BitLocker and this could be due to some BIOS settings preventing the action. In this case, you must remove the write protection from the BIOS settings. Here’s how:
Reboot your PC and press either the F2, F10, or Delete keys (based on the device) to enter the BIOS settings.
Next, check for a setting associated with write protection or read-only mode for your hard drive or storage device.
You may find this setting either in the Security, Boot or Advanced section of the BIOS.
Here, turn off the write protection or read-only mode option. Save the changes and exit to restart your PC and boot to desktop.
Now, you can turn off Bitlocker to remove write protection for the removable drive and fix the error.
That’s about how you can remove Media is Write Protected message in Windows 11/10. This will make sure you can write and modify files within it.
Read: How to remove The Disk Is Write-Protected error for Removable Disks.
What does it mean for media to be write-protected?
Media being write-protected indicates that the removable device, like an external disk or memory card, is locked with a feature that prevents any addition or modification of files. This ensures the data on your storage device is safe by preventing accidental deletion or editing.
Read: All my Files and Folders are Read Only on Windows PC
How do I remove write protection from a JPEG?
To remove write protection from a JPEG file, right-click the image, and select Properties. Next, in the Properties window, select the General tab, and look for the Attributes section. If you notice that the Read-only option is checked, uncheck it press Apply, and then OK to save the changes.
Leave a Reply