Want to get rid of the Move to OneDrive option from right-click context menu in Windows 11/10? This tutorial will help you remove the Move to OneDrive option from the context menu on your Windows PC. The Move to OneDrive feature enables you to save your files to OneDrive. If the OneDrive app is running in the background, you will be able to access and use the Move to OneDrive option from the files’ context menu.
Now, if you don’t really use this option on your PC or accidentally tap on it because it appears at the top of the context menu with other important options, you can choose to remove it. For that, you will have to try some Registry hacks and edit some settings manually. Let’s check out the solutions now!
Before I proceed with the solutions, it is highly recommended to backup Registry data from a safety point of view.
Remove Move to OneDrive from Context Menu in Windows
There are basically two ways to remove the Move to OneDriver option from right-click context menu in Windows 11/10:
- Remove Move to OneDrive option using the Registry Editor app.
- Manually Create a Registry File to remove the Move to OneDrive option.
Let’s discuss these methods in detail!
1] Use the Registry Editor
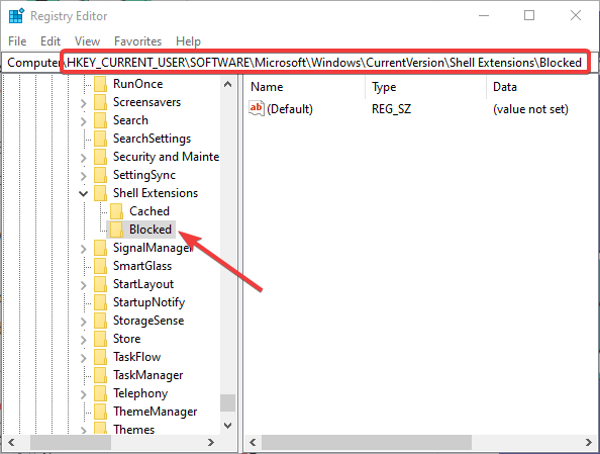
Firstly, start the Registry Editor app on your PC. And then, copy and paste the following path in its address bar:
HKEY_CURRENT_USER\Software\Microsoft\Windows\CurrentVersion\Shell Extensions\Blocked
If you don’t see a folder named Blocked, no problem, you can create a new one. Simply right-click on the Shell Extensions folder and then select the New > Key option. After that, name the folder as “Blocked”.
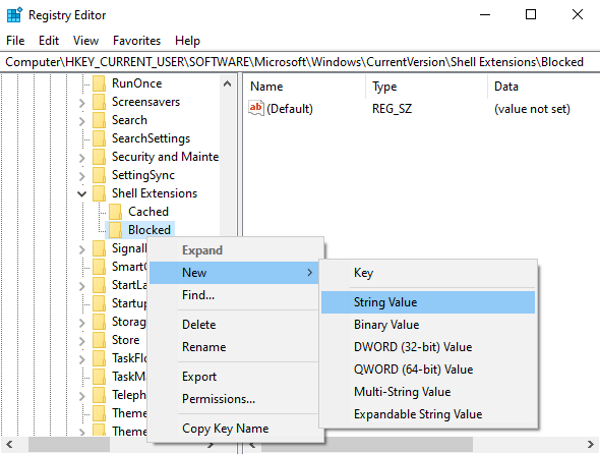
Now, right-click on the Blocked folder and select the New > String Value option.
After that, enter the following name for the newly created value:
{CB3D0F55-BC2C-4C1A-85ED-23ED75B5106B}
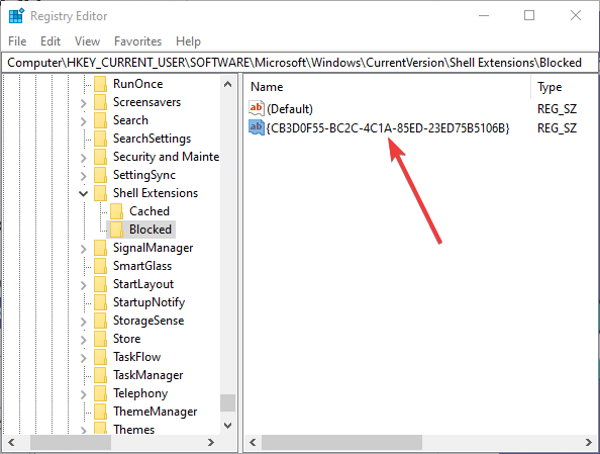
You can now close the Registry Editor app and the Move to OneDrive option will be removed from the right-click context menu.
If you want to restore the Move to OneDrive option back in the right-click menu, you just need to delete the value you created in the Blocked folder. Right-click on the string value and select the Delete option to remove it.
2] Manually Create a Registry File
Another method to remove the Move to OneDrive option is to create a registry file manually to remove the Move to OneDrive option from right-click menu. To do so, open the Notepad application and then type the below commands in it:
Windows Registry Editor Version 5.00

[HKEY_CURRENT_USER\Software\Microsoft\Windows\CurrentVersion\Shell Extensions\Blocked]
"{CB3D0F55-BC2C-4C1A-85ED-23ED75B5106B}"=""
Next, save the commands as a registry file. For that, click on the File > Save as option. And, while saving the file, select Save as type to All Files and put .reg extension after the filename. Finally, click on the Save button the save the registry file.
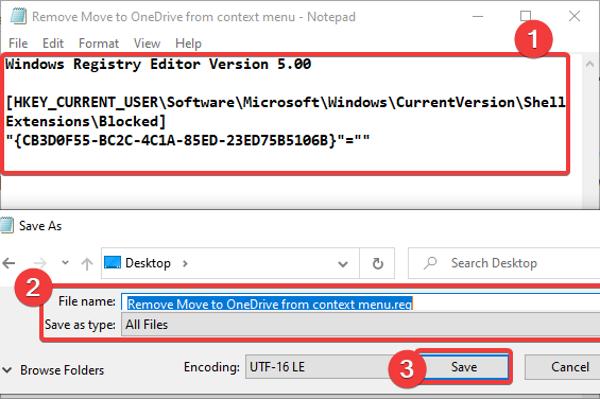
Now, double-click on the registry file you just created. It will display a warning prompt. Read and then if you want to make a change, select the Yes option. Restart your PC and you won’t see the Move to OneDrive option in the context menu.
If you decide to add the Move to OneDrive option back to right-click menu, you can again create a registry file with a slight change in command:
Windows Registry Editor Version 5.00

[HKEY_CURRENT_USER\Software\Microsoft\Windows\CurrentVersion\Shell Extensions\Blocked]
"{CB3D0F55-BC2C-4C1A-85ED-23ED75B5106B}"=-
Double-click on the created registry file, reboot your PC and then see the Move to OneDrive option being restored to right-click menu.
Hope this article helps you out if you were looking for a solution to remove Move to OneDrive from the context menu.
Now read: Turn off OneDrive Shared Files Notifications on Windows.
Leave a Reply