If you want to hide or remove the NVIDIA Control Panel from the context menu and the notification area in Windows 11/10, you can use the NVIDIA Control Panel settings or the Registry Editor.

If you are an NVIDIA GPU user, you might have seen the ‘NVIDIA Control Panel’ option in the right-click context menu as well as the system tray on your PC. It shows such entries so that users can open the control panel to make changes or tweak a few settings of their NVIDIA graphics driver. If you have no use for it, you can remove these entries.
Remove NVIDIA Control Panel from Context Menu & System Tray
To remove the NVIDIA Control Panel option from the context menu and system tray on your Windows 11/10 PC, follow these steps:
- Search for the nvidia control panel in the Taskbar search box.
- Click on the search result.
- Click on the Desktop option from the top menu bar.
- Click on Add Desktop Control Menu and Show Notification Tray Icon options.
Let’s check out these steps in detail.
First, you need to open the NVIDIA Control Panel on your computer. For that, you can search for “nvidia control panel” and open the corresponding search result. Otherwise, you can right-click on the Desktop, and select NVIDIA Control Panel from the right-click context menu.
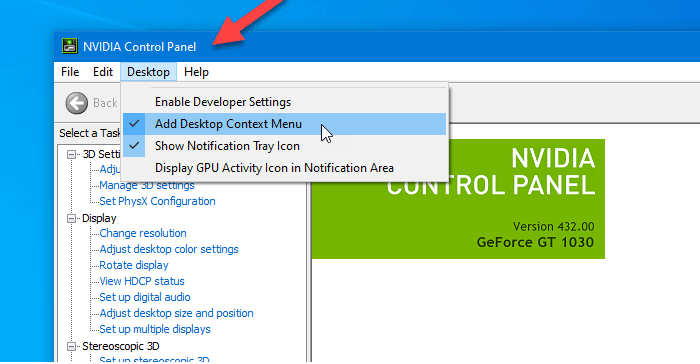
After opening the control panel, you should click on the Desktop option visible in the top menu bar. There, you will find two options:
- Add Desktop Context Menu
- Show Notification Tray Icon
These two options will be checked by default. You need to uncheck these options by clicking on them separately. After this, you should no longer see the NVIDIA Control Panel option in the right-click context menu and system tray area of your PC.
Hide NVIDIA Control Panel from the context menu using Registry Editor

To hide the NVIDIA Control Panel from the context menu using Registry Editor, follow these steps:
- Press Win+R to open the Run prompt.
- Type regedit and hit the Enter button.
- Click Yes in the UAC prompt.
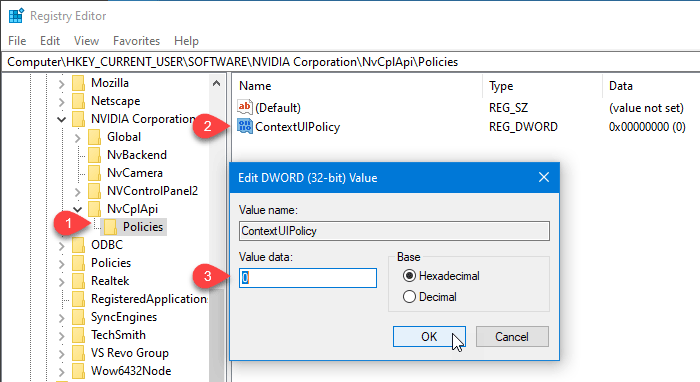
- Navigate to NVIDIA Corporation in HKEY_CURRENT_USER.
- Double-click on ContextUIPolicy.
- Set the value data as 0.
- Close Registry Editor.
You should backup Registry files and create a System Restore point before making any changes in Registry Editor.
To get started, you need to open the Registry Editor on your computer. For example, you can use the Taskbar search box, or you can press Win+R buttons together, type regedit, and hit the Enter button. After that, you have to click on the Yes button in the User Account Control prompt.
Following that, you should find Registry Editor on your screen. If so, you should navigate to the following path:
HKEY_CURRENT_USER\Software\NVIDIA Corporation\Global\NvCplApi\Policies
If you cannot find the NvCplApi key, you can create it by right-clicking on the Global key and choosing New > Key. Once the key is added, you can rename it as ‘NvCplApi’. Similarly, you can create the Policies key.
In the Policies key, you should see a DWORD value called ContextUIPolicy. You need to change the value data of this DWORD value. If you’ve just created the Policies key, right-click anywhere in the empty area on the right panel, select New > DWord 32-bit Value, and rename it as ContextUIPolicy.
Next, double-click on ContextUIPolicy, and set the Value data as 0. Click OK to save changes. Now, you can close Registry Editor. After that, you should not find the NVIDIA Control Panel option in the context menu when you right-click on the desktop.
Alternatively, you can create a notepad file with the following text-
Windows Registry Editor Version 5.00

[HKEY_CURRENT_USER\Software\NVIDIA Corporation\Global\NvCplApi\Policies]
"ContextUIPolicy"=dword:00000000
Save it as a .reg file and run it. It will do the same job as before.
I hope this helps.
Read: NVIDIA Control Panel missing on Windows.
How do I remove Nvidia control panel from system tray?
To remove the NVIDIA Control Panel option from your PC’s system tray area, you may temporarily hide the icon. Click the Start button and select Settings. Navigate to Personalization > Taskbar. Scroll down to the Other system tray icons section and turn off the toggle next to NVIDIA container. Alternatively, you may open the NVIDIA Control Panel, click the Desktop menu on top, and uncheck the Show Notification Tray Icon option.
How to add nvidia control panel to system tray?
To add the NVIDIA Control Panel to your system tray area, you can use the Control Panel’s UI. Right-click on your desktop and select ‘NVIDIA Control Panel’ from the context menu. Once the NVIDIA Control Panel is open, go to the Desktop menu at the top of the window and ensure that the Show Notification Tray Icon option is checked. If you cannot access NVIDIA Control Panel or its settings, download and install the latest drivers from the NVIDIA website or via GeForce Experience.
Read Next: How to fix NVIDIA Control Panel not opening.