Windows 11 provides a Run as administrator option in the right-click menu. Using that option, you can run any supported application (say a BAT file, EXE, CMD, etc.) with full administrator access which is needed in some cases. But, if you don’t want this option to perform any action, then you can tweak Windows Registry to disable the Run as administrator option in right-click context menu of Windows 11.
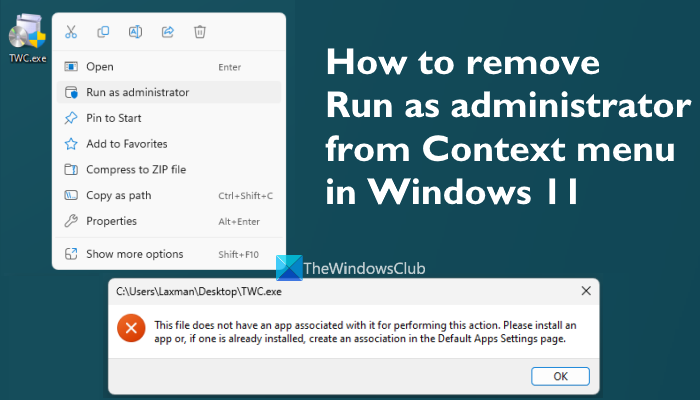
Once this is done, the option will neither work on Start menu items nor on desktop items or anywhere else. If you will try to use this option in the Start menu, nothing will happen. And, if you will select the Run as administrator option for a supported application available on the desktop or in a folder on a hard drive, it will show the following error:
This file does not have an app associated with it for performing this action. Please install an app or, if one is already installed, create an association in the Default Apps Settings page.
Don’t worry as you can also enable the Run as administrator option in the context menu of Windows 11 whenever needed. This post includes both sections with step-by-step instructions.
Before making any changes to Windows 11 Registry, it is recommended that you create a system restore point or backup the Registry. This will help you undo any unexpected changes. Also, you must log in with an administrator account so that you can perform this action.
How to remove or disable Run as administrator from the Context menu in Windows 11
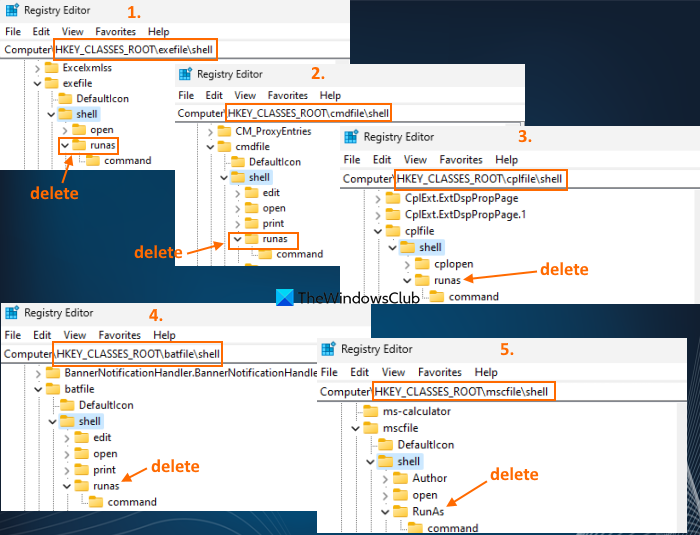
To remove Run as administrator option from Windows 11 context menu, carefully follow these steps:
- In the Search box, type regedit, and use the Enter key
- The Registry Editor window will open. There, first, access the shell Registry key for exefile Registry entry. The path is:
HKEY_CLASSES_ROOT\exefile\shell
- The shell Registry key contains a runas key
- Right-click on that key and use the Delete option
- In the confirmation box, press the Yes button
- In case you are not able to delete the Registry key, you first need to take full control and ownership of the Registry key and then delete it
- In the same way, access the shell Registry keys for CMD, CPL, and BAT files one by one using the following paths:
HKEY_CLASSES_ROOT\cmdfile\shell
HKEY_CLASSES_ROOT\cplfile\shell
HKEY_CLASSES_ROOT\batfile\shell
- Delete the runas Registry keys available in those locations
- Now access the shell key present under the mscfile Registry entry:
HKEY_CLASSES_ROOT\mscfile\shell
- Delete the RunAs key present under the shell Registry key.
Restart File Explorer and this will completely disable the Run as administrator option in the right-click menu of Windows 11.
Related: Run as Administrator option not working or missing
Enable the Run as administrator option in Windows 11 context menu
In case you need to enable the Run as administrator option in the context menu of Windows 11 later, follow this process very carefully.
First, open the Registry Editor window. Jump to the shell key for exefile Registry entry. The path is:
HKEY_CLASSES_ROOT\exefile\shell
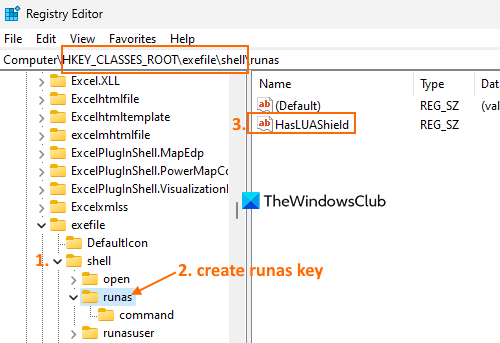
Right-click on the shell key, go to New, and select the Key option. Rename the new key with runas. After doing that, create a new String value under the runas key and name it HasLUAShield.
Create a subkey under the runas Registry key and name it command. In the command key, you will have a (Default) name String value on the right section. Double-click on it and a box will open. Add "%1" %* in the Value data field and press OK to close the box.
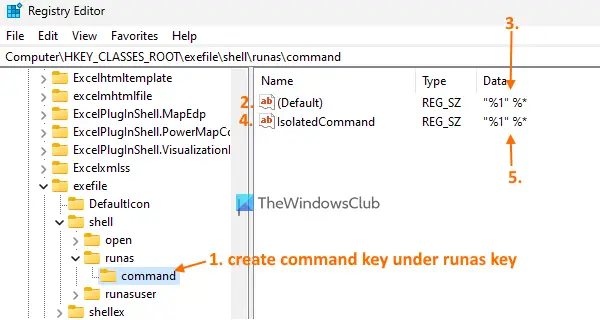
Now create a new String Value under the command key and name it IsolatedCommand (as visible in the screenshot above). Double-click that value and a box will open. Again, add "%1" %* in the Value data field and close that box using the OK button.
With the above steps, the Run as administrator context menu option will start working for EXE files again. Now continue this process for other file types.
Access the shell key for the batfile Registry entry. Its path is:
HKEY_CLASSES_ROOT\batfile\shell
Create a runas key and a command key under that shell Registry key. Under the runas key, create a HasLUAShield String value. The command key will already have a (Default) String value. Double-click on it to open the Edit String box. Add the following path in the Value data field:
%SystemRoot%\System32\cmdexe /C "%1" %*
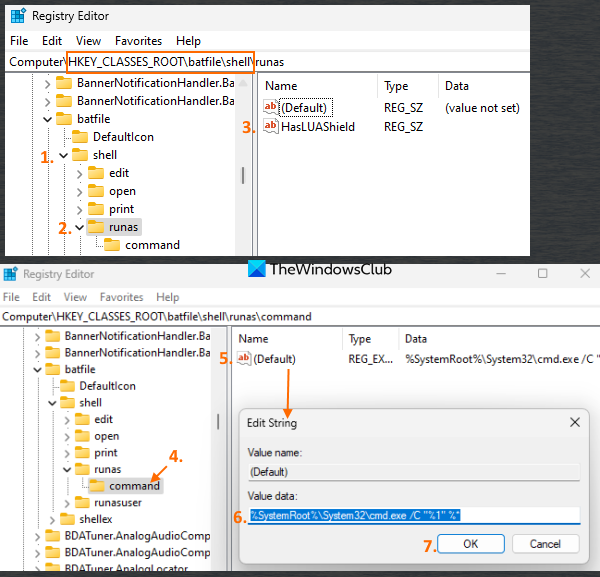
Press the OK button.
Repeat these exact steps for shell key available under cmdfile Registry entry. The path to its shell key is:
HKEY_CLASSES_ROOT\cmdfile\shell
Next, jump to the shell key present under cplfile Registry entry using this path:
HKEY_CLASSES_ROOT\cplfile\shell
Create a runas key and command key under it. Under the runas key, create a HasLUAShield String value. And, in the command key, double-click on the (Default) name String value. In the Edit String box, paste the following path:
%SystemRoot%\System32\rundll32.exe shell32.dll,Control_RunDLLAsUser "%1",%*
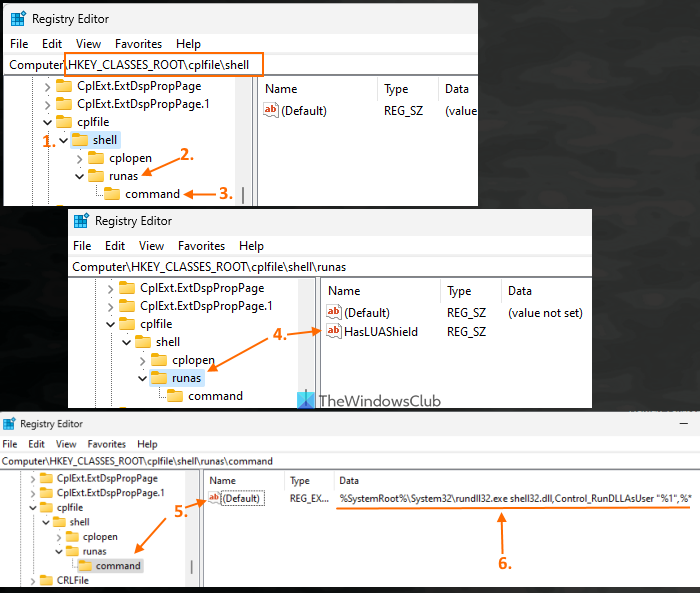
Press the OK button to close the box.
In the final step, jump to the shell key present under the mscfile Registry key. Here is the path:
HKEY_CLASSES_ROOT\mscfile\shell
Create a RunAs key and a command key under it. On the right section of the RunAs key, generate a HasLUAShield String value.
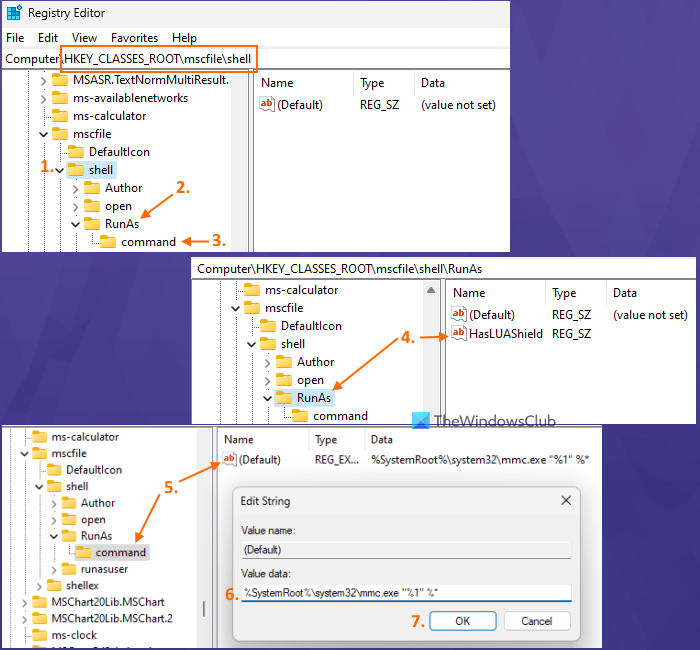
On the right section of command key, double-click the (Default) Sting value to open its edit box. Paste this path in the Value data field:
%SystemRoot%\system32\mmc.exe "%1" %*
Press OK button to close this box.
By following this entire process, the Run as administrator context menu option will start working for CMD, EXE, CPL, and other supported files on your Windows 11 computer.
That’s it!
Read: How to change Administrator in Windows 11
How do I Run as a different user in Windows 11 context menu?
The quickest way to use Run as a different user option in the context menu of Windows 11 is by pressing and holding the Shift key. Select an application or desktop shortcut, press n hold the Shift key, and right-click on the selected item. You will see Run as different user option in the right-click menu temporarily. You can also use Registry Editor to create required entries to permanently add the Run as different user option in the Windows 11 context menu.
How do I get rid of context menu in Windows 11?
If you want to disable the default context menu of Windows 11 File Explorer, then first, open the Group Policy Editor. After that, navigate to User Configuration > Administrative Templates > Windows Components > File Explorer. Double-click on the Remove File Explorer’s default context menu setting. Select the Enabled option and press OK to save the new setting.
Read next: How to check if a process is running with admin rights on Windows PC.