Microsoft has added one awesome Start Menu in Windows 11/10, which comes with some useful settings to personalize the Start Menu. However, there are some things, that are not available in the new Settings panel. Some small changes can be effected, by tweaking the Windows Registry.
By default, the Windows 11/10 Start Menu has a transparent background. Nevertheless, this can be changed easily using the Registry Editor. For example, you can remove transparency and enable blur in Start Menu background, remove transparency totally, change the background color and more.
Remove Transparency, Enable Blur in Windows 11 Start Menu
To remove transparency and enable blur in Windows 11 Start Menu, follow these steps:
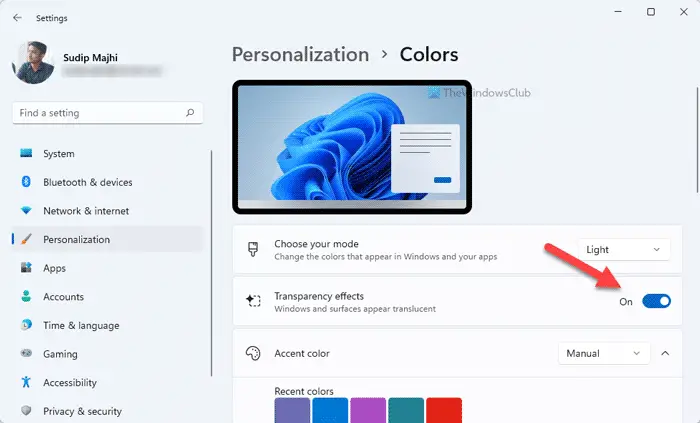
- Press Win+I to open Windows Settings.
- Go to Personalization.
- Click on the Colors
- Toggle the Transparency effects button to turn it off.
However, if you are using Windows 10, follow these steps.
Remove Transparency, Enable Blur in Windows 10 Start Menu
You will have to Run regedit to open the Registry Editor. Before making any changes in Registry Editor, make sure that you have created a backup of the Registry.
So open the Registry Editor on your machine. To do so, press Win+R, type regedit and hit Enter.
You will get the UAC confirmation pop-up. Just hit the YES button. After it is opened, navigate to the following path,
HKEY_CURRENT _USER\SOFTWARE\Microsoft\Windows\CurrentVersion\Themes\Personalize
On the right-hand side, you will see a key named EnableBlurBehind.
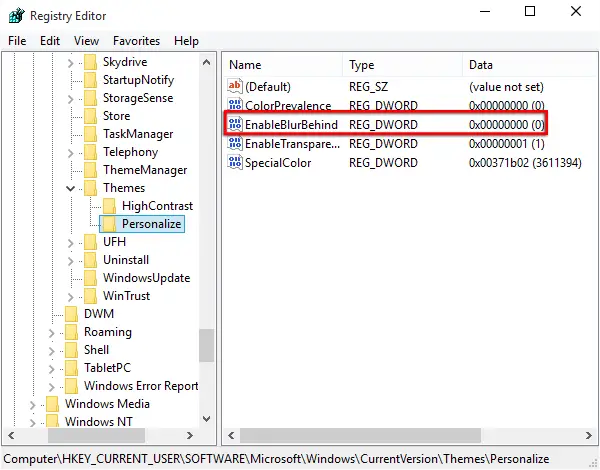
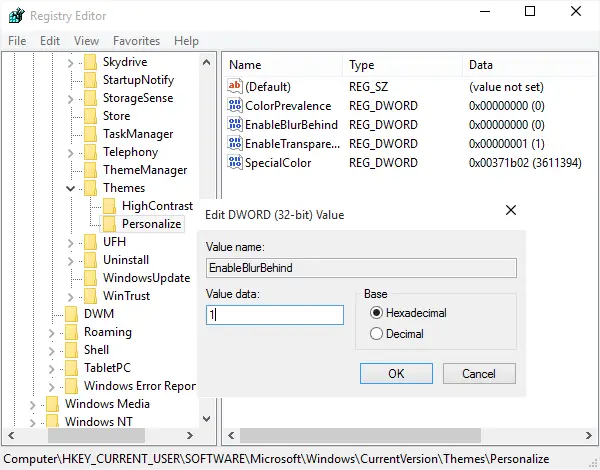
Right-click on it and select Modify. The default value should be 0. Change it to 1 and click on OK.
You will be required to restart your computer for the effects to be seen.
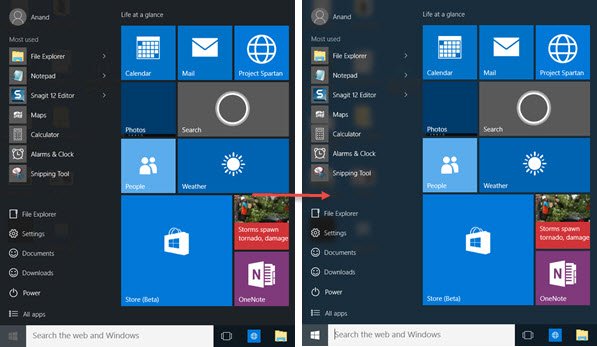
If you want to re-enable the Transparent background, set back the value to 0.
To increase Start Menu Transparency, you may also change the value of EnableTransparency key from 1 to 0.
Let us know if you like the new-look Start Menu in Windows 11/10.
Read next:
- How to make Taskbar transparent or blurred in Windows
- How to show Color on Start Menu and Taskbar in Windows.
How do I make my Start menu not transparent?
To make the Start Menu non-transparent in Windows 11 or Windows 10, follow these steps: Open Windows Settings and go to Personalization > Colors. Then, toggle the Transparency effects button to turn it off.
How do I change the opacity on my Start menu?
You need to use the Registry Editor to change the opacity level on your Start Menu. For that, head to the following path: HKEY_LOCAL_MACHINE\SOFTWARE\Microsoft\Windows\CurrentVersion\Explorer\Advanced. Create a REG_DWORD value and name it as UseOLEDTaskbarTransparency. Then, double-click on it and set the Value data as 1. Finally, restart your computer to get the change.

Yes, I really like the new Start Menu… much better than before. Additionally, your posts hve been huge help in tweaking the OS to my liking. Thanks a bunch for that.
Wow! That’s a really awesome tweak. Loving the new look of the start menu. Thanks for the tip! :-)
Thanks for your creative inputs. But applying this tweak does not helping me much. I followed those steps…by setting EnableBlurBehind and EnableTransparency to 1. This does nothing. However if i turn EnableTransparency to 0 and EnableBlurBehind to 1 the blur effect does come alive. Now the problem is if i restart my computer the “make start button, task button and action center transparent” button in Personalized setting becomes inactive automatically (as i set EnableTransparency to 0 i guess) and leaves my start button without blurred and without transparent. And it i turn it (“make start button, task button and action center transparent” button) on and refresh the registry panel the “EnableTransparency” value turns back to 1. i am confused. Please help me out.
Thanks & Regards
What happens if I don’t have EnableBlurBehind? I only have ColorPrevalence and Enable Transparency. I also have a (Default) key, but it’s not a DWORD. How do I put EnableBlurBehind back into Windows 10?
Create it.
Great answer, wish I thought of it. Are you kidding, I already was searching the internet looking for that. That’s why I asked how to put it back in. Sorta the same thing as create it! If you don’t want to help fine, but don’t leave dumb responses.
Please stop being sarcastic! That is the only answer there is. You have to create the EnableBlurBehind DWORD value, if it does not exist, and then give it the desired value. Select Personalize. Then right-click in right-pane > New > DWORD (32-bit) etc. If you are unfamiliar with the Registry, I suggest you do not do it. And yes, remember to create a system restore point first.
That’s what I was looking for, how to create it. I don’t know why my new copy of Windows doesn’t have it? I will try to create it tonight. Thank you.