Most Network Adapter names are random and complicated. But Windows 11 allows you to easily rename the Network Adapter to a name that you can identify with. So, if you want to change the name of your WiFi network adapter on Windows 11 then this post will help you do so using the Settings app, Command Prompt & PowerShell.
How to Rename Wi-Fi network adapter on Windows 11/10
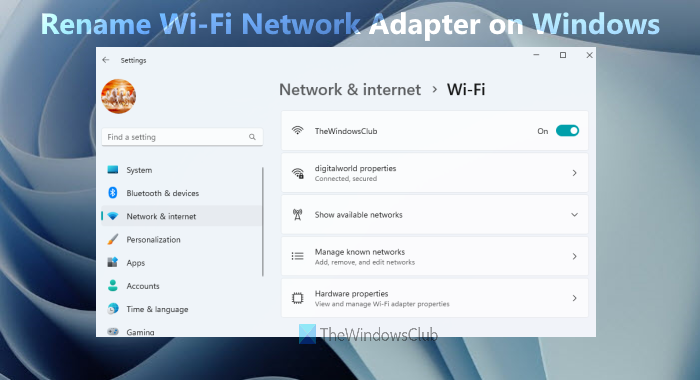
To rename the Wi-Fi network adapter on your Windows 11 PC via Settings, use the below suggestions:
- First, launch the Windows Settings.
- Then click on the Network & internet tab.
- Scroll to the Advanced network settings option and then open it.
- Under the Network adapters section, click on the Wi-Fi category.
- Go to the Rename this adapter option and then click on Rename button.
- Next, name your Wi-Fi network adapter and click the Save button.
Let’s now see the above steps in detail:
To rename the WiFi network adapter on your computer, open the Settings app first. For this, right click on the Start menu and select the Settings option from the menu list.
Inside the Settings app, click on the Network & internet menu from the left pane. Now move to the right, scroll down to the bottom and click on the Advanced network settings option.
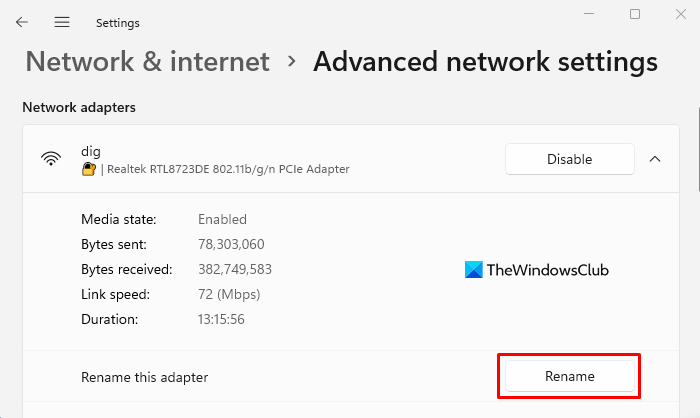
Under the Network adapter section, click on your Wi-Fi network to expand it. Then click on the Rename button that is available next to the Rename this adapter segment.
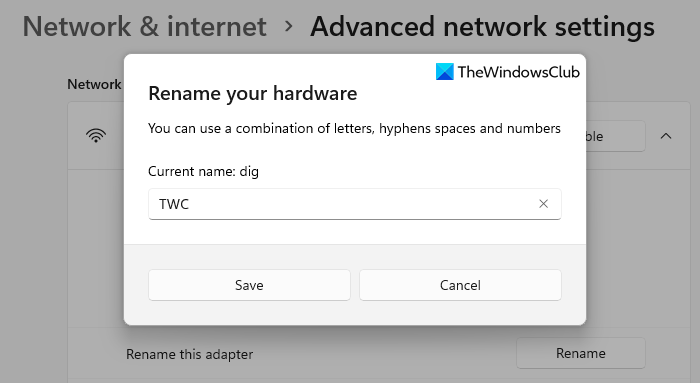
On the next popup menu, you will see the current name of your adapter. To rename your hardware adapter, you can use a combination of letters from a to z, hyphens spaces, and numbers from 0 to 9 in the name.
Once you create the preferred name, click on the Save button to apply the changes you made here. This way you can easily rename the WiFi Network Adapter on your Windows 11 computer system.
Rename Wi-Fi Network Adapter using Command Prompt on Windows 11/10
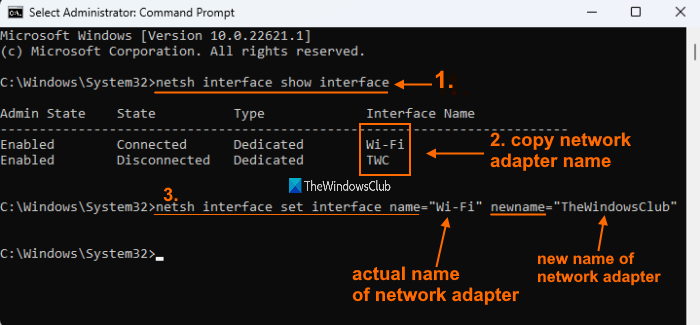
This option helps to rename Wi-Fi, Ethernet, or some other network adapter connected to your Windows 11/10 computer. Let’s check the step by step instructions to use this option:
- Type cmd in the Search box of Windows 11/10 computer
- In the search results, right-click on the Command Prompt option
- Select Run as administrator option to open Command Prompt window
- Execute the command to see a list of all the network adapters. The command is:
netsh interface show interface
- Copy or remember the Interface Name of the network adapter for which you want to change the name
- Now execute a command that includes the old or current name and the new name of your network adapter. The command would be:
netsh interface set interface name="CurrentNameOfNetworkAdapter" newname="NewNameOfNetworkAdapter"
- Replace CurrentNameOfNetworkAdapter with the actual name and NewNameOfNetworkAdapter with the name you want to set for your network adapter.
That’s it! As soon as the command is executed, the changes are added immediately.
Change the Wi-Fi Network Adapter name using PowerShell on Windows 11/10
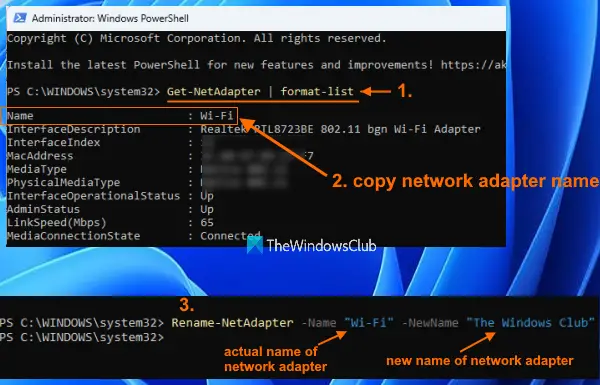
Another option to rename or change a Wi-Fi network adapter name is using the Windows PowerShell on a Windows 11/10 computer. Here are the steps:
- Run PowerShell as an administrator
- Now, get a list of network adapters available on your computer. For this, execute this command:
Get-NetAdapter | format-list
- In that list, you will see the network adapter name, MediaType, AdminStatus, and other information. You just need to copy the network adapter name that you want to change or rename
- After this, run the following command for renaming the network adapter:
Rename-NetAdapter -Name "NetworkAdapterName" -NewName "NewName"
- In the above command, you have to replace NetworkAdpaterName with the actual name and NewName with the name you want for your network adapter.
The command is processed instantly and your network adapter will be renamed with the name set by you.
How do I change my Wi-Fi name on Windows 11?
You can easily rename Wi-Fi or change the active network profile name on Windows 11 as well as Windows 10 computers. There are two ways to do it:
- Using Registry Editor
- Using Local Security Policy.
In Registry Editor, you need to access a ProfileName string value for your Wi-Fi or active network name and then add the new name in the Value data field of that string value.
In the Local Security Policy option, you need to access the Network List Manager Policies folder. That folder contains all the network names. Just open the Properties of a network name and then you can change the name of that network.
How do I find my network name in Windows 11?
There is an easy way to find the network name in Windows 11. You can do this using the Settings app of Windows 11. The steps are as follows:
- Open Windows 11 Settings app by pressing Win+I hotkey
- Click on the Network & internet category
- On the right-hand section, click on the Wi-Fi option or Ethernet option and your network name will be displayed on the top part.
Hope this helps.
Read next: How to Reset Network Adapter on Windows 11.
Leave a Reply