If you are an Internet Explorer user, you may at times face some problems. You should know how to repair Internet Explorer to avoid wastage of time searching for solutions for different problems on the Internet or otherwise.
The problems can be as diverse as:
- Internet Explorer freezes, crashes or hangs
- Internet Explorer does not open links
- Internet Explorer Troubleshooter Fix It
- IE cannot display the webpage
- Internet Explorer error messages on page
- Download Manager is missing in Internet Explorer
- Internet Explorer opens and closes immediately
- Internet Explorer does not save History Settings
This list is not comprehensive, but indicative. This does not mean Internet Explorer is a bad browser. These things happen with other browsers too. In most cases, the steps to repair Internet Explorer are the same, and IE is fixed when you find out which add-on is giving problems. This also means in most cases, it is one or more add-on that creates the problem.
Find Out Problematic Add-On
Most programs add their own add-ons to Internet Explorer. When you install programs such as Nero or ZoneAlarm, they install their own toolbars and attempt to change the homepage. Programs like Adobe and HP printer drivers too, add their own IE helpers. To handle real-time changes in IE helpers or add-ons, I recommend using WinPatrol.
Repair Internet Explorer
To repair Internet Explorer, first of all you need to see if it is some add-on creating problem. To check out the same, run Internet Explorer without any add-ons and see the performance. If it runs fine, the problem is some add-on.
To run Internet Explorer without add-ons:
- Click Start Menu
- Click All Programs
- Click Accessories
- Click System Tools
- Click Internet Explorer Without add-ons
To isolate the add-on that is creating a problem:
- Press ALT + T to open the Tools menu
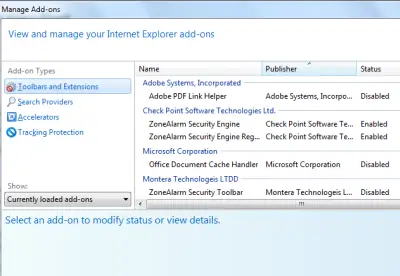
- Select Manage Add-ons
- When the Manage Add-ons window appears, disable all the toolbars and other add-ons
- Enable one add-on
- Click OK to close the Manage Add-on Dialog Box
- Test the performance of IE
- If it gives a problem, the add-on you just enabled is the culprit.
- If it does not give any problem, keep on enabling and checking IE performance until you find the one giving you the problem
- When you find the problematic add-on, simply disable or remove it from IE.
If you enabled all add-ons one by one and the problem is still there, some setting must have been changed in the Internet Options.
This is where you will need to reset Internet Explorer.
Reset Internet Explorer
To reset the Internet Explorer:
- Open Control Panel
- Open Internet Options
- Go to the Advanced Tab
- Click on the Reset Button
- Confirm by clicking OK
- After the reset, reopen Internet Explorer and see if the problem is gone.
If the problem is still there, you will need to reinstall Internet Explorer. But before you do so, try using our Fix IE utility or the Internet Explorer Troubleshooter and see if it helps you.
This explains how to repair Internet Explorer for common problems. If you have any questions, please feel free to leave a comment below.
How to Reset Internet Explorer Settings to default in Windows?
Internet Explorer has many security enhancements, that make it less susceptible to malware. However one can never be too sure! Moreover, badly written add-ons can also affect the browsing experience in IE. Often we find that our once fast browser has become slow to start and use. Over a period of time, we may install and uninstall add-ons, plugins, and toolbars. Should you find that your Internet Explorer freezes or is not working the way you want to, you can easily reset Internet Explorer settings to default. This is called the RIES feature of IE.
To reset Internet Explorer Settings to default, open IE > Tools > Internet Options > Advanced tab > Click Reset > Close >OK. Once this is done restart Internet Explorer. But before you use the reset button, there are a few things you should know.
When you click on the Reset Internet Explorer button, the following will happen:
- Toolbars and add-ons get disabled
- Web browser settings revert to the default
- Privacy & Security settings are changed back to their default values
- Tab browser, pop-up settings, and advanced options are reverted back to default values.
If you select the Delete personal settings, then additional settings like home page, search providers, accelerators, etc are all set to default. Moreover Cache, Cookies, Passwords, Web form data, History, ActiveX filtering, Tracking Protection data, etc files are also deleted.
RIES does not reset some settings in Internet Explorer.
The following four settings are not reset, because applications other than IE may be using them.
- Enable FTP folder view (outside of IE)
- Use passive FTP (for firewall and DSL modem compatibility)
- Always use ClearType for HTML
- Check for Publisher’s certificate revocation
To reset these settings, in Windows, you will have to follow these steps:
Click Start, type inetcpl.cpl in the Start Search box, and hit enter. In the Internet Properties dialog box, click the Advanced tab, and then click Restore advanced settings.
The RIES DOES NOT affect the following settings:
By default, the Automatically detect intranet network setting is enabled. To change this setting, follow these steps:
- On the Security tab in the Internet Properties dialog box, click Local intranet, and then click Sites.
- Click to select the checkbox that is next to Automatically detect intranet network.
By default, the Require server verification (https: ) for all sites in this zone checkbox for the local intranet is not selected. To restore this setting, follow these steps:
- On the Security tab in the Internet Properties dialog box, select the Local intranet zone, and then click Sites.
- In the Local intranet dialog box, click Advanced.
- Click to clear the Require server verification (https: ) for all sites in this zone checkbox.
By default, the Require Server Verification (https: ) for all sites in this zone check box for trusted sites is selected.
To restore this setting, follow these steps:
- On the Security tab in the Internet Properties dialog box, select the Trusted sites zone, and then click Sites.
- In the Trusted sites dialog box, click to select the Require server verification (https: ) for all sites in this zone checkbox if it is not already enabled.
By default, the Lock the Toolbars setting is enabled. In Internet Explorer \, on the View menu, click Toolbars, and then click Lock the Toolbars to enable this setting if it is not already enabled.
PS: If you are not an Internet Explorer user, you might want to check these links instead!
If you use a real browser (no IE), then you would not have this problem. IE and the trident engine is junk. For a better browsing experience, dump IE and use something better.
The Dump IE song is old now – and no longer valid, imo. It is just a cliche which still gets repeated!
I knew there would be some such comment – so in advance itself, we had mentioned two links at the end of this post about troubleshooting other browser issues too – which were written on request from several of our readers.
But yes – one should always use the browser one likes, no denying that! :)
What is the difference between starting IE 9 with “iexplore.exe -extoff” and with all the add-ons disabled? If I use iexplore.exe -extoff – then I can sign into Igoogle. So I disabled all the add-ons – ALL of themloaded, run with out permission, etc and I still have a problem with Igoogle.
Thanks for this post, i will try that.
My internet explorer stops working and shows a problem caused the program to stop working correctly. Windows will close the program and notify you if a solution is available.
I have tried the trouble shooter, with no problems found, I tried the Fix IE utility and still keep getting the same error message.
I have tried updating, to no avail!
Concerned!!
The dump IE song is not old and is still very very valid.
It sucks, you’re right, but it’s the ‘standard’ by which a lot of companies write their site code for.