RescueZilla is free software that lets you backup your computer. You can create a backup of all the disk partitions or a specific one. You can use this backup to restore your computer in case of a hard drive failure or if your data gets corrupted. In this article, we will see, how to backup and restore your computer using RescueZilla.
How to backup and restore your computer using RescueZilla
You can backup and restore your computer using RescueZilla. It is a straightforward software that lets you backup your computer within a few clicks of your mouse. In this article, we will see how to use RescueZilla to:
- Create a backup of a hard disk
- Restore the backup created by RescueZilla
Let’s start.
How to use RescueZilla to create a backup of a hard disk
Go through the following instructions to create a backup of your hard disk using RescueZilla:
- Download the RescueZilla ISO file from its official website.
- Make your Pen Drive bootable using the RescueZilla ISO file.
- Shutdown your PC and boot it from the bootable Pen Drive.
- Connect your external hard disk to save the backup.
- Launch RescueZilla.
- Click Backup and follow the on-screen instructions.
Below, we have described all these steps in detail.
First of all, you have to download the RescueZilla ISO file. The ISO file is available on its official website, rescuezilla.com. After downloading the ISO file, you need software that converts a Pen Drive into a bootable Pen Drive using the RescueZilla ISO file. BalenaEtcher is one of the free software that lets you create a Bootable Pen Drive. You will get the download link of BalenaEtcher on the RescueZilla official website.
After visiting the BalenaEtcher website, download its portable version by clicking on the drop-down next to the download button. The benefit of downloading the portable version is that you need not install it on your computer. Now, run the BalenaEtcher software and follow the steps below:
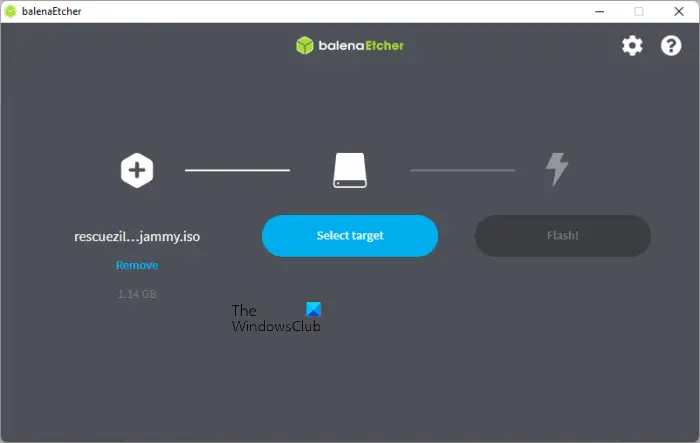
- Connect your Pen Drive to your computer.
- Click on the Flash from drive button.
- Select the RescueZilla ISO file from your computer.
- Click on the Select Target button and select your Pen Drive from the list.
- Now, click Flash.
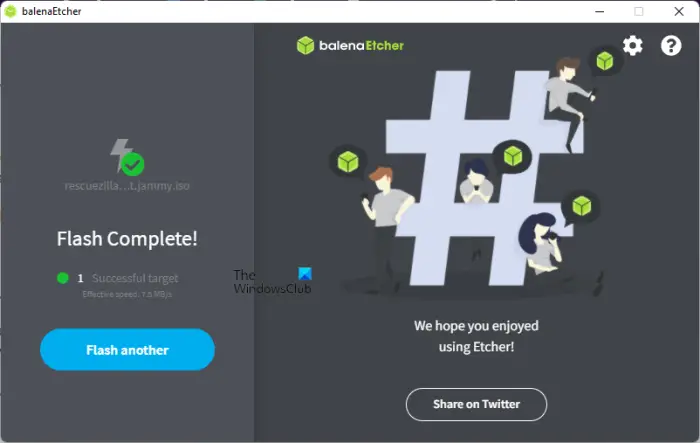
BalenaEtcher will take some time to convert your Pen Drive into the bootable Pen Drive using the RescueZilla ISO file. After the process gets completed, you will see the Flash Complete message on your screen (see the above screenshot). You will also get a prompt to format the Pen Drive. Do not format your Pen Drive. Click Cancel. Now, close the BalenaEtcher software and shut down your computer.
Now, the next step is to boot your computer from the bootable Pen Drive that you have just created. Computers of different brands have a different key to boot from Pen Drive. You can check this on the official website of your computer manufacturer. Or you can change the boot order in the BIOS. Do note that, if you change the boot order in your BIOS, your computer will always boot from the Pen Drive. In this case, revert the changes after you create a backup of your computer using RescueZilla. It will be better if you click a photo of the boot order of your computer before changing it.
On booting from your Pen Drive, you will see an interface to select the language. The default language is English. If you want RescueZilla in another language, select your language and then select Start RescueZilla. If you do nothing on this screen, RescueZilla will start automatically after a few seconds in the English language.
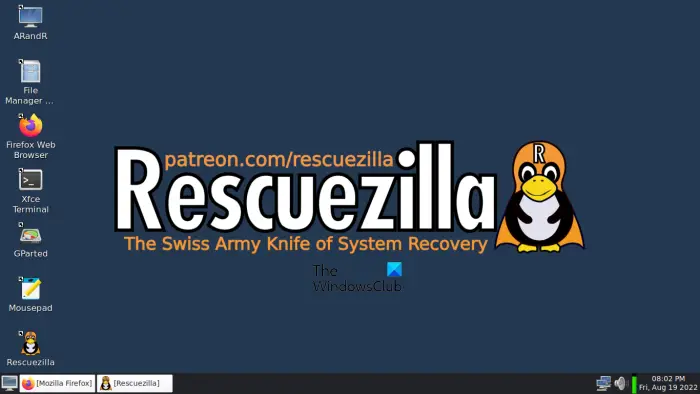
After booting from the Pen Drive, you will see the interface of Linux (see the above screenshot). Now, you are in the Linux ecosystem. Therefore, the Windows commands will not work here.
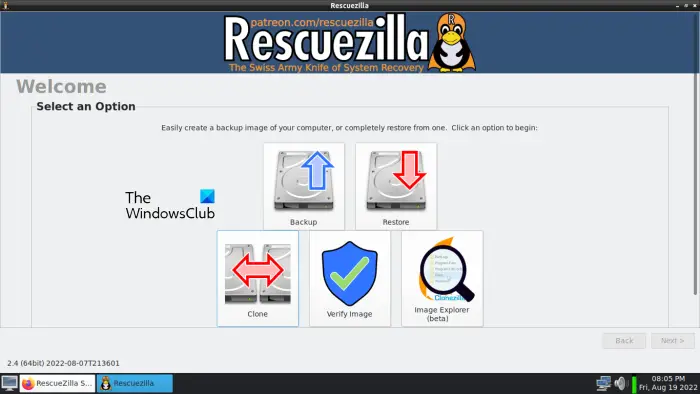
Connect an external hard disk and click on the RescueZilla shortcut on the desktop to launch RescueZilla. After that, you will see the RescueZilla interface. Now, click on the Backup button. After that, RescieZilla will take a few seconds to scan all the hard disks (internal and external). After scanning, it shows you the list of all available hard disks. If you do not see your external hard disk, close RescueZilla, disconnect your hard disk, wait for a few minutes, and reconnect your hard disk. Now, launch RescueZilla again.
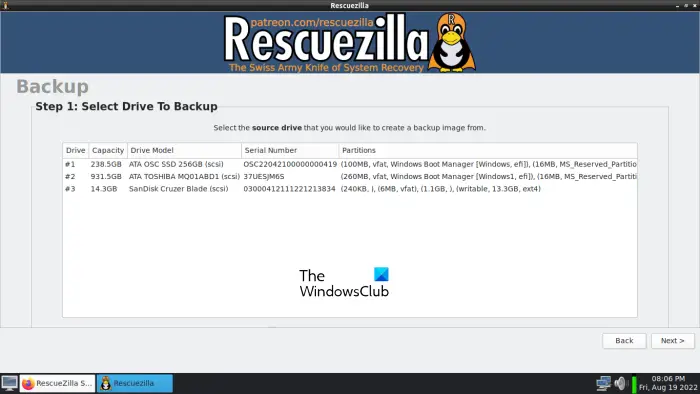
Now, you will be guided through the step-by-step wizard to create a backup of your computer. In the first step, RescueZilla will ask you to select a drive to backup. Select your hard drive from the hard drives shown in the list and click Next.
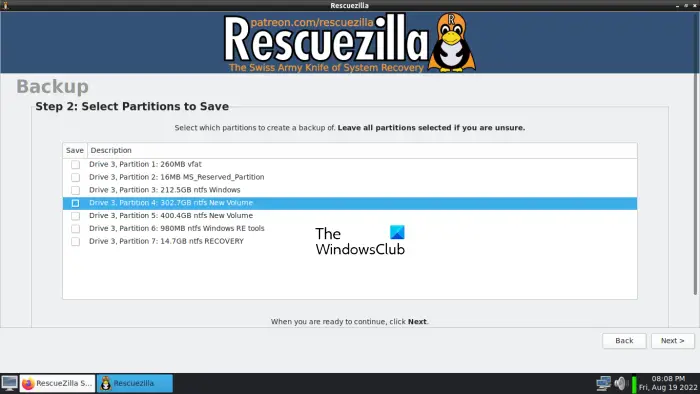
If your hard disk has partitions, on the next screen, RescueZilla will ask you to select the partition to create a backup for that partition. By default, all the partitions are selected. If you want to backup a particular partition, you can select only that partition and deselect the rest of them. After selecting the partition(s), click Next.
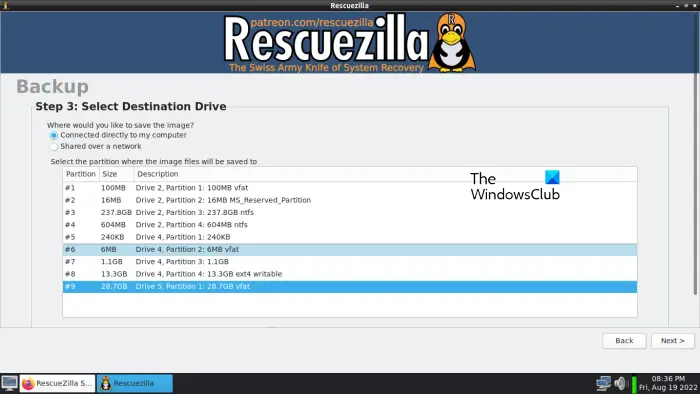
Step 3 is to select the targeted drive or the destination drive to save the backup. Here, you have to select the external hard disk to save your backup. RescueZilla also gives you an option to save the backup on the Network Drive. If you want to do so, select Shared over a Network and then enter the required details. When you are done, click Next.
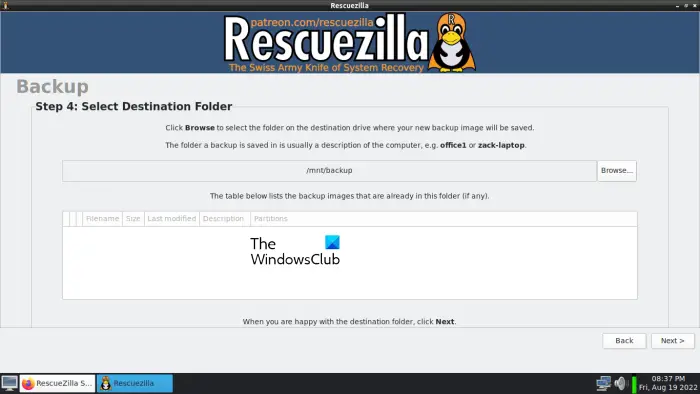
On the next screen (step 4), you have to select the destination folder to save your backup. You can leave it to the default, or select your own folder by clicking on the Browse button. Click Next when you are done.
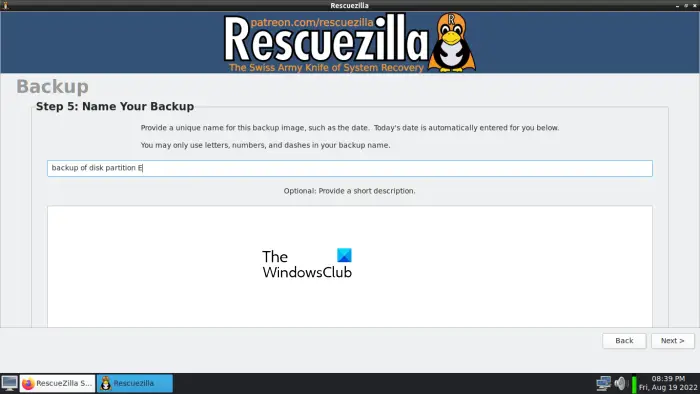
In the next step (step 5), you will be asked to name your backup. The default name of your backup is the current date that RescueZilla detects from your system. Click on the required field to rename your backup or leave it to the default. When you are done, click Next.
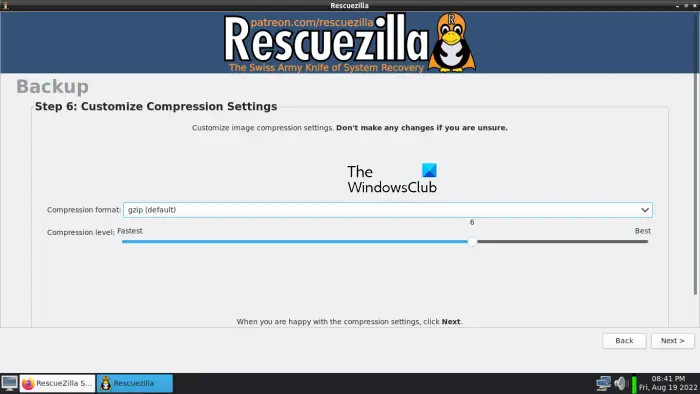
RescueZilla will show you the compression settings on the next screen. You can customize the compression settings by selecting the compression format and compression level. Click on the drop-down to select the compression format and move the slider to select the compression level. If you do not know about these settings, leave it to the default and click Next.
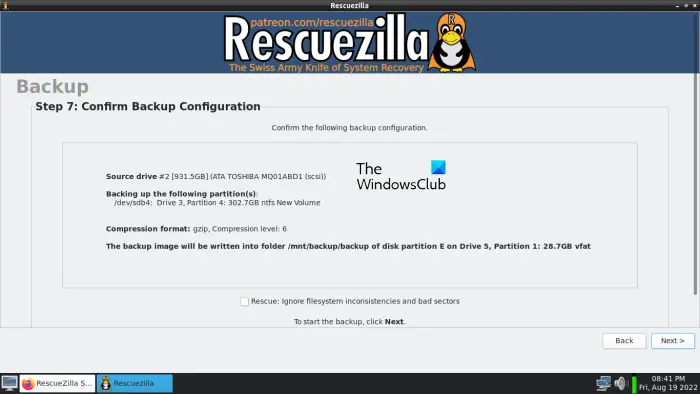
On the next screen, RescueZilla will show you the summary. This is the confirmation screen where you can check if you have selected the right hard disks to create and save the backup. If you find anything wrong, go back and do the required changes. Or close RescueZilla and proceed from scratch. If all the details on the confirmation screen are correct, click Next.
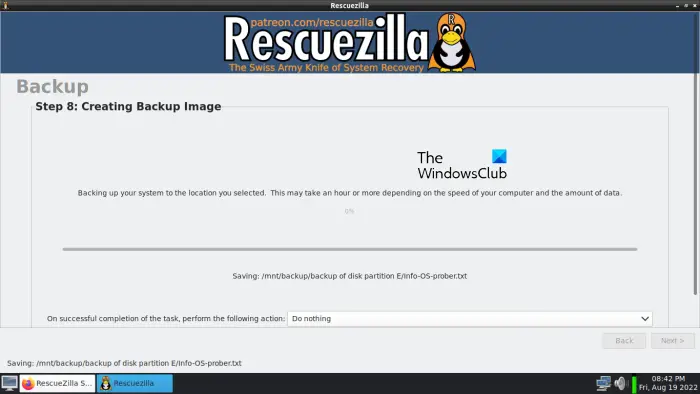
As you click Next, RescueZilla will start creating the backup of your hard disk and you will see the Creating Backup Image screen. This process will take an hour or more depending on the amount of data and the data transfer speed of your computer. At the bottom of this screen, you will see a drop-down. Here, you can select an action after the completion of the backup process. By default, it is set to Do nothing. If you want, you can change it to:
- Shutdown
- Reboot
In my opinion, selecting Reboot makes no sense here. If you have a large amount of data, the process may take several hours. In this case, you can select it to Shutdown.
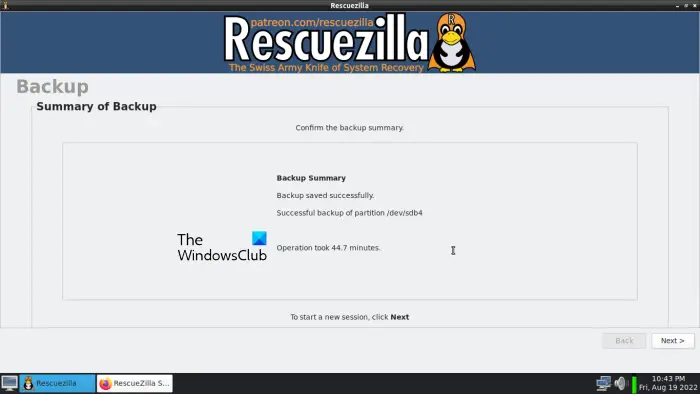
When the backup gets completed, you will see the Backup Summary on your screen. Here, you can see the total time taken by RescueZilla to create a backup image of your computer or the selected hard drive partition. Click Next to start a new session or close RescueZilla.
Now, shutdown your computer, remove the bootable Pen Drive, and turn on your computer again (if you want). To shutdown your computer in the Linux ecosystem, follow the steps below:
- Click on the computer icon on the bottom left side.
- Select Shutdown.
- Click Yes in the confirmation dialog box.
This is how you can create a backup image of your computer using RescueZilla. Now, let’s see how to restore your computer or data on a particular hard drive partition using RescueZilla.
How to use RescueZilla to restore your computer
Suppose your data has been corrupted. Because you have backed it up using RescueZilla, you can restore it now. The following steps will guide you on how to use RescueZilla to restore your computer.
- Connect the bootable Pen Drive that you created using the RescueZilla ISO image.
- Shutdown your computer.
- Boot your computer from the bootable Pen Drive with RescueZilla ISO image.
- Select the hard disk in which you saved the backup.
- Launch RescueZilla and click Restore.
- Follow the on-screen wizard to restore your computer.
Below, we have explained all these steps in detail.
Connect the bootable Pen Drive that you created using the RescueZilla image. If you do not have that Pen Drive, you can make another Pen Drive bootable with RescueZilla ISO image by following the steps described earlier in this article. Now, shutdown your computer and boot it from the bootable Pen Drive.
Select your language and start RescueZilla or leave it to the default language (English) and let RescueZilla get launched by itself after a few seconds.
When you enter the Linux, connect the external hard disk in which you saved the backup of your computer. Now, double-click on the RescueZilla desktop shortcut to launch RescueZilla. On the Home screen of RescueZilla, click Restore. The Restore wizard will appear on your screen. RescueZilla will take a few seconds to scan all the hard drives connected to your system.
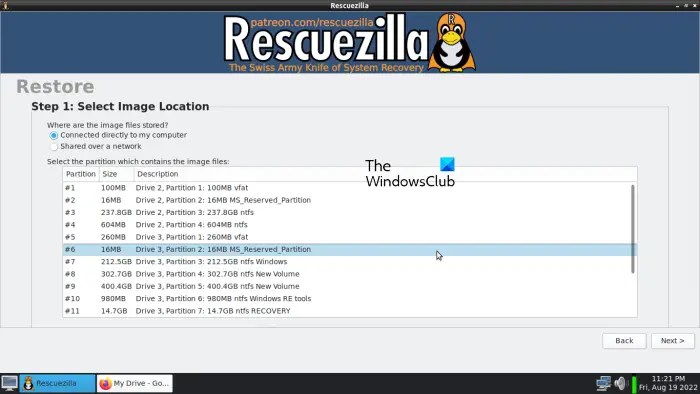
The first step is to select the backup image location. You will see the list of all available hard drives. Select the one on which you saved the backup image of your computer. If you saved the backup image of your computer to the Network Drive, select the “Shared over a network” option and select the Network Drive. Click Next when you are done.
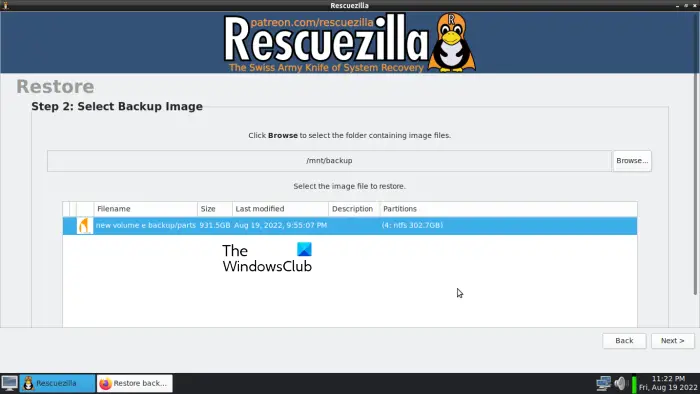
Now, the next step is to select the backup image. If you saved the backup image inside a subdirectory on your external hard disk, click on the Browse button and select it. After selecting the backup image, click Next.
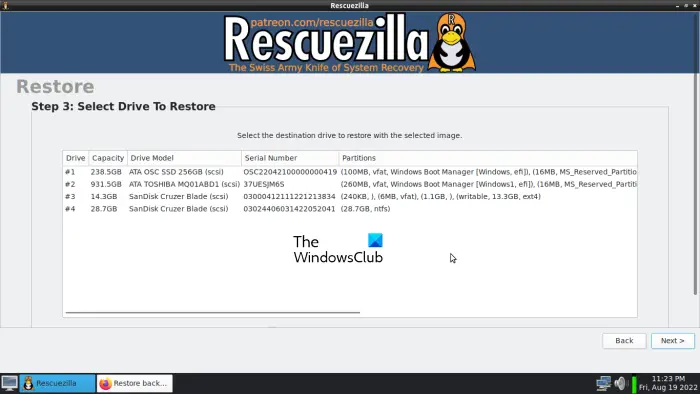
On the next screen (step 3), RescueZilla will ask you to select the drive to restore. Here, you have to select the drive to which you want to overwrite the data in order to restore the data. Click Next after selecting the drive to restore data.
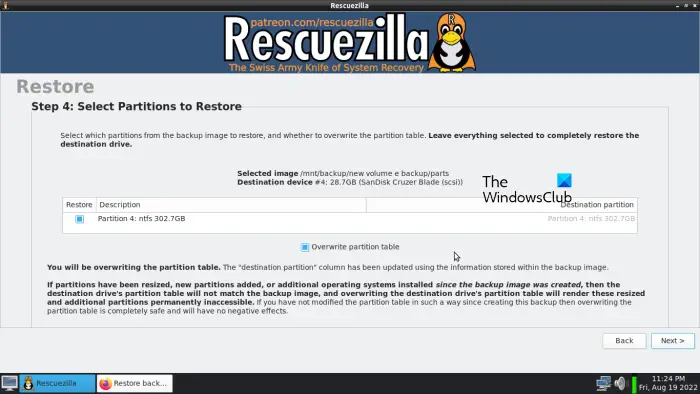
The fourth step is to select the partitions that you want to restore. By default, all the partitions remain selected, but if you want to restore only a specific partition, you can select that partition and deselect the rest of the partitions. Now, click Next.
The next screen will be the confirmation screen, where you have to check the details of the source image, destination drive, and restoring partitions. If you find anything wrong, go back and do the required changes or close RescueZilla and launch it again to start from scratch. Click Next.
As you click Next, you will see the confirmation message asking you to overwrite the data on the selected hard drive partitions. Click Yes. This process will take time. After the restoration process gets completed, shutdown your computer, remove your bootable Pen Drive and external hard disk, and turn on your computer.
This is how to restore your computer or data on a particular hard drive partition using RescueZilla.
Read: How to Clone a Hard Drive on Windows 11/10.
How do I backup and restore my hard drive?
You can backup and restore your hard drive by using disk image creator software. The disk image creating software lets you create a backup of your hard disk and partitions on a hard disk. After creating the backup image, you can use that image to restore your computer or a particular hard disk partition.
RescueZilla lets you backup and restore your computer. To use RescueZilla, you have to make your Pen Drive bootable using the RescueZilla ISO image with the help of dedicated software. You can search online for free software to make Pen Drive bootable. The RescueZilla ISO image is available to download for free on its official website. We have explained a detailed step-by-step process to create a backup and use that backup to restore your computer using RescueZilla in this article.
Read: Best Free Imaging, Recovery and Backup Software for Windows.
Can CloneZilla run in Windows?
Clonezilla Live is a free Imaging Software for Windows to clone disks. You can use this free software to clone your hard disk. Disk cloning has several advantages. When you clone a hard disk on another hard disk, all your data will be backed up on that hard disk. If you clone your C drive, you will get all the installed programs and games along with the saved settings and configurations on another hard disk. CloneZilla can run in Windows. You can use it to clone your hard disk on Windows.
That’s it. I hope you find our article helpful.
Leave a Reply