In this post we will see what is Reserved Storage in Windows 11/10 and how to view Reserved Storage size.

‘Failed Updates’ comes across as one of the major issues plaguing Windows 11/10 users during its upgrade. It occurs when not enough free storage is available for the task to be completed. This is set to change as Microsoft has come up with a practical alternative – Reserved Storage. The software giant will automatically reserve enough space to ensure the process is completed without any hassles. It will reserve 7GB of disk space to prevent big Updates from failing. This post explains how the new Storage Reserve will work in Windows 11 and Windows 10.
What is Reserved Storage in Windows 11/10
Reserved Storage will be enabled automatically on new PCs with Windows 10, v1903 pre-installed, and for clean installs. It will not be enabled when updating from a previous version of Windows.
Activating the Reserved Storage feature will reduce the space consumed by updates, apps, temporary files, and system caches. Moreover, the feature will not only reserve storage but also be utilized for the smooth running of your PC day to day.
Reserved Storage will start at about 7GB. Once activated, it cannot be removed from the OS. However, if required, you can influence the amount of space reserved.
Optional features
Whenever an optional feature is installed, Windows invariably increases the amount of reserved storage. This practice ensures there’s enough space available to maintain this feature on your device when updates are installed. That said, you can downsize the space quota by uninstalling optional features that are not in use.
Installed Languages
Although most customers stick to a single language, some users prefer to switch between two languages at least. As such, Windows naturally increases the reserved storage quota when an additional language is installed. This ensures that there is enough space to maintain installed languages. Similar to optional features, you can configure the space required for reserved storage by removing languages you aren’t using.
How to view Reserved Storage size in Windows 11/10
You can either use the Settings app or the Command Prompt/PowerShell to view the Reserved Storage size in Windows. While the Settings app provides a straightforward, graphical interface to view Reserved Storage, Command Prompt offers more detailed or technical information that may be useful for troubleshooting or in-depth analysis.
Use the Settings app

Open the Settings app by pressing Win + I. Go to System > Storage. You will see a glimpse of how much storage is being used by various system components (Installed apps, Temporary files, etc.)
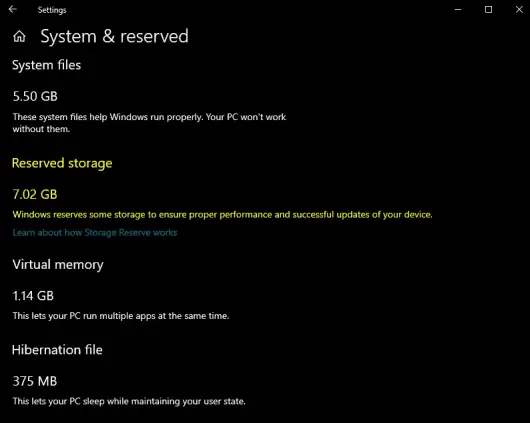
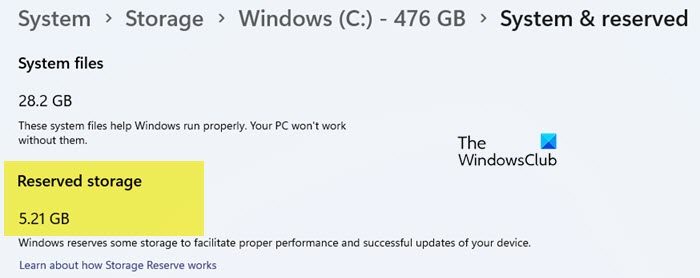
Scroll down and click the Show more categories link. Locate ‘System & reserved’ under Storage usage and click on it.
Under the Reserved storage section, you can see how much space is being reserved by Windows to help keep your system running efficiently and to ensure that updates can be installed without issues.
Use Command Prompt/PowerShell

Press Win + X and select ‘Windows Terminal (Admin)’ from the menu that appears. A User Account Control prompt will appear. Click Yes to open Windows Terminal using administrator privileges.
By default, Terminal opens with Windows PowerShell, but this can be changed to Command Prompt or other environments like WSL based on your preferences.
In the PowerShell window, type the following command and press Enter:
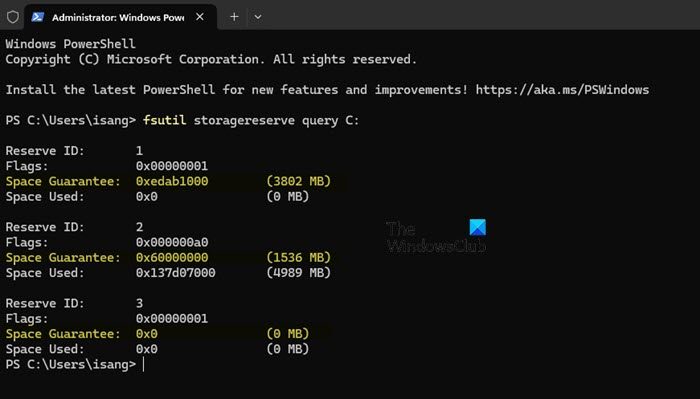
fsutil storagereserve query C:
Once executed, the command will display details about the reserved storage, including the total reserved space and the amount of space in use. Following is a brief breakdown of the output:
- Reserve ID: A unique identifier assigned to each reserved storage area on your system
- Flags: Hexadecimal values indicating specific attributes of the reserved storage area.
- Space Guarantee: The amount of disk space allocated and reserved for a specific purpose.
- Space Used: The actual amount of reserved space currently being utilized.
By adding the sizes listed under each Space Guarantee, you can determine the total amount of disk space allocated for reserved storage on your system.
If all values under Space Guarantee come out to be 0, it indicates that Reserved Storage is disabled on your Windows 11/10 PC. To verify this, you may execute the following command in the PowerShell window:
Get-WindowsReservedStorageState
If the output of the above command confirms that Reserved Storage is disabled, you’ll need to enable it to utilize this feature. Once enabled, you may view the reserved storage space on your system using the methods described above.
By reviewing this information, you can ensure your system has sufficient reserved space to handle updates and maintain optimal performance smoothly.
In a nutshell
Storage Reserve is a new feature that Microsoft intends to test to improve the Windows 11/10 experience. It will simplify the upgrading process by removing all the temporary unrequired OS files and allow the update to take over the full reserve area. In the case of misfortune, Windows will assume responsibility and guide you fully through steps to reduce the clutter or free up disk space.
Related read: How to enable or disable Reserved Storage on Windows.