You can, if you wish, reset the Internet Options and Settings to default values in Windows 11 or Windows 10. You may need to use this option if you are facing some issues while connecting to the internet.
How to reset Internet Options to default in Windows 11/10

To reset Internet Options to default in Windows 11/10, do the following:
- Search for Internet Options and click on the result to open it
- The Internet Properties box will open
- Click on the Advanced tab
- Locate and click on the Restore advanced settings button
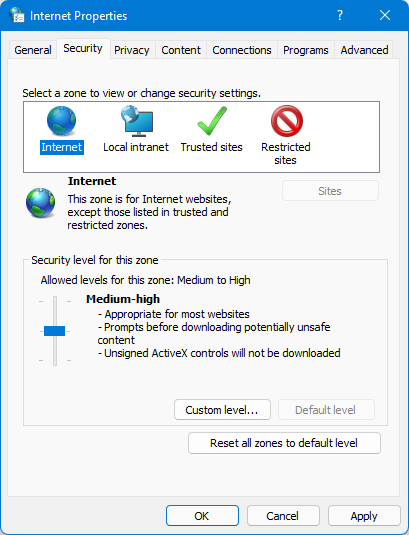
- Next, go to the Security tab and click on Reset all zones to default level button
- Click on Apply and then OK.
Your Internet Properties and settings will be restored to Windows default values. Your Internet Security Zones will also be reset to default.
If you are facing persistent issues while connecting to the network or the internet, you may also use the Network Reset option. This option will reinstall Network adapters, Reset Networking Components to default.
Related: How to add a Trusted Site via Internet Options.
How do I reset my Internet settings on Windows 11?
To reset your internet settings on Windows 11 or Windows 10, you need to use the Windows Settings panel. Press Win+I to open the Windows Settings panel and go to Network & internet. Then, go to the Advanced network settings and click on the Network reset option. Following that, click on the Reset now button.
Read: How to reset the Microsoft Edge browser to default settings.
What happens when you reset Internet Options?
If you reset the Internet Options on a Windows computer, all the custom settings get reset to factory defaults. This includes all the changes you may have made for Accelerated graphics, Accessibility, Browsing, Security, etc.

Open
the “Reset Internet Explorer Settings” dialog box. The user can
automatically or manually open it depending upon the preferences.
Click on the “Reset” option when seeing “Reset Internet
Explorer Settings” dialog box.For removing the browsing history, home
pages, search providers, ActiveX Filtering data and Tracking Protection,
make sure you select “Delete personal settings” check box.
When default settings are done, click “Close and tap “OK”.
Exit completely and start Internet Explorer.