In this guide, we will see how you can restore the default location of the Library folders on your Windows 11/10 computer. That’s because, if the location is incorrect or corrupted, you will notice the Library folder will cease to open.

After installing Windows 11/10, you will find some folders such as Camera Roll, Documents, Music, etc. These are Windows Library folders, and users can save files in those folders. It is quite easy to open and use Windows Libraries. By default, these Library folders are saved in the C:\Users\<username> folder. However, many people often change the location of these folders for their benefit. If you have done that earlier and now you want to reset the location, here’s how to do it.
Restore default location of Library folders
Before we restore the default location of the Library folders, delete all the custom Libraries that you may have created and added. Also, delete all the default ones except the ones which are working. Having done that, restore the defaults.
To restore the default libraries on Windows 11:
- Select Libraries on the Explorer
- Right-click on it
- Select Show more options
- Click on Restore default libraries
Let’s get into the details of the process.
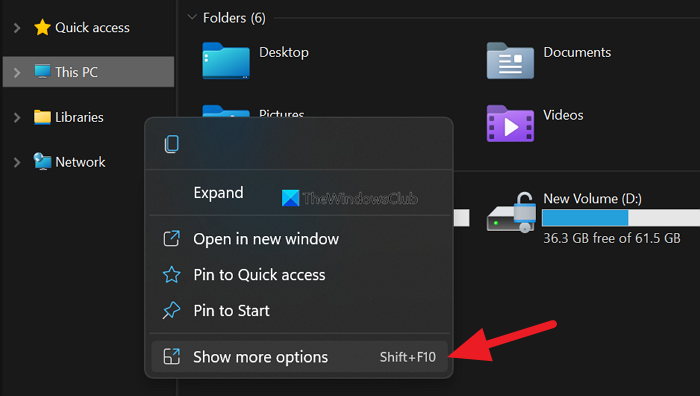
On the Explorer window, select Libraries and right-click on it to see options. Click on Show more options.

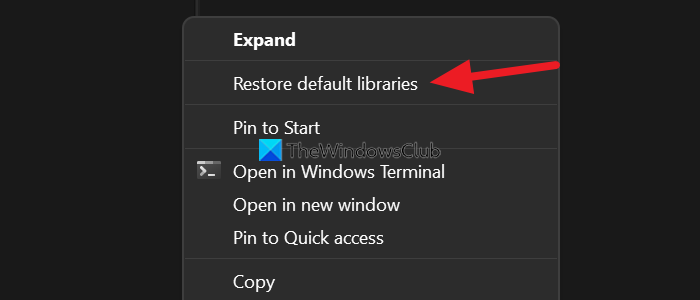
You will see more options. Click on the Restore default libraries on the context menu that opened.

This is how you can restore default libraries on Windows 11.
You will find that Windows Libraries will start working properly
To restore the default location of Library folders in Windows 10, follow these steps-
- Open the Library folder on Windows 10.
- Right-click on the folder and select Properties.
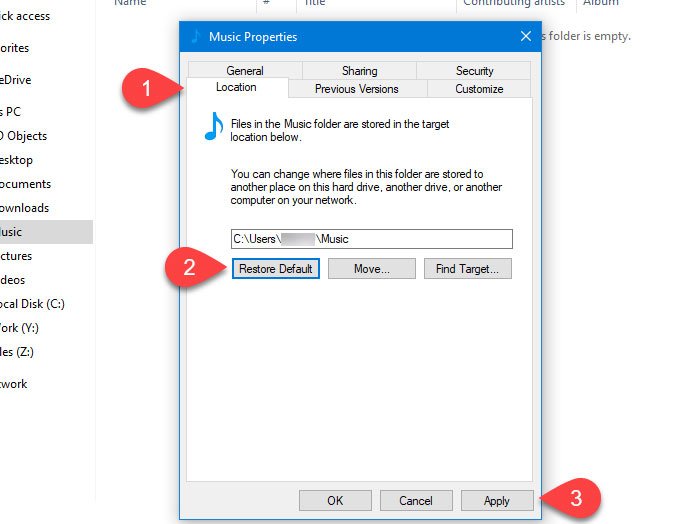
- Switch to the Location tab.
- Click on the Restore Default button.
- Click the Apply button.
- Click the Yes button to create the folder in the new location.
- Click the Yes button to move content from the old to the new location.
Let’s delve into the steps in detail.
First, you need to open the desired Library folder on your computer. If you cannot find the folder that you want to open, press Win+R to open the Run prompt and enter any of these commands-
Desktop:
shell:desktop
Documents:
shell:personal
Downloads:
shell:downloads
Music:
shell:my music
Pictures:
shell:my pictures
Videos:
shell:my videos
3D Objects:
shell:3d objects
Contacts:
shell:contacts
After opening the folder on your PC, right-click on it and select Properties from the context menu.
Now, you should see several tabs. Switch to the Locations tab and click the Restore Default button.

Finally, click the Apply button. It should display a popup with a Yes button. If you click the Yes button, it will create the corresponding Library folder in the new location (in this case, it is the System drive).
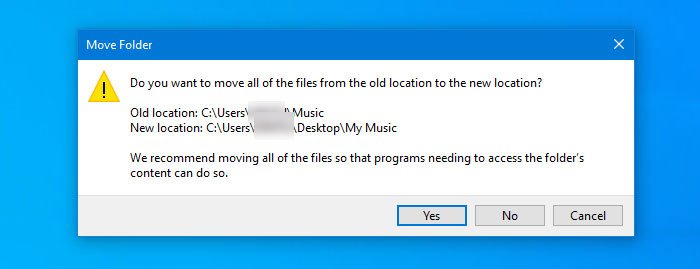
After that, it will ask you to move your content from the current location to the new location. If you want to move all the content, click the Yes button.

Now, the selected Library folder should be created in the new location.
You can do the same for the other Library folders.
That’s it!
How do I change the default library path in Windows 11?
To change the default library path in Windows 11, you need to right-click on the folder and select Properties. Now, go to the Location tab and then change the location from the given field. Finally, click on Apply > Ok.
Read: Add or Remove Libraries from File Explorer Navigation Pane in Windows 11/10
How to restore default libraries in Windows 11?
To restore the default library location in Windows 11, you need to right-click on the folder and select Properties. Then, navigate to the Location tab and click on Restore Default. It may ask you to confirm your actions, just give your consent and you will be good to go.
Also Read: Add or Remove folders in a Library in Explorer in Windows 11/10.
Leave a Reply