Keeping aside how user-friendly Windows-based systems are, everybody will agree that maintaining it cannot be overlooked. We may run into serious problems that need immediate troubleshooting. If the problem is serious, we may need to carry out certain operations, so it is always good to know remedies to deal with it beforehand. Fortunately, every Windows system comes with certain problem-solving mechanisms that can sometimes be a lifesaver.
If you are using a Surface device and running Windows 11/10 OS, then this tutorial, based on steps suggested by Microsoft on how to restore, reset, downgrade and reinstall Windows on your Surface device, is sure to interest you.
Restore Microsoft Surface from a System Restore Point
A System Restore Point is a saved state of your system files. If you run into a problem, you could restore your system to a previous good point in time, using this feature. Even though Windows will create restore points automatically from time to time, it is always advisable to create it manually now and then, especially if you are making some changes to your system.

Here is how you can restore your Surface Pro from a system restore point:
- Press and hold the Start button and select Control Panel.
- Head over to the search box present at the upper right corner, enter recovery.
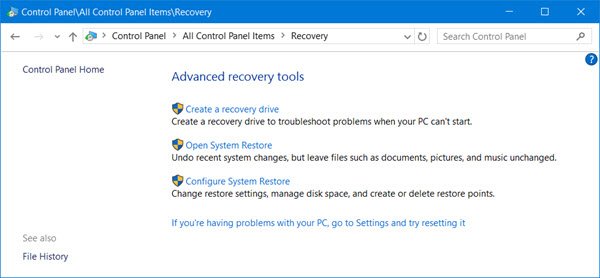
- Select it, and navigate to Recovery > Open System Restore > Next.
- Here you will see the list of restore points. Select the appropriate one, click Next > Finish.
When you do this, you are taking your system to a previous state which means any installations, drives, updates performed in the meantime would get deleted.
If Restore Points are not available
If you cannot find any restore points in your system, then you can solve your problem by resetting your Surface device. Right after resetting Windows, make sure that System Protection is turned on, by following these steps:
- Right-click or press and hold on Start and select Control Panel.
- Head over to the search box present at the upper-right corner, enter recovery.
- Navigate to Configure System Restore > Configure .
- Select Turn on System Protection check-box
If you cannot sign in to Windows 11/10

If you cannot sign into your system, you can restore your system in the Windows Recovery Environment.
- On the Windows sign-in screen, select Power.
- Press and hold Shift and Alt Keys and select Restart.
- You would see Choose an option screen. Select Troubleshoot.
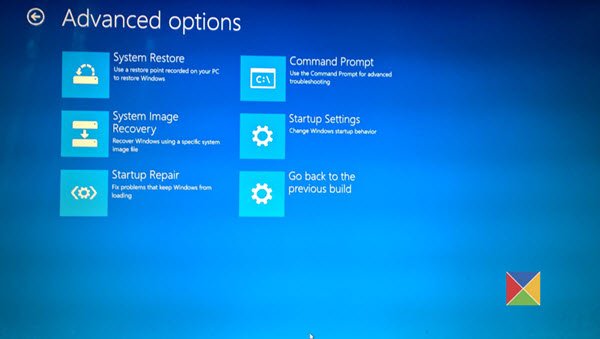
- Go to Advanced Options > System Restore.
- Enter a recovery key, if asked. Select the target Operating System, and click Next.
- Select a restore point, select Next >Finish.
- When prompted to continue, select Yes.
You would be able to start your system, once the process gets completed.
If you cannot start Windows 11/10
If you cannot start your Surface device at all because of a problem, you may want to perform a system restore in the Windows Recovery Environment, by following these steps –
- Start your Surface Pro with a USB recovery drive. To do so, insert a bootable USB drive (formatted to the FAT32 file system) into your USB port. Press and hold Volume down key, while you press and release the Power button. You will see the Surface logo.Then release the Volume down button.
- Windows will prompt you for language and keyboard layout. Select them appropriately.
- Navigate to Troubleshoot >Advanced Options > System Restore.
- If asked for the recovery key, enter it. After that, select the target operating system and click Next.
- Choose the appropriate restore point.
- Select Next > Finish to complete the wizard.
When the process is completed, you will be able to start your Surface.
Reset Surface Pro
Resetting allows you to reinstall Windows. You can choose whether to keep or delete your files all at once. This comes in handy when the system isn’t working well and you haven’t installed anything new for a considerable time. Adding to that, resetting is the next step you want to take when restoring doesn’t solve your problem. Follow steps below to reset your Surface Pro:
- Go to Start and navigate to Settings > Update & Security > Recovery.
- Select Reset this PC and select Get Started and select the appropriate option among the displayed three. Here is what each of them does:
- Keep my files: This option will reinstall Windows 11/10 to your Surface Pro keeping personal files and apps that your PC came with. But it removes the changes made to settings and installed apps and drivers.
- Remove everything: As the name implies, this is cleaning everything. If you choose this, all your personal files would get removed along with the changes you’ve made to settings and apps/drivers you’ve installed. Be careful while selecting this as you may never be able to revert/recover it.
- Restore Factory settings: This option turns your system as it is the day you got it by reinstalling the OS and any apps which came with it. It removes personal files, changes to settings and apps/drivers you’ve installed.
You need to note that if you upgraded to Windows 11/10 and reset your Surface Pro within a month after the upgrade, downgrading to a previous version isn’t possible unless you took some steps that would let you downgrade even after 30 days.
Read more details on how to Reset Windows 10.
If you cannot sign in to Windows
If you cannot sign in to your System for some reason, you can reset your Surface Pro from the Recovery environment.
- Select Power on the Windows Sign-in screen.
- Select and hold down Shift and Alt keys on your keyboard, and select Restart.
- You would see Choose an option screen, choose Troubleshoot.
- Select Rest this PC, and select appropriate option Remove Everything or Keep my files.
If you cannot start Surface
If you cannot start Windows at all on your Surface Pro, then you may want to reset it from the Windows Recovery Environment. Follow these steps
- Start your Surface Pro with a USB recovery drive. To do so, insert a bootable USB drive (formatted to the FAT32 file system) into your USB port. Press and hold the volume down key while you press and release the power button. You would see a Surface logo, then release the volume down button.
- Windows prompts you for language and keyboard layout. Select them appropriately.
- Select Troubleshoot > Reset this PC. Choose Keep my files or Remove everything.
After the wizard completes, you will be able to use the system normally.
Downgrade to Previous Version of Windows 11/10
If you want to install a previous version of Windows, you can rollback from Windows. The important thing here which needs a mention is if you reset your System within a month, this option wouldn’t be available to you either – unless you took some steps that would let you downgrade even after 30 days. Follow the steps below to go back –
- Go to Start and navigate to Settings > Update&Security > Recovery.
To go back to the Previous version, you may need to do a couple of things.
1] Keep everything in the $Windows.~BT, $Windows.~WS and Windows.old folders after the upgrade.
2] Remove user accounts you’ve added after the upgrade.
3] Keep the password you’ve used for your previous version to be able to sign in, if any.
4] Keep the USB stick you used to upgrade, ready with you.
If Go Back isn’t available
If the Surface Pro you’ve bought came with Windows 11/10, going back isn’t an option. If you run into a problem, all you can do is reset your machine to Factory settings. Refer to the section above to learn how to do that. If you had a recovery drive before upgrading to Windows 11/10, you can use that as well to restore it to factory settings (discussed in the section that follows), even if the option isn’t available in settings.
If you are a Windows Insider
If you a member of the Windows Insider program and running a preview build, if ran into a problem then navigate to Start > Settings > Update&Security > Recovery . Under Go back to an earlier build, select Get Started .
Use a Recovery Drive to Reinstall Windows
You can use this mechanism when a recovery drive is available to you and your system won’t start because of a problem. Follow these steps to use it in your Surface Pro running Windows 11/10.
- First, Shut down your Surface and plug it in. Then, insert the USB recovery drive into a USB port.
- While pressing and releasing the power button, press and hold the volume-down key. When a Surface logo appears on the screen, you can release the volume-down button.
- Select the appropriate language and keyboard layout. After that, you would see a Choose an option screen, wherein, select Troubleshoot > Recover from a drive. If Windows asks for a recovery key, you can simply select Skip this drive present at the bottom of the screen.
- After that, choose Fully clean the drive or Just Remove my files as needed. Select Recovery.
Depending on the option you’ve selected, the wizard will run for several minutes. If it prompts you to change your TPM, simply select OK. One important thing that needs to be mentioned here is that if you choose not to back up system files when you create a recovery drive on Windows 10, you cannot use that drive to reinstall Windows.
How do I restore my Surface Pro to factory settings?
To restore your Surface Pro to factory settings, follow the entire guide mentioned above. The steps are almost the same whether it is running Windows 11 or Windows 10. Therefore, you can follow these steps to reset or restore your Surface Pro to the factory defaults.
How do you refresh a Microsoft Surface?
Refreshing a Microsoft Surface and a regular desktop computer are not that different. However, you may find a slight change in the initial steps. You can follow this guide to refresh a Microsoft Surface within moments.