BitLocker security software created by Microsoft is based on next-generation secure computing architecture. It is encrypted for all devices whether portable or non-portable to prevent third-party intrusion while working on the device. It is used by many organizations where employees carry confidential data from one place to other. This seamlessly user-friendly software comes with some drawbacks; therefore many users would like to deactivate it from their device. In this post, we will illustrate how to resume or suspend BitLocker encryption on Windows 11/10 via Control Panel.
This security feature is easy to use, encrypts the hardware of the system, and is known for service the securing purpose very well. However, device encryption can become a problem for some users as it may slow down the computer. Sometimes the device encryption takes a longer period and most importantly it supports only when the system is compatible with encryption.
How to Resume or Suspend BitLocker encryption on Windows 11/10
Bitlocker is gaining popularity and is being increasingly used by modern devices to prevent data breaching. The data protected can be extracted from the hard drive of the system. It also allows the user to secure important data with the help of a password. Here in this tutorial, we will see how to resume or suspend BitLocker encryption on Windows 11/10.
1] Resume BitLocker encryption on Windows 11/10

If you want to resume the BitLocker encryption which you have earlier suspended on Windows 10 PC, then use the following suggestions:
- At first, open the Control Panel window.
- Click on System and Security section.
- Scroll down and select the BitLocker Drive Encryption option.
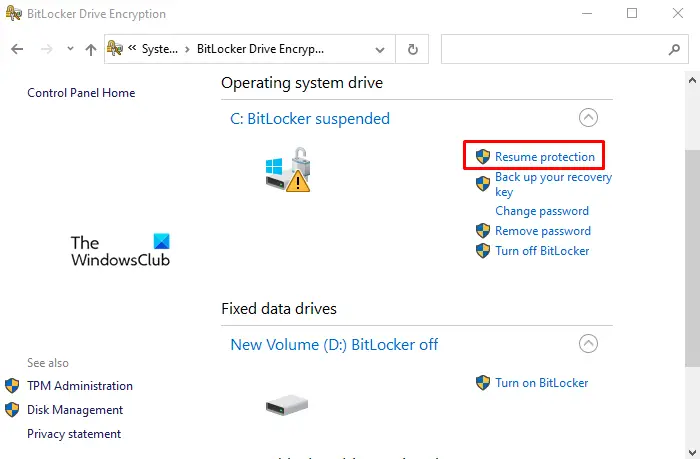
- Select the Resume protection option.
If you need, you can see the above steps in detail:
To get it started, open the Control Panel first. For this, click on Start, type Control Panel and press the Enter key.
Inside the Control Panel window, head over the System and Security option.
Next, scroll down, and click on the BitLocker Drive Encryption option.
Now under the operating system drive title, click on the Resume protection link to resume BitLocker encryption on Windows 10.
After that, restart your computer to complete the process.
Read: How to backup BitLocker Drive Encryption Recovery Key.
2] Suspend BitLocker encryption on Windows 11/10

BitLocker efficiently protects system data from cold boot attacks but its encryption may create problems in system updates and firmware. Therefore, many of you may like to suspend it temporarily. It is important to note that BitLocker suspension is not permanent and new data created after the suspension with stay encrypted until it is suspended again for data decryption.
To Suspend BitLocker encryption on your Windows PC, follow the below suggestions:
- Open the Control Panel window.
- Click on System and Security section.
- Scroll down and select the BitLocker Drive Encryption option.
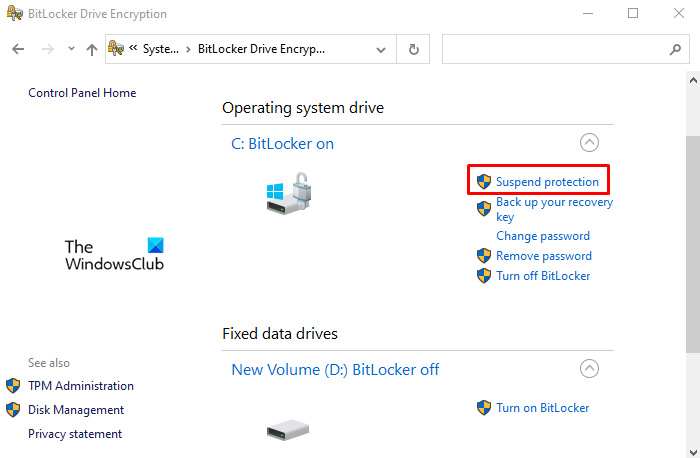
- Select the Suspend protection option.
- Click on the Yes button to continue.
Now let’s see the above steps in detail:
The suspension can be done using the control panel of your computer system. So, first of all, open the control panel and select the System and Security option. Now choose the BitLocker Drive Encryption option.
Inside the BitLocker window, click on the Suspend protection option that is available below the heading of your OS drive. Then click on the Yes button to confirm the changes. Restart your computer and check if it is done.
Kindly do note that, if you suspend the protection, your data will not be protected. Sometimes you may need to suspend BitLocker temporarily while updating Windows or PC’s firmware. So, if you forget to resume BitLocker protection, it will resume automatically the next time you restart your PC.
This post will show you how to Suspend or Resume BitLocker Protection for Drives via Explorer, Command Prompt, PowerShell.
Related: How to change BitLocker Encryption method & Cipher Strength.
Leave a Reply