In this article, we will see how to rotate and crop an image in Microsoft OneNote. Microsoft OneNote is a digital notebook where users can create notes, insert images, multimedia files, and organize their notes in separate digital notebooks.

Crop a picture in Microsoft OneNote
Microsoft OneNote is available in both desktop and online versions. Here, we will see the following:
How to crop an image in Microsoft OneNote online

Follow the below-listed steps to crop an image in Microsoft OneNote online.
- Log into your Microsoft account and open OneNote online.
- Insert an image by clicking on the “Insert” option.
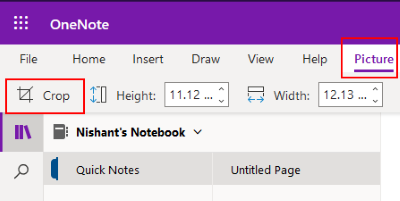
- Click on the inserted image to select it. When you select the image, a “Picture” option will appear on the ribbon.
- Go to “Picture > Crop.”
You can also resize an image by changing its height and width. Alternatively, you can place your mouse cursor on the edges of an image and stretch or compress it to change its size.
Read: The basics of using the OneNote app in Windows.
How to crop a picture in OneNote for Windows & OneNote 2016
Neither OneNote for Windows 10 nor OneNote 2016 has a built-in tool to crop a picture. Hence, to crop an image in these applications, you have to use Windows 10 screen clipping feature. The steps to crop an image are listed below:
- Insert an image by clicking on the “Insert” option.
- Now, press “Windows key + Shift + S” on your keyboard together to start Windows screen clipping mode.
- When the entire screen dims, select the part of the image that you want to crop by dragging your mouse.
- When you are done, release the left click of the mouse and Windows will copy the selected part of the image to the clipboard.
- Now, press Ctrl + V to paste the cropped image in OneNote.
- If it looks good for you, keep the cropped image and delete the original one (if required).
Rotate a picture in Microsoft OneNote
For now, Microsoft OneNote online does not support rotate an image feature.
How to rotate an image in OneNote for Windows

Launch OneNote for Windows 10 application and follow the below-listed steps to rotate an image:
- Select the image you want to rotate.
- Click on the “Picture” option. Do note that the Picture option will be available only after selecting an image.
- Now, you will see the image rotating options. You can rotate the picture left and right at 90 degrees, and flip it in both horizontal and vertical directions.
Read: Important OneNote features.
How to rotate a picture in Microsoft OneNote

The following steps will guide you on how to rotate an image in Microsoft OneNote 2016:
- Click to select an image in OneNote application.
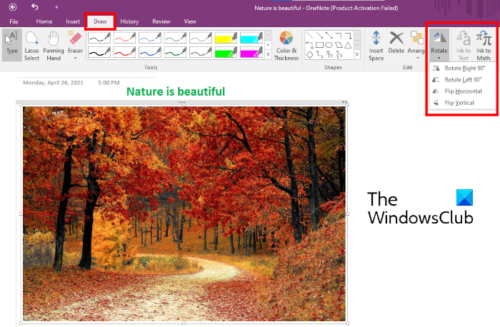
- Go to “Draw > Rotate.”
You can rotate the image in both right and left directions at 90 degrees or flip it horizontally and vertically.
That’s it. You can share your views in the comments below.
Read next: How to enable dark mode in Microsoft OneNote.
Leave a Reply