RRAS (Routing and Remote Access Service) is a Microsoft API software router that lets businesses deploy VPN connections in order to provide the end-users with remote access to their organization’s network. It also lets you set up a site-to-site VPN connection between two servers. Some users are experiencing issues with RRAS while setting up the VPN connection. According to them, the Routing and Remote Access Service keeps stopping or gets terminated with an error. This article lists some solutions that you can try if the Routing and Remote Access Service is not starting on your Windows device.
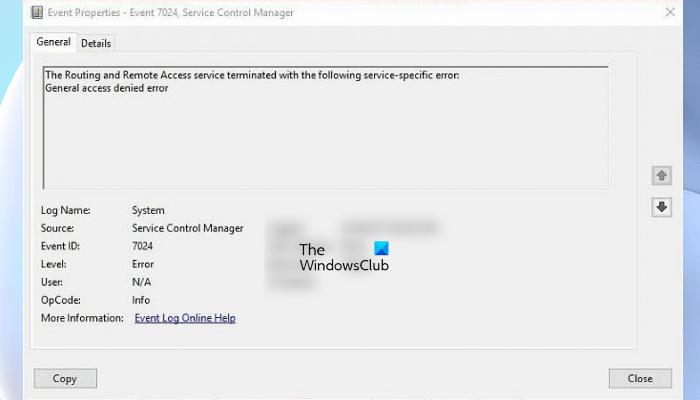
The following are some of the error messages reported by the users:
- The Routing and Remote Access service terminated with the following service-specific error:
General access denied error - The Routing and Remote Access service terminated with the following error:
The system cannot find the file specified. - Unable to load C:\Winnt\System32\Iprtrmgr.dll
- The Routing and Remote Access service terminated with service-specific error 2 (0x2).
- The Routing and Remote Access service terminated with service-specific error 31 (0x1F)
- The Routing and Remote Access service terminated with service-specific error 20205 (0x4EED).
- The Routing and Remote Access service terminated with service-specific error 193 (0xC1).
Routing and Remote Access Service not starting
If the Routing and Remote Access Service keeps stopping or gets terminated with an error on your Windows device, you can try the solutions mentioned below.
- Enable the SvcHostSplitDisable Value in Registry
- Verify the RouterManagers key Values in the Registry
- Reset the TCP/IP or Internet Protocol
- Disable IPv6
- Restart the Routing and Remote Access Service
Let’s see all these troubleshooting guidelines in detail.
1] Enable the SvcHostSplitDisable Value in Registry
This solution has worked for a lot of users. You have to enable the SvcHostSplitDisable Value in two different locations in Windows Registry. The steps to do so are explained below. Before you begin, we recommend you create a system restore point and backup your Registry.
Press Win + R keys to launch the Run command box. Type regedit and click OK. Click Yes if you receive the UAC prompt. This will open the Registry Editor.
Once the Registry Editor opens, copy the following path and paste it into the address bar of the Registry Editor, and press Enter.
HKEY_LOCAL_MACHINE\SYSTEM\CurrentControlSet\Services\RasMan
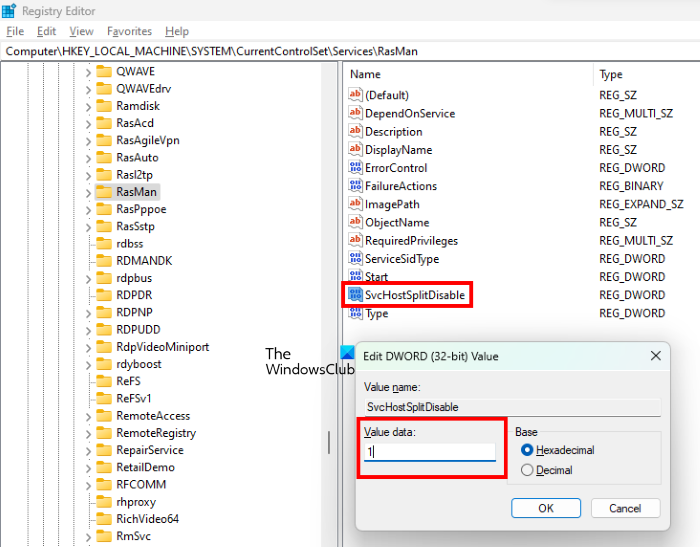
Make sure that the RasMan key is selected on the left side. Now, check whether the SvcHostSplitDisable value exists on the right side or not. If not, you have to create it manually.
To do so, right-click in the empty space and go to “New > DWORD (32-bit) Value.” Right-click on the newly created value and select Rename. Name that value to SvcHostSplitDisable.
Double-click on the SvcHostSplitDisable Value and enter 1 in its Value data. After that, click OK.
Now, navigate to the following path in the Registry Editor.
HKEY_LOCAL_MACHINE\SYSTEM\CurrentControlSet\Services\RemoteAccess
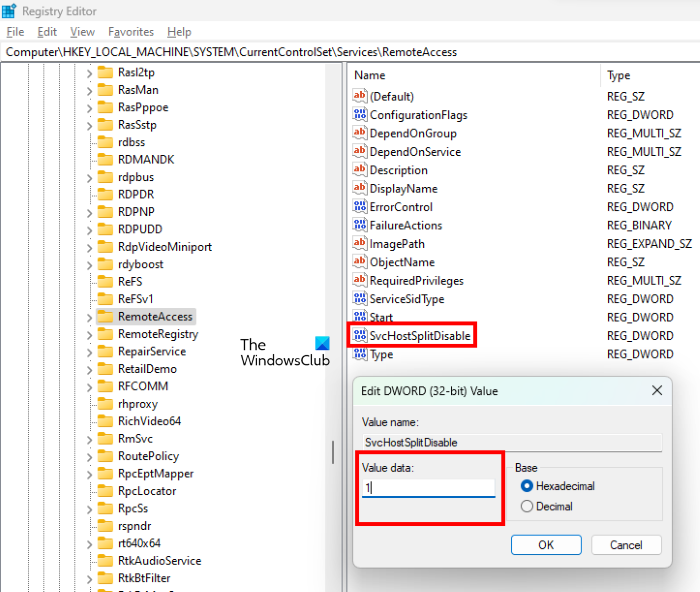
Make sure that the RemoteAccess key is selected on the left side. Check if it contains the DWORD (32-bit) SvcHostSplitDisable Value on the right side. If not, create it manually by following the procedure described just before.
After creating the SvcHostSplitDisable Value, double-click on it and enter 1 in its Value data.
After creating the above two values in Registry, restart your computer. After restarting the device, the problem should be fixed. If not, try the next solution.
2] Verify the RouterManagers key Values in the Registry
This solution is for the users who are getting the following error message with event ID 20103:
Unable to load C:\Winnt\System32\Iprtrmgr.dll
Open the Registry Editor and go to the following path.
HKEY_LOCAL_MACHINE\System\CurrentControlSet\Services\RemoteAccess\RouterManagers\IP
Make sure that the IP key is selected on the left side. Check whether the following Values are present on the right pane or not.
- DLLPath
- GlobalInfo
- ProtocolID
If yes, the above-mentioned Values should show the following Data type and Value data.
DLLPath
Data type: REG_EXPAND_SZ
Value data: %SystemRoot%\System32\Iprtrmgr.dllGlobalInfo
Data type: REG_BINARYProtocolID
Data type: REG_DWORD
Value data: 0x21 (Hexadecimal)
Now, go to the following path in the Registry Editor and check if the ServiceDLL is present on the right pane.
HKEY_LOCAL_MACHINE\SYSTEM\CurrentControlSet\Services\RemoteAccess\Parameters
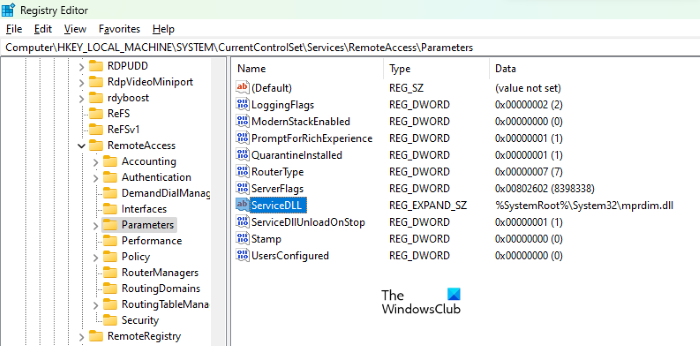
If the ServiceDLL is not there, you have to export the above-mentioned registry branch from a computer on which the RRAS is working and then import that registry branch to your computer. To do so, you need to log in on another computer as an administrator.
Open the Registry Editor on which the RRAS is working and go to the above path. After that, go to “File > Export.” Save that branch to your Pendrive. Now, connect the Pendrive to your computer and open the Registry Editor. After that, Go to “File > Import” and select the file from your Pendrive. This should fix the issue.
If the issue still persists, reinstall the modem by following the instructions given below:
- First, disable the Routing and Remote Access service.
- Right-click on Start and select Device Manager.
- In the Device Manager, expand the Modems node and uninstall your Modem driver by right-clicking on it.
- Now, restart the server and wait till the Plug and Play service redetects the Modem.
- Enable the Routing and Remote Access service.
Read: Fix Enter network credentials error on Windows 11/10.
3] Reset the TCP/IP or Internet Protocol
If the problem is occurring due to the corruption in TCP/IP or Internet Protocol, resetting the Internet Protocol may fix the problem. If that does not help, you may use the Network Reset button and see.
4] Disable IPv6
Disabling IPv6 has fixed the issue for some users. You can try this solution if the above fix did not solve your problem. The steps to disable the IPv6 are as follows:
Open the Registry Editor by following the steps described above.
Navigate to the following path.
HKEY_LOCAL_MACHINE\SYSTEM\CurrentControlSet\Services\Tcpip6\Parameters
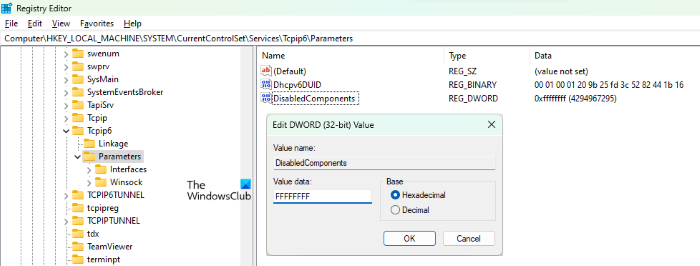
Make sure that the Parameters key is selected on the left side. Create a new DWORD 32-bit Value, named DisabledComponents. We have already described how to create a DWORD 32-bit Value above in this article. If the value DisabledComponents already exists on the right side, no need to create it.
After creating the DisabledComponents value, double-click on it and change its Value data to FFFFFFFF. Click OK to save the changes.
Close the Registry Editor and restart your computer.
5] Restart the Routing and Remote Access Service
You can restart the Routing and Remote Access Service from the Windows 11/10 Services app. The following instructions will guide you on this:
- Launch the Run command box by pressing the Win + R keys.
- Type
services.mscand click OK. - In the Services app, scroll down the list of services and locate Routing and Remote Access.
- Once you find it, right-click on it and select Properties.
- Under the General tab, click on the Startup type drop-down and select Automatic (Delayed Start).
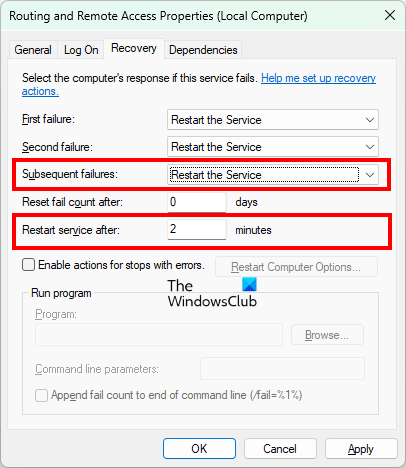
- Now, go to the Recovery tab and select Restart the Service in the Subsequent failures drop-down.
- Leave the Restart service after option to the default value, 2 minutes.
- Click Apply and then OK.
- Restart your computer. The service should be started after a delay of 2 minutes automatically.
Read: How to fix Wireless Network Connection Error 0x00028002.
What is Routing and Remote Access in Windows 11/10?
The RRAS or Routing and Remote Access Service is used to provide site-to-site connectivity by using a VPN or dial-up connections. By using RRAS technology, you can deploy VPN connections that let users access your organization’s network remotely. In short, the RRAS technology offers routing services to businesses in LAN or WAN environments by using secure VPN connections.
How do I disable Remote Access and Routing services?
To disable the Routing and Remote Access Service, you must be a member of the Administrators group. The steps to disable RRAS are listed below:
- Open Routing and Remote Access.
- Right-click on the computer name for which you want to disable the RRAS.
- Click on the Disable Routing and Remote Access option.
Hope this helps.
Read next: Network and Sharing Center not opening in Windows 11/10.
Leave a Reply