Print Titles is a feature in Microsoft Excel that enables its users to print a row or a column heading on each page of a report. This makes your printed copy easier to read and spot vital details mentioned therein. That said, Print Titles are not the same as the header of a report. Although both appear on the same page, the former occupies the body of the main report while the latter prints text in the top margin of the report.
For designating a row or a column as the print title for a report, follow the steps outlined in this tutorial.
Designate a Row or Column as Print Title of an Excel Report
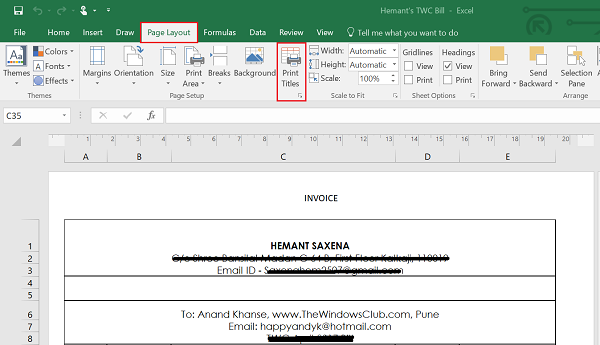
Launch the Microsoft Excel worksheet you would like to print. Then, from the Ribbon menu that appears at the top of the Excel Sheet, select ‘Page Layout’ tab.
Next, look for & click on the ‘Print Titles’ option under it. Please note that the Print Titles command will appear dimmed if you are working in cell editing mode, if a chart is selected on the same worksheet, or if you do not have a printer installed.

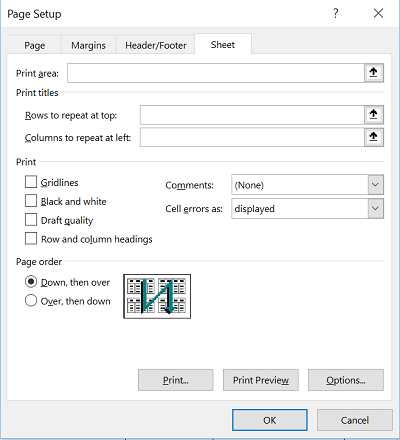
On the Sheet tab, under Print titles, do one or both of the following:
- In the Rows to repeat at top box, type the reference of the rows that contain the column labels.
- In the Columns to repeat at left box, type the reference of the columns that contain the row labels.

For instance, if you would like to print column labels at the top of every printed page, you could enter $1:$1 in the Rows to repeat at top box.
Once you are done with the job of setting up your worksheet to include row and column headings or labels as Print Titles on every page, simply proceed further to print your worksheet. The changes will be visible only in the preview of the sheet and not the original copy.
If you have selected more than one worksheet for Print Titles, the Rows to repeat at top and Columns to repeat at left boxes will not be available in the Page Setup dialog box.
To clear print titles from a report if you no longer need them, open the Sheet tab of the Page Setup dialog box and then delete the row and column ranges from the ‘Rows to Repeat at Top and the Columns to Repeat at Left text’ boxes.
Click OK or press Enter.
Read: How to change default number of Worksheets in Excel
How do I select rows and columns to Print in Excel?
To select rows and columns to print in Excel, you must choose the rows and columns first. Then, you need to go to the Sheet Options and tick the Print checkbox. Alternatively, you can press the universal keyboard shortcut to print, Ctrl+P. It will print the selected rows and columns within moments.
How do you set row 1 to be a Print title so it will be printed at the top of every page?
To set row 1 to be a Print title so it will be printed at the top of every page, you need to follow the aforementioned steps one after one. From here, you need to choose row 1 in the Rows to repeat at top option. It is visible under the Print titles section. Following that, your selected row will be the title on every page.
That’s all! Hope this guide helped.
Leave a Reply