On your Windows 11 or Windows 10 computer, whether you’re trying to use the Task Scheduler to run a task at a specific time or when an event occurs, you can create a task in at least two different ways using the basic and advanced settings. In this post, we show you how to run Scheduled Task after another Task completes.

The Task Scheduler is a tool that ships with the Windows OS that allows PC users to create and run virtually any task automatically on their system. Typically, the system and certain apps use the scheduler to automate maintenance tasks – for example, disk defragmentation, disk cleanup, updates, and so on. With this experience, you can start applications, run commands, and execute scripts on a particular day and time, or you can also trigger tasks when a specific event occurs. Tasks are the main component of the Task Scheduler – and the following are the components:
- Tasks
- Task Actions
- Task Triggers
- Task Registration Information
- Task Idle Conditions
- Security Contexts for Tasks
- Repeating A Task
- Automatic Maintenance
How to run Scheduled Task after another Task completes
Windows Task Scheduler allows you to create scheduled tasks that can run both on schedule and when a certain event appears in the Event Viewer. For this post, let’s say you have a project that you’re working on, and you have two tasks/jobs, the first task called Task1, and the second task called Task2. Now, you have a requirement where Task2 should run immediately after Task1 has been completed successfully. There are several ways to achieve this – for this particular project, to fulfill the requirement on Task2, you would trigger Task2 based “on an event”, which is the successful completion of Task1.
Read: How to schedule PowerShell script in Task Scheduler
So, if you want to run a Scheduled Task after another Task completes, you can follow the simple step-by-step instructions outlined below to easily accomplish this task. Based on our example or case scenario, follow these steps to successfully create a trigger on Task2:
- Press the Windows key + R keys to invoke the Run dialog.
- In the Run dialog box, type taskschd.msc and hit Enter to open Task Scheduler.
- In the left pane of Task Scheduler, expand the Task Scheduler Library.
- Now, select the folder that contains Task2.
- In the middle pane of the opened folder, right-click the task.
- Select Properties from the context menu.
- On the task Properties window, click the Triggers tab.
- Click on the New button.
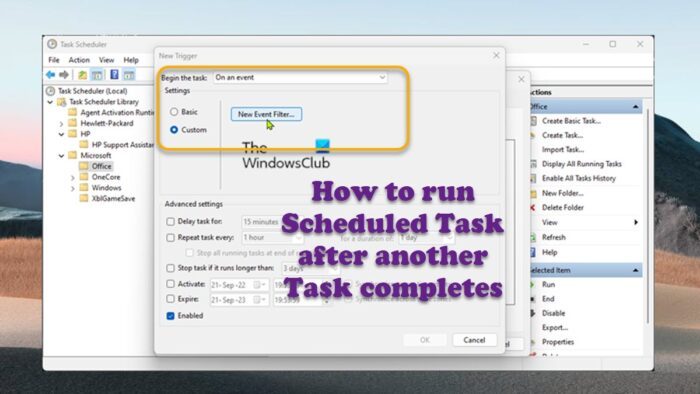
- On the New Trigger window, click the drop-down menu for Begin the task.
- Select the On an event option from the menu.
- Next. in the Settings section, select the radio button for the Custom option.
- Click on the New Event Filter button.
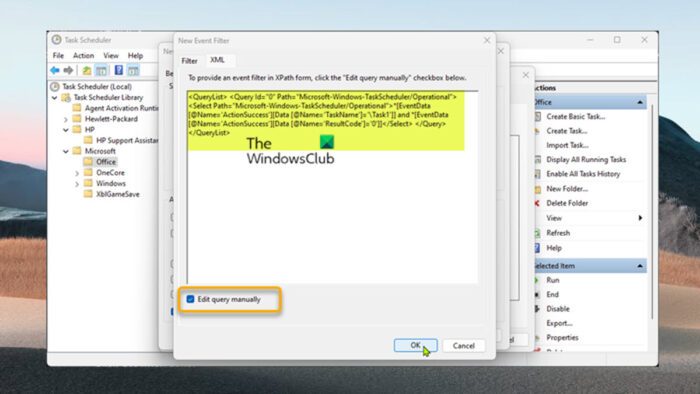
- Next, on the New Event Filter window, click on the XML tab.
- Checkmark the Edit query manually option at the bottom of the window.
- Click the Yes button to continue if you get the following message:
If you choose to manually edit the query, you will no longer be able to modify the query using the controls on the Filter tab. Would you like to continue?
Now, you will need to enter the XPath of the event filter which will be used to query the Windows Event. In our example, this is where you specify the trigger to start Task2 when Task1 has been completed successfully.

- In the XML body, the XPath event filter that will be used in this case will look something like the following. Note that you can adjust the code below per your requirement. The most likely would be the Task Name.
<QueryList>
   <Query Id="0" Path="Microsoft-Windows-TaskScheduler/Operational">
      <Select Path="Microsoft-Windows-TaskScheduler/Operational">*[EventData[@Name='ActionSuccess'][Data [@Name='TaskName']='\Task1']] and *[EventData[@Name='ActionSuccess'][Data [@Name='ResultCode']='0']]</Select>
   </Query>
</QueryList>- Click OK when done.
- Finally, click OK all through to close all windows.
- Exit Task Scheduler.
On a final note, in Windows 11/10, by default the Task History for Task Scheduler is disabled, so to make this work, you will need to enable it. To do this you can go to the Task Scheduler, and without selecting any task, click on Action on the top menu and then click Enable All Tasks History.
Read: How to enable, view, and clear Task Scheduler History
That’s it! Now, you can run Task1 (manually, scheduled, or using PowerShell: Start-ScheduledTask mytasks\Task1). When Task1 completes successfully, Task2 will be automatically started immediately.
Also read:
- How to Import or Export Tasks from Task Scheduler
- How to rename Scheduled Task in Windows Task Scheduler
- How to delete Scheduled Task in Windows
How do I make Task Scheduler run automatically?
To configure Windows Task Scheduler to automatically run a ruleset: From the Start menu, select Administrative Tools > Task Scheduler. Under Task Scheduler (Local), select Task Scheduler Library and choose New Folder from the Actions panel. Enter Datacap and click OK.
Read: Schedule Shutdown or Restarts using Task Scheduler in Windows
Does Task Scheduler allow you to run tasks as another user?
Microsoft Windows Server 2003 – Task Scheduler Allows a Non-Admin User to Create a Task that Runs Under Another User’s Account. ISSUE: A non-administrator user can schedule a task that runs under another user’s account by using Task Scheduler. However, Task Scheduler will not run if the computer is off.
Read:
- Scheduled Tasks running forever, randomly, or multiple times
- Task Scheduler not running, triggering, or starting programs
What weekly tasks would be useful to run in Task Scheduler?
This will be largely dependent on individual use cases. In general, the following can be simple daily/weekly/monthly tasks you can run using the Task Scheduler:
- Launch Chrome at 8AM every morning.
- Automatically Send a Report Monthly to your Bbss.
- Reboot your computer Once Every Day.
- Scan your PC Every Other Week.
- Refresh your Internet Connection Daily.
- Log Performance Monitor Statistics.
What is Run with the highest privileges in Task Scheduler?
Run with highest privileges – this option essentially gives the task administrator privileges the same way the User Account Control (UAC) prompt would do it. If you plan to use this for administrative purposes, you will probably want to enable this option.