Running a computer benchmark test on any PC tells us about its capabilities. Benchmarking is a method of quantifying a system’s performance. It helps you make your next hardware purchase decision. In this article, we will learn how to run the Computer Performance Benchmark Test on Windows 11/10 without using any third-party benchmarking software.
In today’s world, everyone compares their own devices with others. You might remember the Windows Experience Index that used to come with Windows 7. The major task of this index is to provide an accurate or approximate benchmark of a system. It was a simple, basic yet useful utility designed to measure the performance of your own Windows system.
Run Computer Performance Benchmark Test
Performance Monitor is the most complete and trustworthy tool that comes with every copy of Windows 11/10. It allows users to view and analyze applications and hardware data to fix system performance-related problems. In addition to the Performance Monitor Tool, there are other ways of benchmarking your system.
In this article, we will talk about some of these ways along with Performance Monitor. When it comes to any type of tool to test your system, built-in tools are way better than any third-party software. We will be benchmarking our system using three methods:
- Running Performance Monitor Tool
- Using Command Prompt
- Using Windows PowerShell
1] Running Performance Monitor Tool
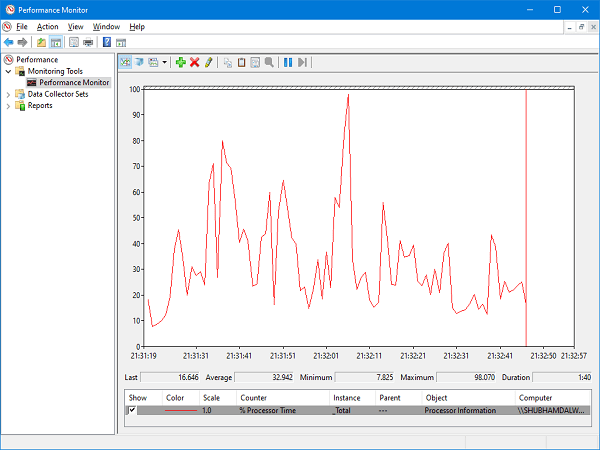
You can run this tool in many ways along with different data sets. But to keep it simple, we will generate two reports i.e., System Performance and System Diagnostic reports
System Performance
Press Win + R keys on your keyboard. The Run window will open up.
Type perfmon and hit Enter. The Performance Monitor application will open up and start collecting the required data. Wait for the application to finish collecting the data and process it.
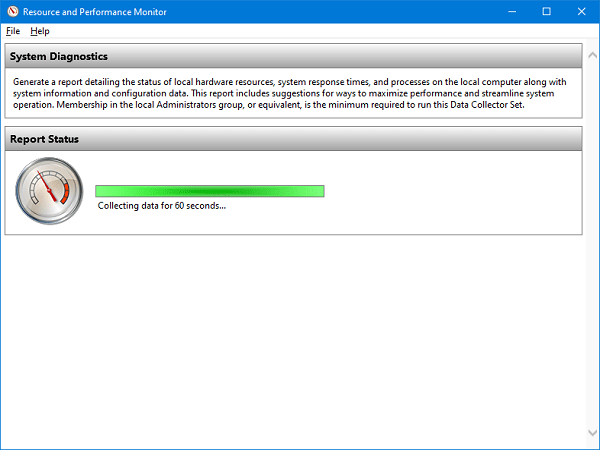
In the System summary, you can see all the details about your computer. From device name to available memory, disk space, processor information, etc.
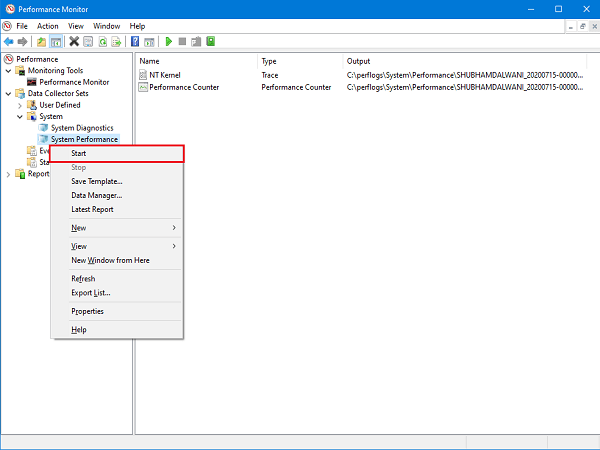
On the left panel, enlarge the Data Collector Sets > System.
Right-click on the System Performance and click on Start. Now it will perform the process of data collection again.
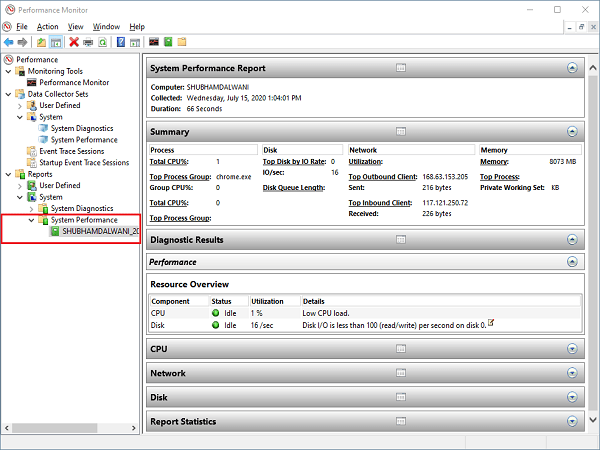
On the left panel, enlarge Reports > System > System Performance.
Click on the report with today’s date in its name. If the process of data collection and processing is yet to finish then wait for some time.
Here you will get a detailed and complete performance report.
It will include the System Performance Report, Summary, Diagnostic Results, Report Statistics, and information about CPU, Network, and Disk usage.
System Diagnostic
Press Win + R keys on your keyboard. The Run window will open up.
Type perfmon /report and hit Enter. The Performance Monitor application will open up and start collecting the required data. Wait for the application to finish collecting the data and process it.
After 60 seconds you will get a Performance Report. Along with some details like CPU, Network, and Disk usage, the report will also certain have details related to device configuration.
Enlarge Hardware Configuration tree, click on Desktop Rating.
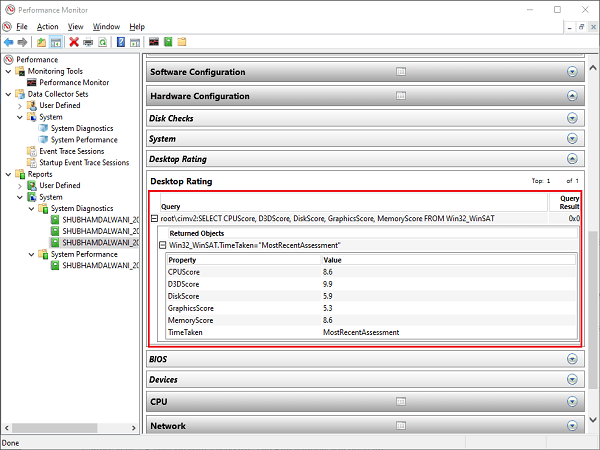
Enlarge the given query and the given sub-query.
You will now get the list of Scores based on your device’s configuration.
Read: What does PC Benchmark mean?
2] Using Command Prompt
If you are a tech enthusiast then you may know that there is nothing that commands cannot do.
Open start menu, type cmd. Select Command Prompt and click on Run as Administrator.
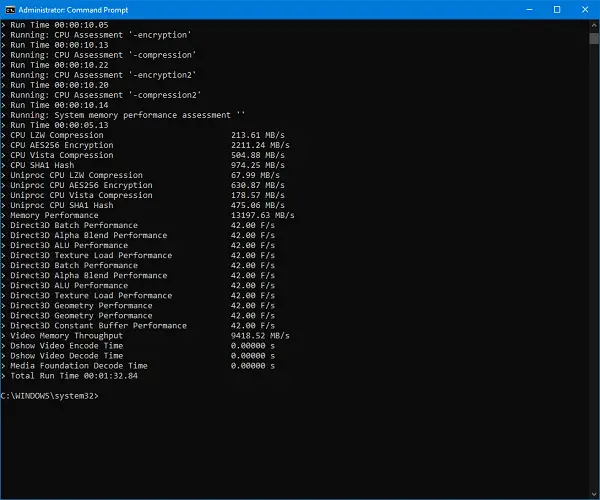
Type the following command and hit Enter:
winsat prepop
Wait for a certain amount of time till the command completes its work.
Once done, you will get a list of results showing how well your system can perform.
Some test results will show data in MB/s (megabytes per second) while others will show in fps (frames per second).
TIP: PerfView is a Performance Analysis & Profiling Tool from Microsoft.
3] Using Windows PowerShell
There are some of the commands which may run only in Command Prompt and some only in Windows PowerShell.
Open Start Menu, type PowerShell. Select Windows PowerShell and click on Run as administrator.
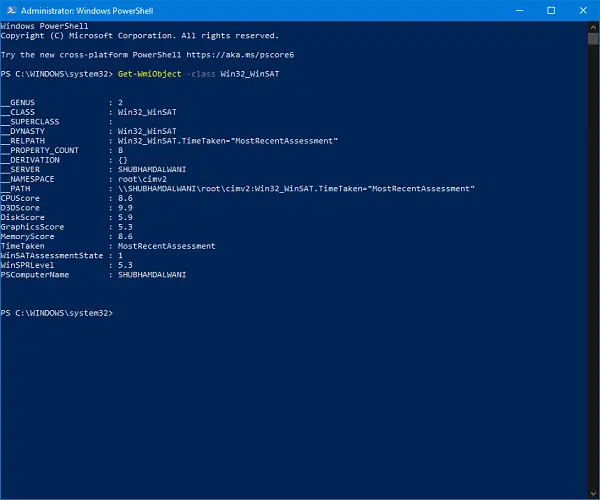
Type the following command and hit Enter:
Get-WmiObject -class Win32_WinSAT
Wait for a certain amount of time till the command completes its work.
Once done, you will get a list of results showing how well your system can perform. The command will give scores to CPU, GPU, Disk and Memory present in the system.
Read: How to run System Diagnostics using System Information Tool?
TIP: This post will show you how to test Hard Drive speed on a Windows computer.
I hope you find this post useful to get started.
Leave a Reply