Windows 11 comes with a setting called Save network bandwidth by playing video at a lower resolution, which helps you save your bandwidth while playing video in some apps. Here is how you can enable it on your Windows 11 computer and start saving some bandwidth while enjoying your favorite movie.

Microsoft Store offers so many apps that often allow you to play videos. Some apps play videos at high resolution to provide the best possible experience when others play low resolution. If you have a high-speed internet connection, most apps often play videos at high resolution by detecting that. However, if you want to watch the video and save the bandwidth, you need to opt for a low resolution. As most of the apps do not have the option to switch between various resolutions, you can use this in-built functionality of Windows 11.
You can enable this setting using Windows Settings and Registry Editor. Here are both the method, and you can follow either of them according to your convenience.
Save network bandwidth by playing video at a lower resolution on Windows 11
To turn on Save network bandwidth by playing video at a lower resolution on Windows 11, follow these steps:
- Press Win+I to open Windows Settings.
- Go to the Apps section.
- Click on the Video playback menu.
- Toggle the Save network bandwidth by playing video at a lower resolution button.
Let’s delve into these steps in detail to learn more.
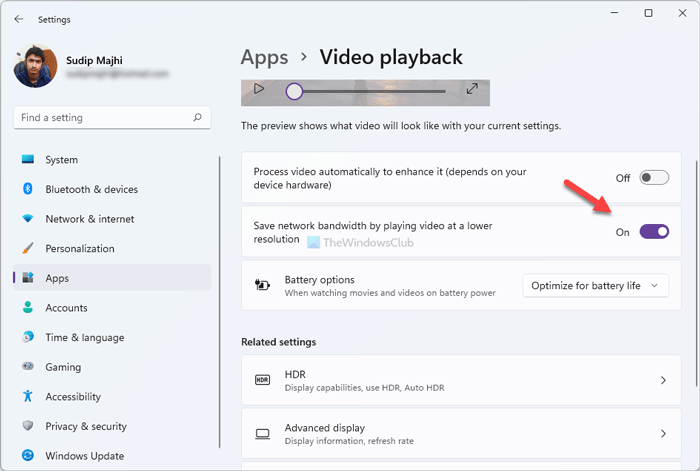
At first, you have to press Win+I to open the Windows Settings panel. Then, switch to the Apps section and click on the Video playback menu.
Here you can find an option called Save network bandwidth by playing video at a lower resolution. You have to toggle the corresponding button to turn it on.

If you want to turn off this option and watch videos in high resolution, you revisit the same place and toggle the same button.
Enable Save network bandwidth by playing video at a lower resolution via Registry
To enable Save network bandwidth by playing video at a lower resolution on Windows 11, using the Registry Editor, follow these steps:
- Press Win+R to open the Run prompt.
- Type regedit, and press the Enter button.
- Click the Yes option.
- Go to CurrentVersion in HKCU.
- Right-click on CurrentVersion > New > Key.Name it as VideoSettings.
- Right-click on VideoSettings > New > DWORD (32-bit) Value.
- Name it as AllowLowResolution.
- Double-click on it to set the Value data as 1.
- Click the OK button.
- Open Task Manager to restart Windows Explorer.
To learn more about these steps, continue reading.
First, you have to open Registry Editor on your computer. For that, press Win+R, type regedit and press the Enter button. If the UAC prompt appears, click the Yes option.
After opening the Registry Editor, navigate to the following path:
HKEY_CURRENT_USER\Software\Microsoft\Windows\CurrentVersion
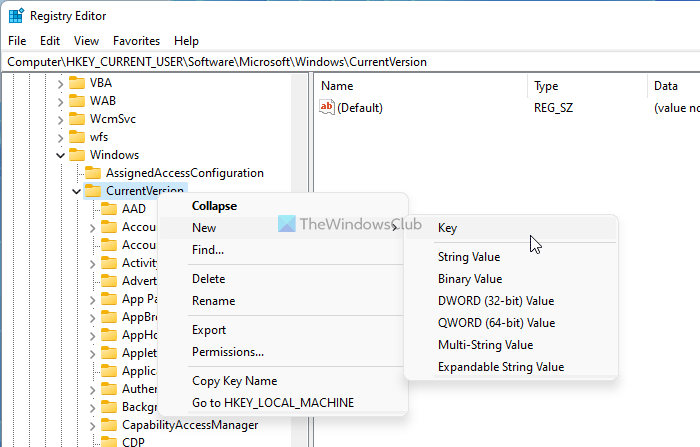
Right-click on the CurrentVersion and select New > Key. Name it as VideoSettings.

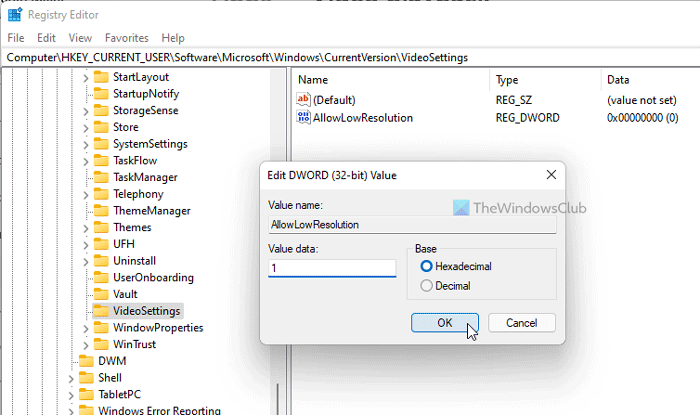
Then, right-click on the VideoSettings, select New > DWORD (32-bit) Value, and name it as AllowLowResolution.
Double-click on the AllowLowResolution REG_DWORD value set the Value data as 1, and click the OK button to save the change.

Open the Task Manager and restart the Windows Explorer process.
Does using video use up bandwidth?
Yes, when you watch a video in any app or browser, it uses a lot of bandwidth. Similarly, it uses the same when you are on a video call via any app such as Skype, Google Meet, Zoom, etc.
How can I save data while watching videos?
There are multiple ways to save data while watching videos, and the methods vary from app to app. However, one common thing is watching the low-resolution video that suits your needs. That is why you can enable the Save network bandwidth by playing video at a lower resolution setting in Windows 11.
Leave a Reply