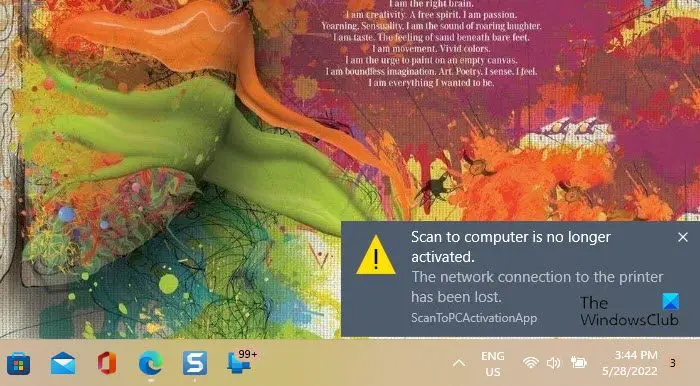
Many Windows users are reporting that their HP Printer has been showing them a notification with the following error message. This message pops out of nowhere in the notification section, annoying many people.
Scan to computer is no longer activated
The network connection to the printer has been lost

In this article, we will talk about this issue and see what you need to do to resolve this issue.
Fix Scan to computer is no longer activated
If you are seeing Scan to computer is no longer activated error message by HP Printer or Windows 11/10 PC, try the following solutions.
- Disable ScanToPCActivationApp
- Turn off Scan to Computer
- Run Printer Troubleshooter
- Restart your Printer
- Update Printer Driver
- Reinstall Printer Driver
Let us talk about this issue in detail.
1] Disable ScanToPCActivationApp

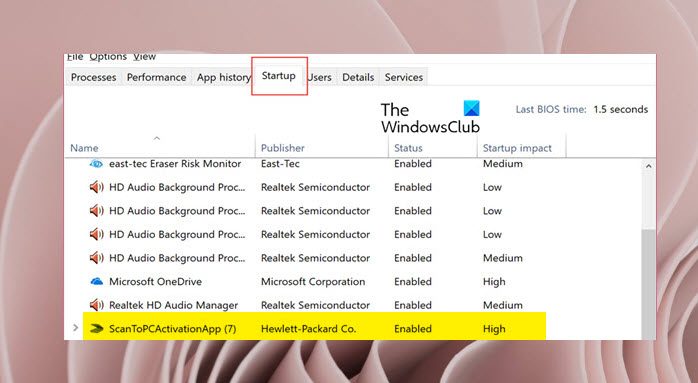
As you can clearly see in the error message, the issue is somewhat related to “ScanToPCActivationApp”. We are going to disable the feature at startup and see if it helps. Follow the given steps to do the same.
- Open Task Manager.
- Go to the Startup tab.
- Right-click on ScanToPCActivation and select Disable.
Restart your computer and hopefully, it will do the job for you.
2] Turn off Scan to computer

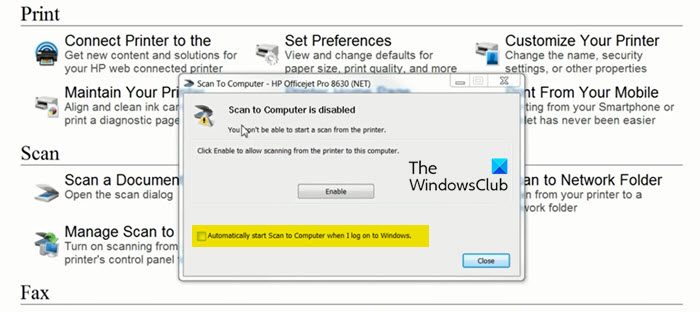
Scan to computer is a feature of HP Printers that automatically scans the document and send it to your computer. As it turns out, the feature is causing issues for a lot of users, you need to disable it to get rid of the issue. However, you can still scan your document manually. To disable Scan to Computer, follow these steps.
- Open HP Printer Assistant.
- Go to Printer, Scan and Fax > Manage Scan to Computer.
- Untick Automatically start Scan to Computer when I log on to Windows and click Disable.
Hopefully, this will do the job for you.
3] Run Printer Troubleshooter
Next up, we are going to use an inbuilt Windows utility that will identify the root cause of the problem and then repair it. To run Printer Troubleshooter, you need to follow the prescribed steps.
Windows 11
- Open Settings.
- Go to System.
- Click on Troubleshoot and then select Other troubleshooters.
- Now, click the Run associated with the Printer.
Windows 10
- Launch the Settings app.
- Click on Update & Security > Troubleshoot
- Then, click on Additional troubleshooters.
- Finally, select Windows Update and click Run the troubleshooter.
You have to follow the on-screen instruction to run the troubleshooter and let it resolve the issue for you. Once have rectified and resolved the issue, you can rest assured that the notification will not pop up.
4] Restart your Printer
Sometimes, the issue can be nothing but a glitch. The glitch can be resolved easily by power cycling your Printer. You need to reboot it completely and see if it helps. Follow the prescribed steps to do the same.
- Turn off your computer and Printer.
- Unplug all the cables that’s connecting your system and printer.
- Wait for 8 to 10 minutes.
- Plug all the cables back in and turn on the Printer.
Now, open your system and see if the notification pops back in. Hopefully, this will resolve the problem for you.
5] Update Printer Drivers
You may also see the error notification if its drivers are outdated. These outdated drivers can be easily updated. We have mentioned the following methods to update your device drivers.
- Install Windows Drivers & Optional Update.
- Use Device Manager to update your drivers.
- Download the latest Bluetooth driver from the manufacturer’s website.
After updating the drivers, reopen your computer and see if the issue persists.
6] Reinstall Printer Drivers
If updating doesn’t work, then maybe your driver is corrupted. We need to reinstall it and see if that helps. To uninstall the driver, you need to open Device Manager, look for Printer Ques, right-click on your printer’s driver and select Uninstall device. Then, right-click on Printer Ques and select Scan for hardware changes.
Hopefully, these solutions will do the job for you.
How do I activate Scan to Computer?
Scan to Computer is usually enabled automatically the moment you connect your Printer to the PC. However, in some cases, users have reported that the feature is disabled, and they want to know how to turn it back on.
Scan to Computer in an HP Printer can be activated using the following steps.
- Open HP Printer Assistant.
- Go to Printer, Scan and Fax > Manage Scan to Computer.
- Check Automatically start Scan to Computer when I log on to Windows and click Enable.
That is how you can enable the feature on your system.
Why is my scanner not recognizing my computer?
There are various reasons why a Scanner is not recognizing your computer, it could be hardware or software-related issues. You should first try and reconnect the whole setup, if there is a loose connection, chances are that you will see the error code in question. In case that doesn’t work, we would recommend you to check our guide on what to do if Scanner is not working.
Also Read: No scanners were detected an error on Windows 11/10 computer