Windows 11/10 automatically defragments the disk. While you can always manually defrag a disk, you can also schedule its run. In this article, we are going to see how to schedule Disk Defragmentation on Windows 11 and more.
Is it good to defrag your Disk?
Disk Defragmentation is a way to organize your disk. It can arrange the data stored on the disk such that the speed of your computer is increased and become more efficient.
Read: Do you need to defrag SSD? What happens if you defrag it?
Schedule Disk Defragmentation on Windows 11/10

To schedule Disk Defragmentation on Windows 11, you can follow the given steps.
- Click on the Start button, search “Defragment and Optimize Drives” or “Disk Defragmentation”, and click Ok.
- Click Change settings.
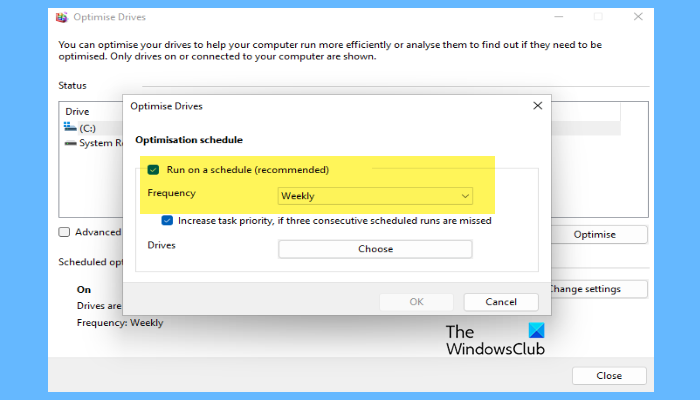
- Tick Run on a schedule (recommended) and from the drop-down menu, select your Frequency.
- Click Choose from Drives.
- Tick the drives you want to defrag, then click Ok.
That’s how you can schedule Disk Defragmentation on Windows 11.
How to check if Disk Defragmentation in Windows 11?

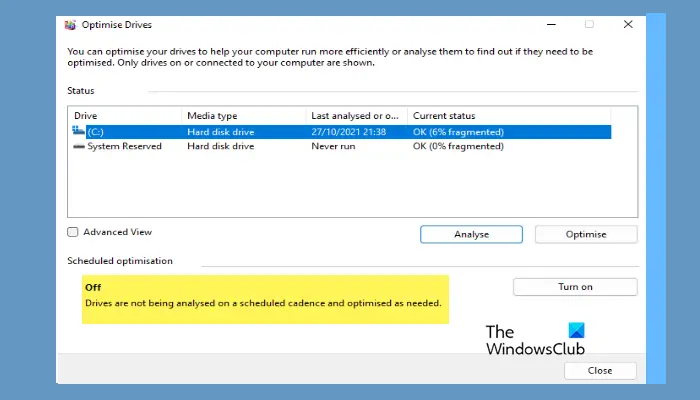
You can always check if a disk is scheduled to be defragged or not. To do that, open Disk Defragmentation by searching it out from the Start Menu. Now, select a drive and see if Schedule optimization is off.
However, not all drives need optimization, hence, it is better to check that. Click Analyze to check if that particular drive needs optimization. If the Current status says Ok, there is no need for you to optimize it.

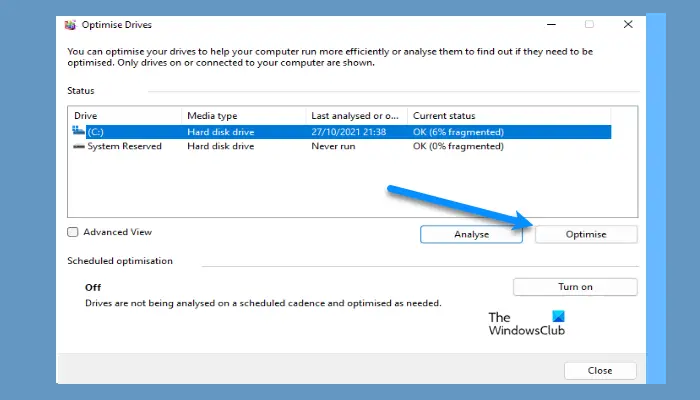
But if there is a need to optimize that drive, click Optimize. Now, wait for the process to complete and it will optimize that drive.
However, it is recommended to schedule optimization (aforementioned) to make sure that all the disks are optimized.
What is the command for Disk Defragmenter?
If you want to defrag a drive using the command-line, you can use a command to do the same. So, open the Command Prompt as an administrator either from the Start Menu or by Run(Win + R), type “cmd”, and hit Ctrl + Shift + Enter.
Type the following command and hit Enter.
defrag C:
You can replace ‘C’ with the drive letter you want to defrag.
Read: Storage Optimizer Error 0x8900002A, Operation requested not supported by hardware
Is it OK to stop defragmentation?
It is completely fine to stop defragmentation, it won’t interfere with the functioning of your computer. However, there is no need to stop the feature, as it is just helping your computer to function better. It is making your computer quicker and increasing its performance.
But if you want to disable Disk Defragmentation, you can go to the same Settings, select a disk, and click Change Settings. Then you can untick Run on a schedule (recommended), and click Ok.
How do I schedule defrag in Windows 11?
To schedule defrag in Windows 11, you need to open the Optimize Drives panel first. For that, search for defrag and optimize drives and click on the individual search result. Then, click the Change settings option and tick the Run on a schedule checkbox. Following that, select the timing as per your requirements and click the OK button to save the change.
How do I automatically defragment my hard drive?
To automatically defragment your hard drive, you need to schedule the defragmentation. Fortunately, there is an in-built option for Windows 11 and Windows 10 computers. You need to open the Optimize Drives wizard and click the Change settings button. Next, tick the corresponding checkbox and select the timing to get the job done.
That’s it!
Read Next: Best Free Defragmentation Software for Windows 11.
Leave a Reply