Microsoft has provided Windows 11/10 with built-in security software, Windows Defender. Microsoft Defender or Windows Defender is an anti-malware component of Windows Security. It’s free, easy to use, and has great features like other competitor antivirus software in its class. In this post, we will see how to schedule a full scan in Windows Defender.
Windows Defender Antivirus, earlier known simply as Windows Defender, is a built-in anti-malware software component in the Windows operating system. This software provides real-time protection to monitor, detect, and remove malware from your system and protect your device and files. While this software runs in the background mostly during idle system moments, you can also run Windows Defender Antivirus on your own schedule or on demand at any time. Windows Defender Antivirus gives you the option to start a scan manually or schedule a scan at a specific time according to your needs.
How to schedule a Windows Defender scan in Windows 11/10
To schedule periodic full scans in Windows Defender that will run in the background and safeguard your Windows from malware, you have to make use of the built-in Task Scheduler.
1. Press Windows Key + R combination and put taskschd.msc in the Run dialog box. Click OK.
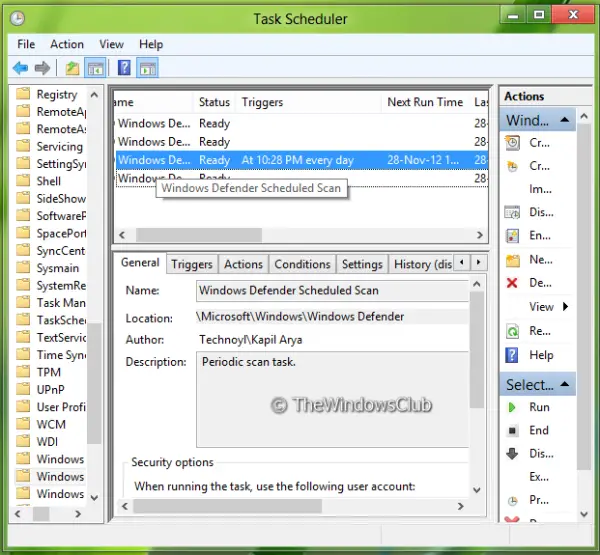
2. On the Task Scheduler window, in the left pane, navigate to Task Scheduler > Microsoft > Windows > Windows Defender.
Now in the mid pane, select the third name that is Windows Defender Scheduled Scan as shown below:

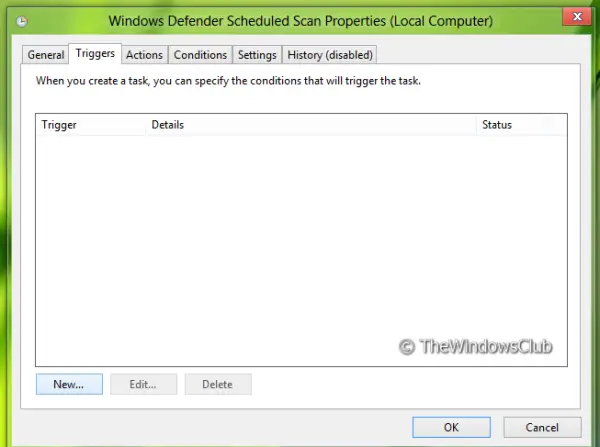
3. Now you’ll be taken to the following location, where you have to switch to the Triggers tab.
Click New.
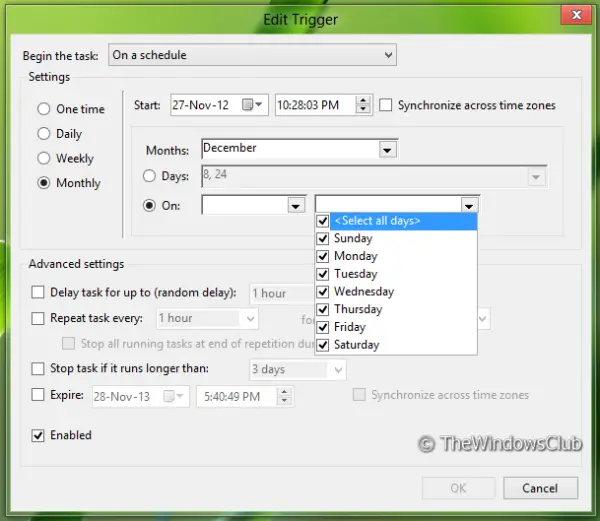
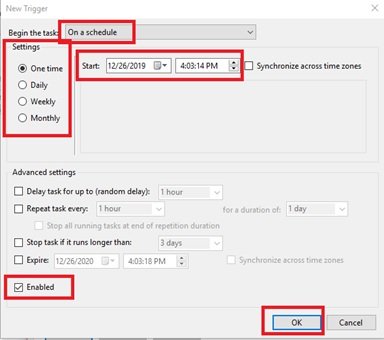
4. Now we’re going to schedule the scan, so configure it as shown in the window below. Firstly choose to Begin the task as On a schedule, then in the Settings section, select your priority to have scanned.
Make sure you have checked Enabled at the left bottom corner of this window. Finally, click OK.
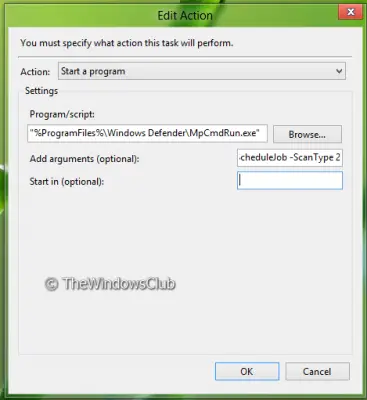
5. Next, switch to Actions tab and click Edit.
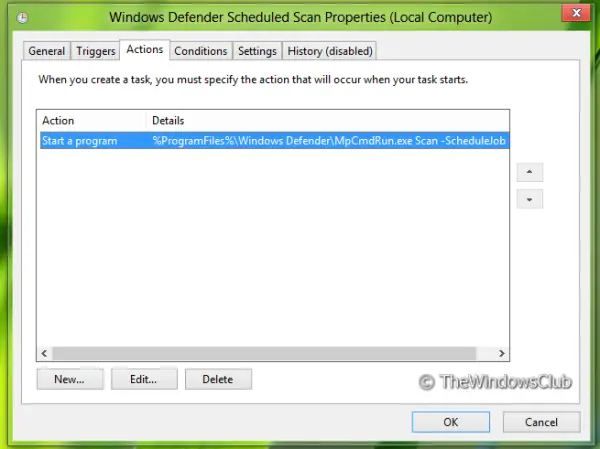
6. First of all, embed the Program Script within quotes as it is not there, by default.
And to this, you can add two types of arguments here:
Scan -ScheduleJobfor Quick Scan andScan -ScheduleJob -ScanType 2for Full Scan.
Click OK.
7. Now come to Conditions tab and select the Power options according to your best-suited priority.
It will be beneficial to set your device to ON itself if it is not ON at the scheduled time. Here you can also configure the priority for the network.
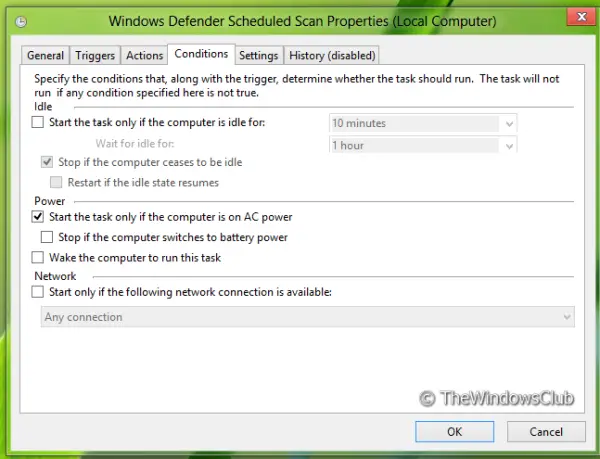
There are other useful options here, like the ‘Conditions’ tab. If you are on a laptop, you might want to select the “Stop if the computer switches to battery power” and “Start the task only if the computer is on AC power” options. These options prevent the task from running when the system is expected to shut down due to low battery. In addition, the “Wake the computer to run this task” option is very useful for those who put their system to sleep when not in use. When this option is enabled, Windows independently wakes the system, runs the scan, and puts it back to sleep when done.
8. Thus we’re done now as far as scheduling is concerned. You can confirm it by in the window, where the Next Run Time is shown as per your choices provided in step 4.
Windows Defender will automatically scan your computer at the scheduled time.
Once you complete these steps, the built-in antivirus will run automatically.
Schedule a Windows Defender Antivirus custom scan
Sometimes the built-in task doesn’t work the way it is expected to; also, some users come across the Error 0x2. In such circumstances, users can set up Windows Defender to automatically scan by setting up a custom schedule using a new task. Try the below-mentioned steps:
1] From the ‘Start Menu’ open the ‘Task Scheduler’
2] Right-click the ‘Task Scheduler Library’ and select the ‘New Folder’ option from the menu.
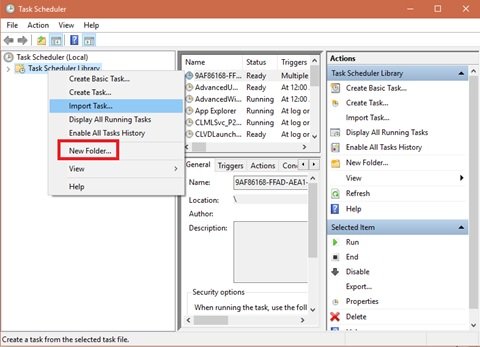
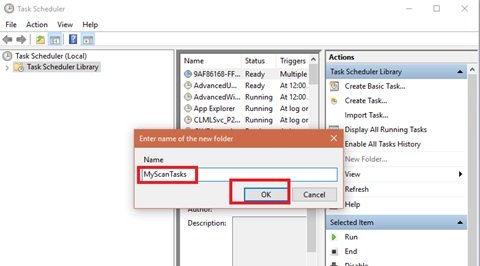
3] Type a custom name for the new folder. In this example, we set it as ‘MyScanTasks’
4] Now click ‘Ok’
5] Now expand the ‘Task Scheduler Library’ branch and select the antivirus task folder that you just created i.e. ‘MyScanTasks’
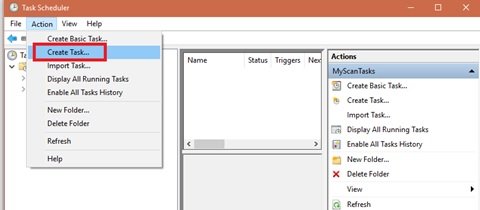
6] Click the ‘Action’ menu on the top of the window, and select ‘Create Task’
7] Specify the task.
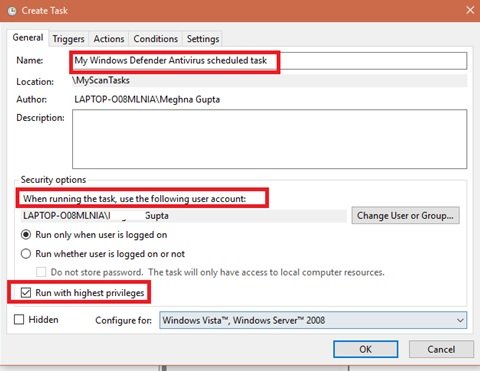
8] In the ‘Name’ section, type in a descriptive name for this task. In this example, ‘My Windows Defender Antivirus scheduled task’
9] In the ‘Security options’ section, you can configure which user account can run the task
10] Check the option ‘Run with highest privileges’.
11] Now, click the ‘Action’ tab and hit the ‘New’ button
12] Add the Windows Defender Antivirus program to the task
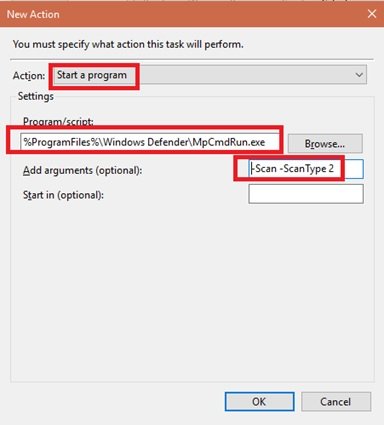
13] Use the ‘Action’ drop-down menu and select the ‘Start a program’ option.
14] Under the ‘Settings’ section, in the ‘Program/script’ field, specify the path for the Windows Defender Antivirus program:
%ProgramFiles%\Windows Defender\MpCmdRun.exe
15] In the “Add arguments” field, lay down the type of scan you want to run:
-Scan -ScanType 2
16] Hit ‘OK’
17] Now, in the ‘Triggers’ tab, click ‘New’ and specify the time settings. The steps here are the same as the above when setting up Windows Defender to automatically scan using the built-in task.
Once you complete these steps, authenticate with your account credentials, and then the Windows Defender Antivirus will do its job automatically on the given schedule.
I hope you found the article useful.
Next, learn how to update Windows Defender even when Automatic Windows Updates is disabled.

Brilliant tutorial Kapil
Why use that awful thing when you can get the free version of Superantispyware?
Great tutorial, but WTF Microsoft? Why can’t you schedule a scan right in Windows Defender? Why can’t I have Security Essentials in Win8??? I am an advanced computer user and Win8 has thrown me for a loop. Can’t wait to see the reaction of the masses.
Does it automatically get the updates first?
Nope!
I did this a while back and got it to work.
You have to give your User Account a password, and then use that password on the Scheduled Task (to get updates).
Here are my notes. I’ll know for sure if it works Thursday. I think it will.
You want to see 0x0 in the Last Result.
* * * * * * * * * * * * * * * * * * * * * * * * * * * * * * * * * * * * * * * *
Task Scheduler / Microsoft / Windows / Windows Defender
Highlight “Windows Defender Scheduled Scan” / Show-Hide the Action Pane / Enable All Tasks History
Then you can see what happens in the History
* * * * * * * * * * * * * * * * * * * * * * * * * * * * * * * * * * * * * * * *
Go to a command prompt to see all the settings for: MpCmdRun.exe
cd Program Files Windows Defender MpCmdRun /?
* * * * * * * * * * * * * * * * * * * * * * * * * * * * * * * * * * * * * * * *
Here’s what I see in my Win Defender folder, below (not in this order).
It’s set to get the updates every day, starting at 7 am, and check for updates every 6 hours.
On Thursdays, Win Defender runs a Full Scan at 7:05 am (it will have gotten the update first at 7 am)
1, 2, and 3 are not scheduled to run. Should they be?
– – – – – – – – – – – – – – – – – – – – – – – – – – – – – – – – – – – – – – – –
1.) Windows Defender Cache Maintenance
2.) Windows Defender Cleanup
3.) Windows Defender Verification
4.) Windows Defender Scheduled Scan
. . . Weekly on Thursdays at 7:05 am / Enabled
. . . Program/script: “C:Program FilesWindows DefenderMpCmdRun.exe”
. . . Add arguments (optional): -Scan -ScanType 2
5.) Windows Defender – Get Update … I think there’s an issue if you call it: Windows Defender Update
. . . General / Description / Get updates
. . . General / Run whether user is logged on or not
. . . General / Run with highest privileges
. . . General / Configure for: Win 8
. . . General / Change User or Group / SYSTEM . . . previously: NT AUTHORITYSYSTEM . . . No . . .
. . . General / Change User or Group / leave it as your profile name
. . . . . . Right-click / Run . . . It doesn’t appear to run. I click Refresh, and then it deletes itself. Why?
. . . . . . If I do: Task Scheduler / Run as Administrator, and set it up . . . then it says SYSTEM
. . . . . . Right-click / Run . . . Now it runs, 0x0 . . . but if I close and re-open Task Scheduler, it disappears.
. . . . . . I did this a while back – Need to give the User Account a password, and use it here – then it will work
. . . Daily at 7:00 am … Recur every 1 days … Repeat task every 6 hours … for a duration of: Indefinitely
. . . Program/script: “C:Program FilesWindows DefenderMpCmdRun.exe”
. . . Add arguments (optional): -SignatureUpdate -MMPC
. . . [check] Run task as soon as possible after a scheduled start is missed
. . . Ok / Now it asks for the User Account Password
– – – – – – – – – – – – – – – – – – – – – – – – – – – – – – – – – – – – – – – –
They combined MSE into Win Defender, but didn’t change the name. Use Task Scheduler to get the updates first and then run a full scan. Please see my notes below.
http://webtrickz.com/how-to-automatically-login-in-windows-8-without-entering-a-password/
If you don’t want to enter the password at logon: Run / netplwiz
Under the Users tab, select the Administrators account and uncheck the option:
“Users must enter a user name and password to use this computer.”
Click Ok / Enter password to confirm / Restart PC
Windows will also ask for the password in case you Log Off or Lock your Windows.
It will even ask for the password when resuming from Sleep mode, but that can be disabled too:
Win 8 / Bottom right – Gear – Settings / Bottom right – Change PC Settings /
Users / Click on the Change button below / Change it from:
Any user who has a password “must enter it” when waking this PC
to
Any user who has a password “doesn’t need to enter it” when waking this PC
Summarized from another page, webtrickz
How to Automatically Login in Windows 8 without entering a Password
It won’t let me include the URL.
* * * * * * * * * * * * * * * * * * * * * * * *
If you don’t want to enter the password at logon: Run / netplwiz
Under the Users tab, select the Administrators account and uncheck the option:
“Users must enter a user name and password to use this computer.”
Click Ok / Enter password to confirm / Restart PC
Windows will also ask for the password in case you Log Off or Lock your Windows.
It will even ask for the password when resuming from Sleep mode, but that can be disabled too:
Win 8 / Bottom right – Gear – Settings / Bottom right – Change PC Settings /
Users / Click on the Change button below / Change it from:
Any user who has a password “must enter it” when waking this PC
to
Any user who has a password “doesn’t need to enter it” when waking this PC
^^ Thanks for your inputs Slack :)
Can you please elaborate this step:
…./ Show-Hide the Action Pane / ….
I clicked that button, Show-Hide the Action Pane
. . . because then I could see in the column at right: “Enable All Tasks History”
I clicked to enable it, so then you can see what happens in the History.
There may be another way to get the Action Pane through the drop-down menus across the top.
Keywords to google for pages that explain the error / status codes:
Microsoft Developer Network, System Error Codes, (0-499), The operation completed successfully. (0x0)
Windows Dev Center, Windows Desktop, System Error Codes, (0-499), The operation completed successfully. (0x0)
Windows Dev Center, Windows Desktop, Task Scheduler Error and Success Constants, The task is currently running, (0x41301)
– – – – – – – – – – – – – – – – – – – – – –
Observations:
My computer wasn’t on before the start time. Win Defender didn’t get the update before running.
The scheduled scan took longer than if I ran it manually.
– – – – – – – – – – – – – – – – – – – – – – – – – – – – – – – – – – – – – – – –
It was taking about 1 hour 20 minutes to complete, if I ran Win Defender manually. I do not have it set to Scan archive files.
If it’s set to scan inside archives, and you have a lot of zip, cab, iso, etc. files, then it can take a very long time.
It started at 7:53 am. It is now 12:08 pm. That’s 4 hours and 15 minutes, and it still says: (0x41301), which means, “The task is currently running”
I right-click in the status area and select Refresh – I see that it has actually completed, (0x0)
The History shows it completed at 10:09 am, so it actually only took 2 hours and 16 minutes.
. . . To figure out how long it takes, look at the times for: Action started to Action completed
That’s longer than usual. I think that indicates that it scanned the archive files.
– – – – – – – – – – – – – – – – – – – – – – – – – – – – – – – – – – – – – – – –
Per the info in the DOS prompt for MpCmdRun /?
Return code 0 = no malware found, no additional user action required
Return code 2 = malware found, additional action required, see History for more info
If I look under the History tab / Task Category – Action completed … look under the General tab below, it says:
Task Scheduler successfully completed task . . . with return code 0.
If it has a Return code of 2, does it give you a message?
Or, is the only way you’ll know about Return code 2, is if you look here?
– – – – – – – – – – – – – – – – – – – – – – – – – – – – – – – – – – – – – – – –
Can I set it so it doesn’t scan archive files?
Go to a command prompt to see all the settings for: MpCmdRun.exe
cd Program Files Windows Defender MpCmdRun /?
I take another look at the available settings.
-Scan Type 0 . . . is the “Default, according to your configuration”
. . . So that means it will scan how I have it set in Win Defender (?) – Scan archive files is un-checked – How long does it take?
If I run Win Defender manually, it takes about 1 hour and 20 mins
. . . It only took 3 minutes! That’s not even how long a Quick Scan takes. I wonder what it does here.
Before I ran the above scan, I right-click on “Get Update” / Run . . . it says Running . . . after two minutes, that seems like it’s too long
I right-click on the status area / Refresh, and yes, I see that it actually already got the update (0x0)
How is the Refresh rate determined for the status area? That could be improved.
– – – – – – – – – – – – – – – – – – – – – – – – – – – – – – – – – – – – – – – –
The other Scan Type options are:
1 = Quick scan . . . don’t want this, I need a Full Scan, except for archives
3 = File and directory custom scan . . . this gets too specific, and they don’t show you the syntax for the path – like, I would want to do drives C: and D:
Looks like I will have to settle for Type 2. Ok, that’s not so bad.
– – – – – – – – – – – – – – – – – – – – – – – – – – – – – – – – – – – – – – – –
What about these 3? There’s no Trigger. They’re all -IdleTask
They must run when the computer is idle.
Windows Defender Cache Maintenance, -IdleTask -TaskName WdCacheMaintenance
Windows Defender Cleanup, -IdleTask -TaskName WdCleanup
Windows Defender Verification, -IdleTask -TaskName WdVerification
I can run them manually, though, when I check the Result code for my Win Defender scan.
Highlight them all / Right-click – Run / Right-click – Refresh, after a minute
– – – – – – – – – – – – – – – – – – – – – – – – – – – – – – – – – – – – – – – –
I’ve put a Shortcut to Win Defender, and the Task Scheduler, on my Desktop
– – – – – – – – – – – – – – – – – – – – – – – – – – – – – – – – – – – – – – – –
^^ The Action Pane is already enabled by default for me. The scan time would depend on how much files system scans but awkward to hear that it takes more time than manual one. Did you find that it takes more than manual one in both the cases – Full Scan ; Quick Scan?
I haven’t timed the Quick Scan, manual or automated. I don’t use it, because I’m not sure in which scenarios it makes sense.
^^ I always use Quick Scan or custom scan though, never bothered to take full scan because it takes too long to complete :)
If I download some file I’m not sure of to Desktop, I do a Custom scan of just the Desktop, and Win Defender takes a look at that file.
Full scan takes too long? How long? Yes, but I think it’s important to scan everything, at least once a week. It runs in the background. Fortunately, I haven’t found anything in a number of years.
I was using Malwarebytes (1:22), AVG (1:02), and IOBit (0:32), once per week. Then, I read up on how Win Defender in Win 8 has MSE combined into it (the equivalent of AVG I think) . . . and, it’s real-time protection. As far as I know, the above three are not. So that’s why I de-installed the above three, and now use Win Defender.
Also, I noticed a big drain on computer usability, when Malwarebytes and AVG are running. Not so with Win Defender.
I checked it out:
A manual run of Quick Scan took 16 minutes
Automated runs of:
-Scan Type 1 . . . the “Quick scan” . . . took 3 minutes
-Scan Type 0 . . . this is the “Default, according to your configuration” . . . it took 1 minute
I wonder what it’s doing. It seems like there’s a bug with automated Quick Scan, and, no idea what -Scan Type 0 is about.
Conclusion:
Automated -Scan Type 2 is the best
In Task Scheduler / the Status area for Win Defender, go to:
View / Add/Remove Columns / and just have these four, in this order:
Name (has to be there)
Last Run Time
Status
Next Run Time
Last Run Result
Don’t need to see the other columns
Topic: Windows Defender Scheduled Scan, in the Task Scheduler
In the “Last Run Result” column, I usually see this: The last run of the task was terminated by the user (0x41306)
. . . Why do I see this? Even after I run it manually through the Task Scheduler, and go to see the Return Code soon after it was done. This is kind of confusing.
In “Action completed,” I do see a Return Code of 0, but then a couple of lines up, I see: “Task terminated” . . . Is this just some kind of overkill notation of what’s going on?
Conclusion: Because it’s not clear what’s going on, I will disable the Scheduled Scan in Task Scheduler, and just run Win Defender through its GUI (put a reminder to do this in calendar software) – I will then just look for an indication that it has been completed there, and there is not virus. Ok to leave Win Defender to check for updates every 6 hours, though, that seems to work as expected.
Thanks for the tutorial!
I made a mistake though (my fault entirely): I edited the wrong task (“Defender Cache Maintenance” task, instead of “Scheduled Scan” task), following this tutorial in a hurry. So now, I have working “Scheduled Scan” task, but “Cache Maintenance” task is gone. I don’t know whether it is important but… could anybody tell me their settings for the “Cache Maintenance” task so I could put it back in place?
Thanks, Giancarlo
^^ If you have any System Restore pointed dated before you did this, you can restore back :) Cache Maintenance is not of paramount importance, and IMO it should not affect the working of Windows Defender too much. If you face any strange error in near days while using Windows Defender, this might be due to what you have did.
Thank you Kapil,
unfortunately, I had no viable restore points; that is, I just had got rid of some tons of… crapware preinstalled with a new computer and didn’t want to get it all back. I think I have fixed the problem though: I copied the “Cache Maintenance” task file from “windows/system32/tasks/windows defender” on another computer running Windows 8 and imported it into the Task Manager. I’ve also tried running this “Cache Maintenance” thing, it’s running now… just curious how long it will take. If anything starts smoking I’ll post back ,-)
Thanks, Giancarlo
^^ Wow, that’s a perfect news this morning :) Thanks for sharing this with us. I think it will work just fine now. Good luck :D
What an aweful way to schedule Defender. This is absolutely stupid. Sure it’s a nice tutorial, but how hard can it be for Microsoft to create something the average user can use to schedule it.
^^ We can understand its difficult for normal users to follow, would be great if Microsoft will embed the option for scheduling scan in Windows Defender itself :)
+so when i click on windows defender theres no tasks in the middle. what do i do?
Excellent! Thanks
thanks for some reason today I was asked to scan WD three times…that has never happened since August on the new W10 install….