Meetings constitute an important and necessary part of your work life. However, the tools deployed to host and attend meetings can play a significant role to create an impact, both positive and negative. Microsoft Teams is a fantastic tool to enhance your meeting experience. You can leverage Microsoft Team’s capability to share screen. So, here’s a post describing how to enable screen sharing in Microsoft Teams meeting.

Where is the sharing toolbar in Teams?
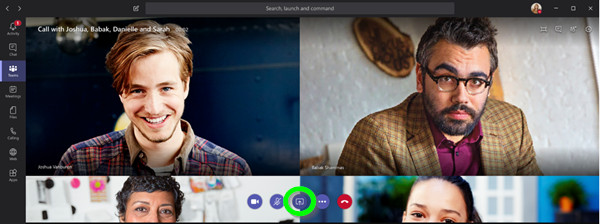
Sharing toolbar or Share content icon (or Share icon) is visible in Microsoft Teams when you are in a meeting. Whether you are using Teams on the web or the desktop app of Microsoft Teams, you can access Sharing toolbar just before the Leave button (in red color) on the top right part of your meeting. Clicking the Sharing toolbar will open the Share content box to let share your screen, a PowerPoint file, an app, a window, etc.
Why am I not able to share my screen in Microsoft Teams?
You may not be able to share your screen in Microsoft Teams if the admin has disabled this option, the internet connection is unstable, or there is a problem with the app cache. So, if the screen sharing is not working in Microsoft Teams for you, then ask the admin to allow everyone to present their screen. Also, make sure you are using a good and stable internet connection. You should also clear the Microsoft Teams cache and update the app to fix the problem.
Configure screen sharing in Microsoft Teams meeting
The cloud-based platform includes business messaging, calling, video meetings and file sharing. To enable screen sharing in Microsoft Teams meeting, all you’ll need to do is
- Select a PowerPoint file in Microsoft Teams
- Grant and seek control of a sharing session.
TIP: This post will show you how to set up and join a Microsoft Teams Meeting.
1] Select a PowerPoint file in Microsoft Teams
If you are an admin, you can configure screen sharing in Microsoft Teams meeting to let users share an entire screen, an app, or a file. Here, we’ll see how to allow PowerPoint sharing. Likewise, you can also configure whether anonymous or external users can request control of the shared screen.

The first step is to launch Microsoft Teams, open a PowerPoint file and choose ‘Share screen’ button in your meeting controls.
Selecting a PowerPoint file in a meeting lets the meeting participants get some special capabilities like:
- Ability to switch to different slides without interrupting the main presentation.
- Capability to sync meeting participants views back to the presenter’s view with one click.

Next, in the PowerPoint section, click the file you want.
2] Grant and seek control of a sharing session
If you would like to delegate certain responsibilities to another meeting participant or allow him to change a file, you can give control to that person.
The action will enable both (admin and the meeting participant) to be in control of the sharing.
So, to proceed, go to the sharing toolbar and select Give control.
Next, select the name of the person you want to give control to.
When confirmed, Teams will send a notification to that person and seek his permission to jointly share control. Thereafter, the admin and the selected meeting participant can make selections, edits, to the shared screen, individually.
That’s all to it! For more information, visit the Microsoft.
Leave a Reply