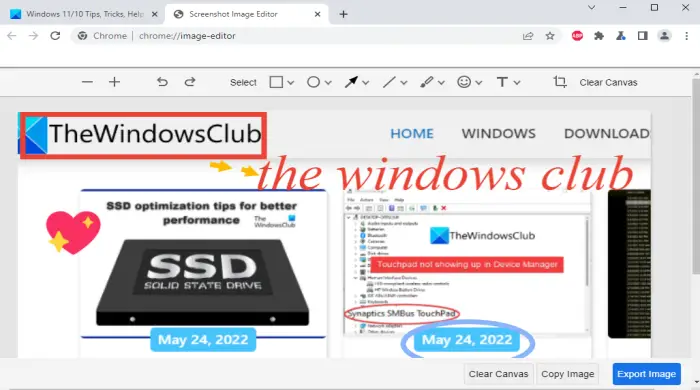
If you want to enable and use the built-in screenshot capture and screenshot editor tool of the Chrome browser, then this post is handy. Google Chrome has come with a native feature to capture webpage screenshot, edit it, and save the edited screenshot to your computer. This feature lets you select an area of the visible part of a webpage, use screenshot editing tools to edit or annotate it, and finally download or export the screenshot as a PNG image. By default, this feature remains turned off or disabled in the Chrome browser. This post covers the steps to enable or turn on this feature and use it.

There exist some free screenshot capture extensions for Chrome browser to capture the selected area or take a full-page screenshot, but, if you want to capture and annotate only the selected area of a webpage, then you might find this built-in feature more suitable. Before you can use this feature, make sure your browser is updated. If not, then first update Chrome browser so that you can access, enable and use it.
How to use Screenshot Capture and Screenshot Editor tool in Chrome
Screenshot capture and editor is one of the experimental features of Google Chrome which is available on the Flags page. Once you activate it from that page, you can capture any webpage and then edit it. Let’s first check how to enable this feature, and later you can use it to capture and edit a screenshot.
Enable Screenshot Capture and Editor tool in Google Chrome

Here are the steps:
- Open Chrome browser
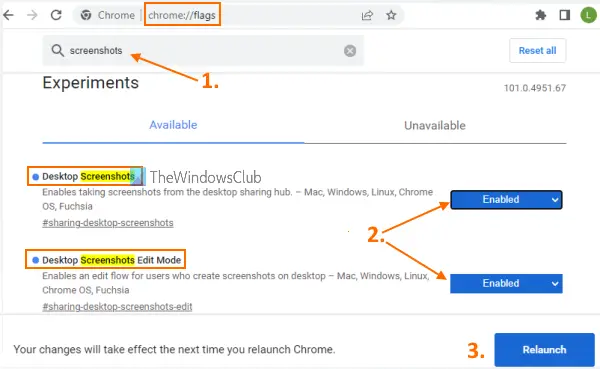
- Type
chrome://flagsin the Omnibox (or address bar) - Press the Enter key to open the Experiments page
- Type screenshots in the search box
- You will see two experimental features named Desktop Screenshots and Desktop Screenshots Edit Mode. For both options, there is a separate drop-down menu. Use that drop-down menu and select the Enabled option for both the features
- Click on the Relaunch button available on the bottom right part.
This will restart the Chrome browser and activate its screenshot capture and editor feature. Now let’s see how to use this feature.
Use the Screenshot Capture and Editor tool in Google Chrome

The steps are:
- Open a webpage in the Chrome browser for which you want to take the screenshot
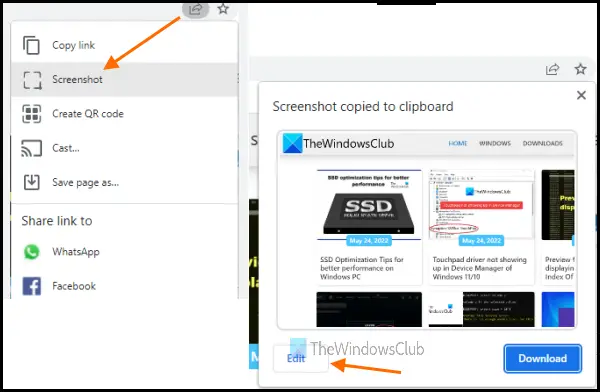
- Click on the Share this page icon (available just before the Bookmark icon) present in the Omnibox of the Chrome browser
- A list of available options will be visible to you. From that list, click on the Screenshot option
- Select an area of your choice
- As soon as you select the area and release the mouse button, a pop-up appears. In that pop-up, select the Edit button to access the editing tools. You can also click on the Download button available in that pop-up if you want to save the screenshot without using annotation tools
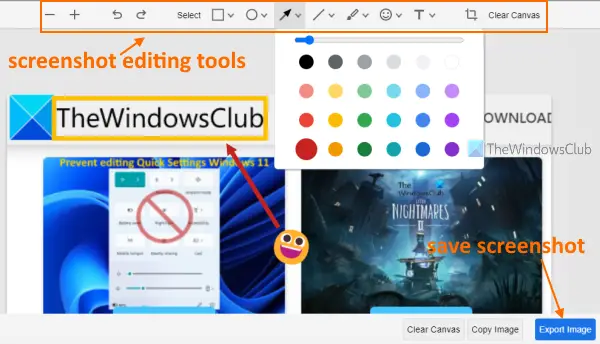
- After selecting the Edit button, its Screenshot Image Editor will open in a new tab with all the available tools. It has Text, Rectangle, Arrow, Brush, Line, and Ellipse tools. For each tool, you can set any of the available colors and also set the width using the given slider. Just select a tool and use it in the captured screenshot. Apart from these tools, you can also use Crop, Zoom in, Zoom Out, Undo, Emoji, Redo, and Clear Canvas options
- Once you are done with the editing part, click on the Export Image button to save the screenshot to your computer.

Though this screenshot capture and editor feature work well, some options are missing that can make it more useful. As of now, it doesn’t provide a full webpage screenshot option, eraser tool, set the opacity level for a tool, etc.
Apart from that, you cannot select the entire tab for screenshot capture. That means this tool doesn’t work on the Bookmarks bar and area above it. It works only on the visible part of the webpage. It might be possible that such or some other features will come with new updates. Till then, you can use this feature with the available options.
Related: How to take full webpage screenshot in Chrome and Firefox natively.
How do I enable screen capture in Chrome?
Earlier, the only option to take webpage screenshots natively in Chrome was using the Developer tools. But now, Chrome has come with a new and built-in feature that lets you capture the selected area of a webpage, annotate it, and save it to your computer. To enable this screen capture feature, you need to use the Flags page of the Chrome browser. If you need detailed instructions to enable and use this feature, then you can check the step-by-step guide mentioned above in this post.
Why Can’t I take screenshots on Google Chrome?
Though Google Chrome doesn’t stop or block you from taking webpage screenshots with or without using extensions, it is possible that some setting is enabled on your Windows computer because of which it is happening. Windows 11/10 OS has built-in options that let you allow or block screen capture on Google Chrome. Those options are Windows Registry and Local Group Policy Editor. So, you need to check both the options and find out if a setting to allow or deny screen capture is enabled there. If yes, then you need to disable it so that you can use the screenshot capture facility in the Chrome browser.
Read next: Best free Screen Capture software for Windows 11/10.
Leave a Reply