Outlook is one of the most used email applications across the globe. When you send mail to someone by default it stores the shipped items or folder into the sent mail. But sometimes sent mail doesn’t appear in Outlook. In this article, we will discuss the causes why the Outlook Sent Items folder may have gone missing and how you can restore the Senti items folder in Outlook.
Why is the Sent Mail Folder not showing in Outlook?
- When storage space is full of sent items due to old and unwanted messages, this issue may occur
- When the option to save copies of messages in the sent items folder in Outlook is unchecked, this could be a reason
- Many people suddenly close the Outlook due to which the sent email cannot be stored in the Sent Mail folder
- A corrupted Outlook Profile can also cause this issue.
Sent Items Folder missing or not found in Outlook
If the Sent Items Folder is missing or not showing in Outlook, then follow these suggestions to restore or get it back:
- Enable the Option Save Copies of Email in the Sent Item Folder
- Remove or Delete Unwanted Sent Emails from the Sent Folder
- Create an Alternative Folder for Storing Sent Emails
- Clear Outlook cache
- Disable Outlook Cached Exchange Mode
- Create a New Outlook Profile
Now let’s know how to fix this problem in detail.
1] Remove or Delete Unwanted Sent Emails from the Sent Folder
Sometimes your sent item folder gets full of your old and unwanted messages by which your sent item folder gets corrupt. It might be the possible reason for most of the recently sent mail not being present in the sent item folder. This problem can be fixed by deleting old, unwanted, and irrelevant emails and messages from the sent items folder in Outlook.
You may choose to Archive the Sent folder regularly.
2] Enable the Option Save Copies of Email in the Sent Item Folder
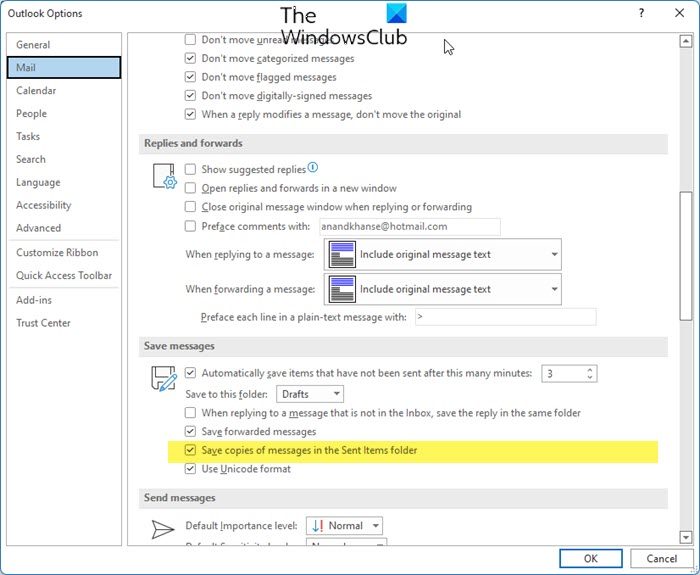
If the mail sent by you is not saved to the sent items folder. It means you have not enabled the option to save copies of emails in the sent item folder. Go there and enable it. By enabling this, if you send mail to someone, that mail is automatically stored in the sent item folder.
Below is the simple step by which you can enable save copies of sent items.
- Launch the Outlook application.
- Click on File which is showing on top.
- Click on Option.
- Now, click on Mail.
- Scroll down the page and go to the Save message section and under the save message section.
- Check the box to Save the copies of messages in the sent items folder option.
- Click OK.
3] Create an Alternative Folder for Storing Sent Emails
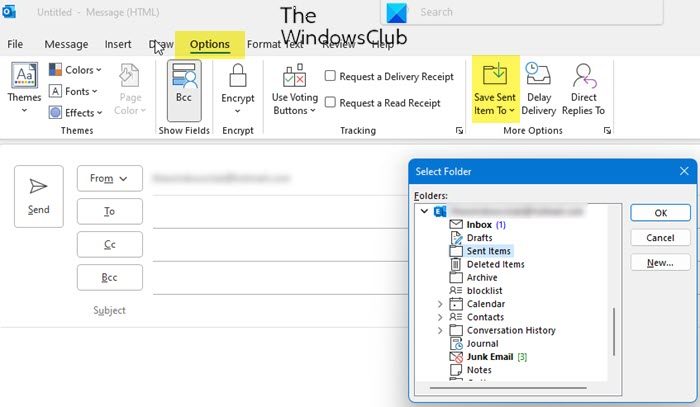
Create or select the alternative folder to save the sent item. When you send mail to someone this mail save in the sent item folder in outlook. Where you can easily find your mail. Follow the below steps to create an alternative folder.
- Launch the Outlook application.
- Click on the New Email tab, and a new window will pop up on your screen.
- Click on Options. Click on the Save sent item to option and then select the Other Folder option.
- A new window will appear on your screen. Click New.
- Create a New Folder page will open. Now select the Name which you want for your new folder.
- Go to the Folder Contains and choose your mail and post which you want to store in that folder.
- Click OK.
Alternatively, you can also follow this path – Open Outlook > Folder > New Folder.
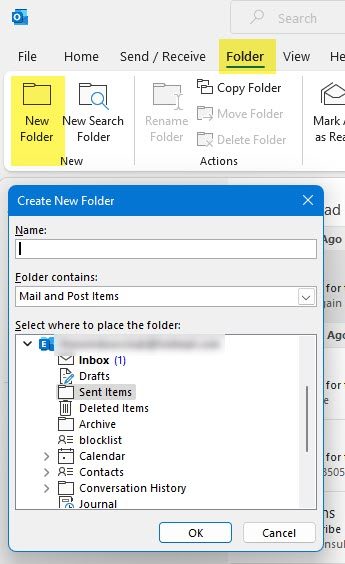
A new folder can thus be created where sent mail will save automatically.
4] Clear Outlook cache
Here is the procedure to completely delete or clear the Outlook cache files from their location, and reset them. This includes auto-complete data as well as other temporary files.
- Launch Outlook
- Navigate to the Outlook cache location- %localappdata%\Microsoft\Outlook
- Delete cached files in Outlook
- Remove auto-complete cache in Outlook
- Restart Outlook
5] Disable Outlook Cached Exchange Mode

Cached exchange mode gives us permission to access emails and another task in outlook. It works also when your system is not connected throw the internet. It saves all files in your system hard drive in OST file format and when the OST file gets oversized it corrupts your email or sent folder. By disabling this option you can prevent your file to get corrupting.
Below are the simple steps to turn the cached exchange mode off.
- Launch the Outlook application, and click on the File option.
- Choose Account Setting, then click on Account settings.
- Select the account and click on the Change tab.
- You will see Offline setting
- Uncheck the box Use Cached Exchange Mode.
- Restart the Outlook application to save the change.
TIP: Running the Microsoft Support and Recovery Assistant Tool can help solve many Office related issues.
6] Create a New Outlook Profile
Your Outlook profile could get corrupt due to many reasons. Abrupt shutdown of outlook application during a power failure.
It’s always good to have a backup of all your important Outlook data. Since your outlook profile is corrupt it means you can’t access your data. In case you have recently taken a backup, creating a new Outlook profile is a good option.
Follow the below steps to create a new Outlook profile
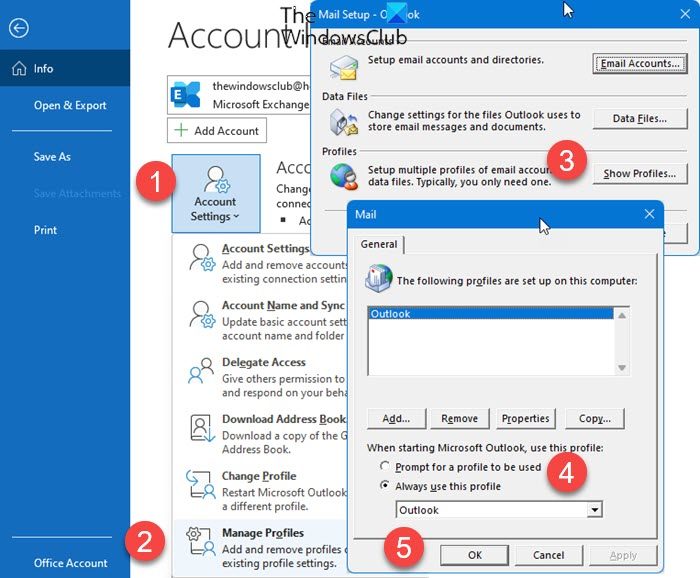
- Launch the Outlook application, click on File, click on Account Setting and select Manage Profiles.
- Then a Mail Setup dialogue will appear on your screen, click on Show Profile.
- A Mail dialogue box will appear on your screen. Where the list of all Outlook profiles which currently exist will show.
- You will see two options check the first option Prompt for a profile to be used.
- Now click OK.
- Add Account dialogue box will show on your screen, enter your name, email-id, and your password to create a new profile, and click Next.
- Close and Restart Outlook.
After creating a new outlook remove the old corrupt profile.
Follow the below steps to remove the corrupt profile
- Launch Outlook
- Click on File
- Go to Account Settings
- Locate Manage profile
- Click on Show Profile
- Select the profile you want to delete
- Click on Remove.
We hope this post helped you resolve the issue.
Read: Microsoft Outlook Inbox is not showing the latest emails.
How do I delete my Outlook profile and create a new one?
To delete your Outlook profile and create a new one, do the following:
- Open Control Panel.
- Click Mail to bring up a list of your current profiles.
- Next, click on the profile you need to delete.
- Click Remove.
- Once you’ve removed your incorrect profile, click Add to add the correct profile.
How do I rebuild my Outlook 365 profile?
To repair or rebuild the profile from the Outlook Desktop application, follow these steps:
- Click File on the menu bar.
- Select Account Settings, and then select Account Settings again in the drop-down menu.
- In the Email tab, select the account you wish to repair and click Repair.
- Select Next.
- Outlook will complete the setup for your account.
How do I get my Sent folder back in Outlook?
When you send a message, it restores into the Sent item folder. However, sometimes, we can’t find it, which means that your Outlook is misconfigured.
- Launch Outlook.
- Click on File.
- Select Options.
- Click on Mail.
- Scroll down the pages and go to the save messages; ensure that the box option “Save copies of messages in sent item folder” is checked.
That’s how you can get the Send Folder back.
Read: How to repair Outlook account
Can we use multiple email accounts in a single Outlook?
Yes, we can use multiple email accounts in a single Outlook. You just need to repeat the usual procedure to add an email account to Outlook. If you are interested, then these posts will show you how to combine Outlook Inbox of multiple accounts and how to add multiple accounts in the Outlook app for Android and iPhone.
Similar: Email not saved to Sent Items folder in Outlook
How do I add a Sent folder in Outlook?
To add a Sent folder in Outlook, you need to enable the Save copies of messages in sent item folder option from settings. If you want to know how to do the same, check the second solution, which will help you add the folder in question.
That’s it!
Read: Repair corrupt Outlook PST & OST personal data files with Inbox Repair Tool, etc.
Leave a Reply