In Windows File Explorer, you might have noticed the different folder layout settings for different folders. Some of the folders have smaller icons while some puts on a large icons view layout. There are several folder layouts available in Windows 11/10/8/7 which you can choose from, for any folder.
Windows OS uses Automatic Folder Type Discovery to detect the contents of a folder and then automatically sets the follder view to its template – Eg. Pictures, Video, etc. But if a folder contains a mix of file types, it will use the General items template
While Windows has set these defaults based on the nature of the files in the folder, if you wish, you can set a default Folder View for all folders. In this post, we will how to set & apply the same view settings of the current folder, as the default, for all other folders on your PC.
What are Folder Templates
Before rolling on to change the folder’s view settings, let’s take a look at how folder templates work. You might have noticed that folders that contain pictures have a different view layout than those that contain videos or documents. This is the folder optimization technique in play which chooses one of the five templates for any folder based on the content that is stored in it. These templates are:
- General Items – Applies to any folder that contains a mixed combination of files and other sub-folders.
- Documents – Applies to the folders that contain documents (Word files, text files, etc.)
- Pictures – Applies to the folders that contain image files (.jpg, .png files, etc.)
- Music – Applies to all such folders which contain music files (.mp3, .wav, etc.)
- Videos – Applies to any folder that contains just video items (.mp4, .avi, etc.)
In short, a Folder Template is nothing but a folder layout or view.
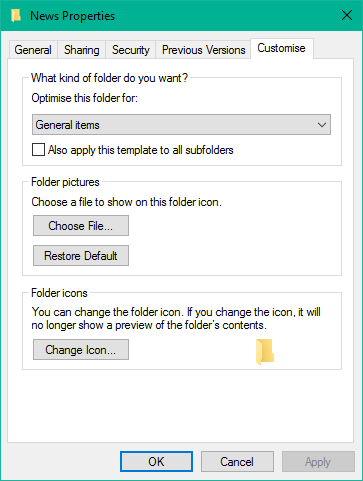
Whenever you create a new folder and put some files in it, Windows does its best to decide the folder template based on the content. If you’re storing mixed type of files in any folder, Windows automatically assigns General Items as the folder template. If you want to view any folder’s template, right-click the folder icon and open its Properties window. In here, navigate to the Customize tab where you can see the correct template optimized for the folder in question.
Read: How to change Library folder template on Windows.
Set a default Folder View for all folders in Windows
Now that we are clear on the basics, let’s roll over to the task at hand. You can apply a folder’s view settings to only those folders which are optimized for the same folder template type. Once the view layout is generalized for a folder template type (say, Music), every time you change the layout of file icons (from tile icons to large icons), the same will be reflected in other folders as well that are optimized for Music template. Now, you can follow the below steps to apply the folder view settings across a folder template type:
Open File Explorer by using key combination Windows Key + E and navigate to the folder you want to use as a source for view layout settings.
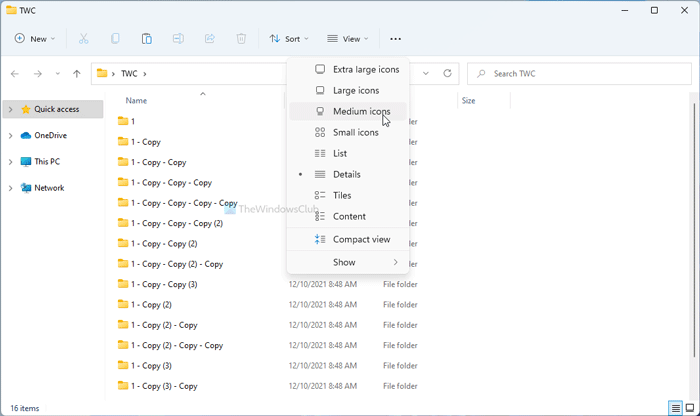
As Windows 11 comes with a new UI in File Explorer, you won’t find the View tab. Instead, you can click on the View button in File Explorer and choose a setting as per your requirements.
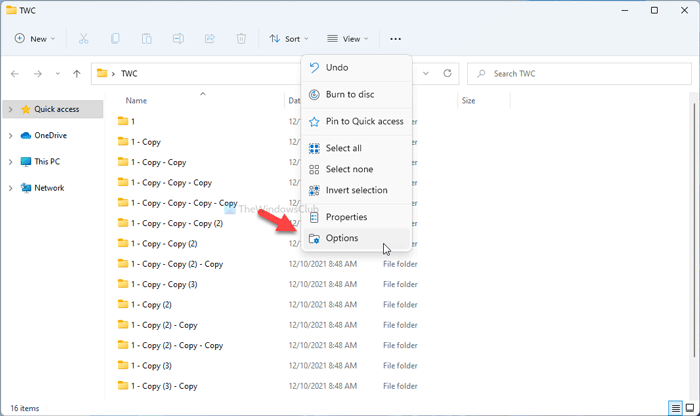
Next, Windows 11 users need to click on the three-dotted icon and select the Options from the list.
However, if you are using Windows 10, navigate to the View tab in ribbon baron the top and change the settings per your wish. You can change the layout and choose the folder details to display, add extra panes, adjust column width, etc.

Once done with the changes, click Options to open the File Explorer Options, earlier called Folder Options. window.
Finally, navigate to View tab in Folder Options window.
Click/Tap on Apply to Folders button.
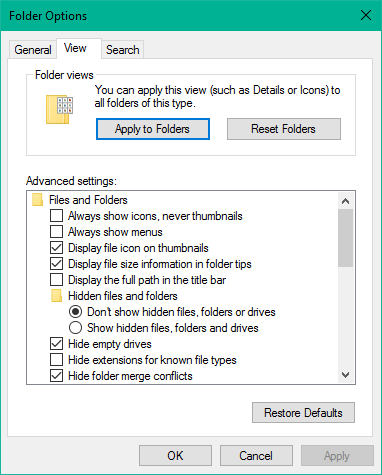
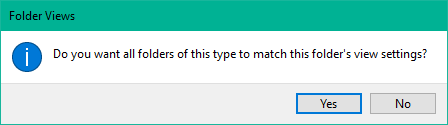
Click/Tap Yes on the confirmation window that pops up.
Click/Tap OK on the Folder Options window to save the settings.
That is it. You have just generalized the view settings for a particular folder template type across the OS. Hope this works for you.
How do I change the default view for all folders?
To change the default view for all folders, you need to follow the aforementioned guide. There are mainly two methods. First, you can right-click after opening a folder and select the Properties option. Switch to the Customize tab and choose a template from the drop-down list. Check the Also apply this template to all subfolder boxes and click the OK button. Alternatively, you can do the same using the View option.
TIP: WinSetView will help you tweak File Explorer,
How do I get folder view to all subfolders in Windows 11/10?
To get folder view to all subfolders in Windows 11/10, you need to open a folder and right-click in an empty space to select the Properties option from the context menu. Then, switch to the Customize tab and choose Pictures from the drop-down list. Tick the Also apply this template to all subfolder checkboxes. At last, click the OK button.
See this post if Windows forgets the Folder View settings.
I’ve tried this, but it DOESN’T work. on Windoze 10 home.
They still come up in detail mode instead of list mode when i first open the folder :( :(
I have exactly the same problem, or perhaps a variant of it–Windows won’t even let me make the change, since the “Apply to Folders” button is always grayed out on whatever folder I try doing this with… Anybody know how to make it so the “Apply to Folders” button actually works??
All the above did NOT work I still see folders that should contain something where they are empty without anything hidden.. Why don’t I see the empty folder icon?
This is obsolete advice. As others have noted, it doesn’t work. Microsoft is steadily removing the ability to manage the windows interface though they often leave the old dialog boxes around. This doesn’t happen just with major releases but even with interim patches.
They also removed the option to change the backwards direction of the mouse control wheel. I think the windows developers all use trackpads and don’t notice how cumbersome a mouse is becoming. Mouse precision has declined as well and yes I’m using one of the latest Microsoft Intellimice but not yet the Surface mouse.
They also broke File History for backups (tested on several machines). It can only be used to restore old backups but not create new ones. At least they left the name as Windows 7 File History so we get a hint. And of course when it crashes, it just gives a meaningless hex code instead of a nice message that “File History Backups are not supported on Windows 10.
There is a reason that the Windows platform is in decline while Chrome OS is growing by over 35% a year.
Thank you, for some reason I’ve not been finding the solution till today! Howrah..
I have tried this method and it has not worked for me, i have Win 10 64bit Home.
However i have found another way that has always worked (not sure if this would work with other OS’s e.g. win 8, 7 ….)
Essentially your looking to ‘Optimize the Type of Folder’ and ‘What kind of folder you want’
Right click the folder you wish to set, select ‘Properties’
you should see the Folder Properties Window
choose the ‘Customize’ tab
you will see at the top ‘What kind of folder do you want?’ ‘Optimize this folder for:’
make a choice of the dropdown list that you want.
Ensure that you have selected (ticked the Box) ‘Also apply this template to all sub folders’
Then ‘Apply’
I hope this helps and hope it works for you all
The “Set a default Folder View for all folders” solution only works for random folders, not the Pictures, Videos, Documents, Downloads folders. My guess is that the optimization profile on those folders that they are talking about overwrites the user settings.
Same problem here of this not working at all. I wish Microcrap would go out of business. Unfortunately, Apple is not far behind them in their systems either. No sense in moving to Apple or their lousy chinese made products. Both companies need to hire people who know how to write software.
THANK YOU!!!!!!!
They should totally fix this problem by making a view apply to all folders option
Here is how you accomplish this, as JR1181 stated already:
When you follow the instructions from this blog you setting the view of the folders by changing the default view settings “to all folder of this type.” There are five different folder types: General, Documents, Pictures, Music, and Videos. So if you want all your folders in Local Disk (C:) drive to look the same, you navigate to Local Disk C, select all the folders (Ctrl-A), right click, and select the Customize tab. Choose “Optimize this folder for” and select a folder type (e.g. General items) and check the box “Also apply this template to all subfolders” and click OK. Now follow the blog’s instructions. Set the folder view to display how you would like, choose Options in the toolbar -> View tab -> Apply to Folders. Now all General folder types will display this way, and your C drive will all be General folders.
Windows will do whatever the eff it wants to do. I want list view for everything (except ‘This PC’). If I want another view I’ll ask for it, but if I don’t ask for it, I want list view. Windows does not care a g.d. thing about whatever the hell YOU might want.
As I’ve said above, Windows will do whatever the eff it wants to (also, it likes to change its mind ever so often). Sometimes that button is greyed out. But even if it isn’t, it still doesn’t work as advertised.
When will people stop titling their articles with a lie. This doesn’t change ALL folder view settings like the title says, only for folders of this TYPE, and I’ve yet to find any rationale for how it defines type. Having done this process for nearly every folder I ever use, it still doesn’t seem to change formatting for what seem to be identical types of folders.
in short, this isn’t guaranteed to do anything but change the settings for the one folder you’re currently looking at.
This is BS.
the solution from this blog doesn’t work unless you want to change each folder one at a time and if you have a few hundreds it will take some time to customize the type for each.
–
after some time spent i found the solution.
1. go to the root of the drive letter you want to cusomize ( c:, e:, d:, etc) so you can see the folders from that root drive(absolute top).
2. set the view as you desired ( i like them in detailed view)(no videos , pictures etc that will take time to scan them)
3. After you set your view (detailed in my case) go one step up ( my computer view) so you can see all drive letters/partitions.
4. right click on the drive letter (aka partition d:, e: etc) – properties – customize – select desired view in the optimize this folder for – (i selected general items) – check the ‘also apply this template to all folders’ – and then hit apply – ok.
–
After some work i found that only step 4 is needed.
Ahhh…I wasn’t using the select all folders (ctrl + a).Thanks JR1181 & LloydChristmas! One question for you, will this include any future new subfolders created under a folder with this setting?
Here’s the steps again for those of you who are not as tech savvy. Hope this helps!
Step 1: Select all folders you’re wanting to change (ctrl + a)
Step A: Right click & select “Properties” (should be the last option)
Step B: There will be two tabs “General” & “Customize” select the “Customize” tab.
Step C: In the “Customize” tab the first option will read “What kind of folder do you want?” feel free to change from general items to any of the other options or leave as is. Then check the box for “Also apply this template to all subfolders”. Click “OK” which will close the properties box.
Step 2: Set up one of the folders how for the display settings you want.
Step A: In the “View” tab (top bar of open window) click the drop down for the last setting “Options” and select “Change folder and search options”.
Step B: Navigate to the “View” tab (middle option).
Step C: The first option will read “Folder views” (has a box around it). Click “Apply to Folders”. Click “OK” to exit and save changes in the “Folder Options” box.
Now you’re done, remember if you change the folder type in Step 1 –> Step C these settings will only apply to the folder type you selected.