When your Internet operator charges you based on the amount of data consumed by you, such connections are called used Metered Connections. They may offer you a fixed rate up to a certain data usage figure and after that, they either charge you extra or reduce your connection speed.
Metered Connection is one of the many new features introduced in Windows. This feature is quite helpful in limiting the data usage so that you don’t get shocked while billing the data consumed payments. Many operators have provided the plan which can be supposed as Metered Connection. Especially talking about 4G and 5G unlimited plans, after a certain limit, you’ll observe that your bandwidth is reduced to a lower rate; this is generally known as the FUP limit.
Theoretically, Metered Connection is the condition when your operator charges you with direct proportionality of the amount of data used so far. As soon as the data is consumed and bypasses the predefined limit, the operator charges you extra or reduces the Internet speed. If you have a Metered Internet Connection, setting your network connection to metered in Windows can help reduce the amount of data you send and receive.
Like it was in Windows 8.1, if you set your Windows 11/10 network connection to Metered Connection, you will be able to save data costs, as some data usage activities get curtailed. Let us see how to set Wi-Fi or a wireless connection as a metered connection in Windows 11/10.
Setting your network connection to ‘Metered’, can also stop Windows 11/10 from automatically downloading the Updates. You can do it as follows – Settings app > Network & Internet > WiFi > Advanced options. Move the slider to On position for Set as metered connection.
Set your network connection to Metered in Windows 11
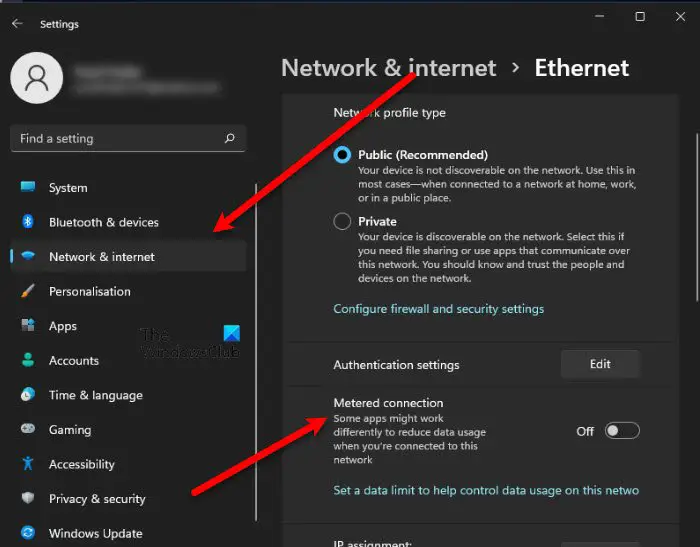
If you enable Metered Connection on a network, your Windows 11 computer won’t automatically download the update when connected to that particular network. Follow the given steps to do the same.
- Open Settings from the Start Menu.
- Click Network & Internet > Properties.
- Now use the toggle to enable Metered connection.
Now, your computer will download updated automatically when connected to that network.
You can also use CMD to set metered Connection in Windows 11/10
You can also use the Command Prompt to set a metered connection. TechNet has listed the commands that can help us here.
To see the list of Wi-Fi profiles on your computer, copy-paste the following command and hit Enter:
netsh wlan show profiles
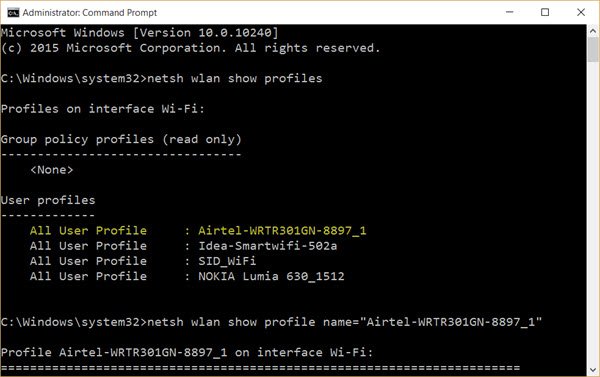
Note down the name of the Wi-Fi connection here which you wish to set as a metered connection. Here I am using the example of Airtel.
Now type the following in the CMD windows, replacing Airtel-WRTR301GN-8897_1 name with your connections name, and hit Enter:
netsh wlan show profile name="Airtel-WRTR301GN-8897_1"
This will show the details of the selected connection.
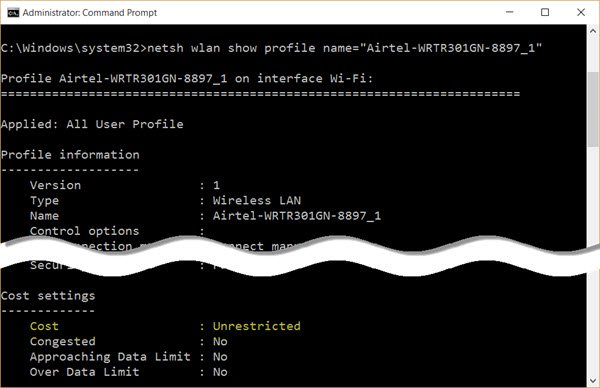
Scroll down till you see Cost settings. Here against Cost, you see Unrestricted in my case. This means that the connection is un-metered or unlimited. To change it to metered, you have to set it to Fixed. Use the following command and hit Enter:
netsh wlan set profileparameter name="Airtel-WRTR301GN-8897_1" cost=Fixed
You will see a command executed successfully message and the connection will be set as a metered connection.
You can also make this work for mobile data broadband plans. You have to just replace wlan with wbn in the above-mentioned commands. This will also work if you are tethered to your mobile phone’s Wi-Fi hotspot.
Read: How to Manage the Data Usage Limit on Windows.
Read: How to remove Metered connection warning in Outlook
How to set Metered Connection in Windows 10
To set a Wi-Fi network connection as metered:
- Open Windows 10 Settings
- Open Network & Internet settings
- Select the Wi-Fi tab.
- Click on the Wi-Fi network name
- Scroll down to Metered connection
- Turn on Set as metered connection.
Open Settings > Network & Internet > Wi-Fi to open the following window.
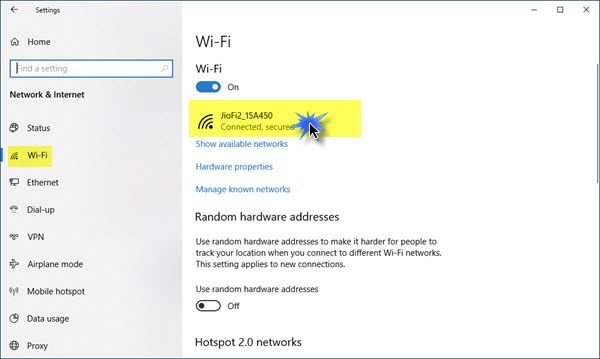
For the desired network connection, click on the WiFi name itself to open the following panel.
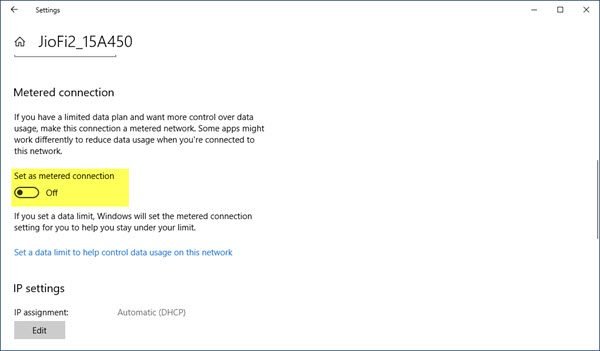
You can see a section named Metered connection. Move the slider to the On position. If you have a limited data plan and want more control over data usage, setting it to On will help.
If you wish you manage or set other WiFi networks as a metered connection, click on the Manage known networks link to open this panel.
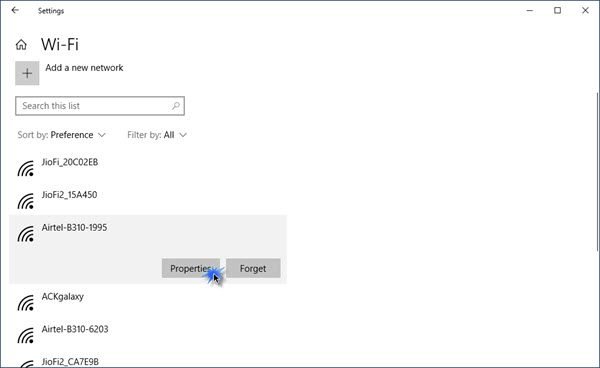
Select the WiFi > Properties, and you will see the desired setting.
When you set a connection as a metered connection Windows Update will not download automatically. Now, will updates for Windows Store apps. Live tiles will also not update in order to show the latest information. Offline files will also not sync. Some Windows Store apps will however work with limited functionality in the background when you set it so.
Data usage high? This post will show you how to limit and monitor Data Usage.
When I click on Advanced Options, all I get is another page with the properties of my system. I’ve done this a thousand times today. I really need to have no automatic updates. The fifteen random attempts by MS to install Windows 10 quadrupled my usage and cost a fortune in extra payments and work time lost to try to resolve it. The community helped but not being tech savvy, I struggled and finally sat up all night last night using the alternatives
I am too scared to try the second option you suggest – in fact I don’t even know where to cut and paste to……………
In fact, I now followed your second method and windows tells me it can’t find it.
You have to click on the Wi-Fi name and then press the Advanced Options link. And have you replaced my Wi-Fi name with yours? Have you done it this way?
Links to help you manage Windows Updates in Windows 10:
https://www.thewindowsclub.com/make-windows-10-notify-you-before-downloading-or-installing-windows-updates
https://www.thewindowsclub.com/turn-off-windows-update-in-windows-10
https://www.thewindowsclub.com/block-unwanted-windows-updates-in-windows-10
https://www.thewindowsclub.com/turn-off-windows-update-delivery-optimization
Metered Connection option was not appearing in the Settings so I tried the second method
Worked great! thanks a lot!
“When I click on Advanced Options, all I get is another page with the properties of my system”. Same here. I had to unplug my ethernet cable between my wireless (cellular) hub, and actually connect to that hub by WIFI. Once the WIFI was showing “connected”, then i could see the “metered” setting. What a poorly-thought-out HI…
One of the new features of windows 8 is metered wireless connections. In the past, you could run Windows programs to monitor your bandwidth data usage or your 3G volume data bundle usage, but they didn’t do anything to actually reduce data usage. With mobile hot spot and broadband card usage on the rise and unlimited data plans nearing extinction, every kilobyte of bandwidth saved is a penny earned. Enabling metering in Windows 8 will limit your PC or tablet’s data usage by preventing nonessential data transfers. It is a great feature and I like it.
Since I have Windows 10 v1607 Home, it is possible to configure each WiFi metered connection (current profile and not) so that ONLY the updates from Windows Update and Microsoft Store are downloaded manually (ie, in order that they are downloaded only when I do click on the relative “Check for updates” buttons)?
Thanks
Bye
Same here. I’m using aobike hotspot. Windows 10 updated 16 Sep, gobbled up SIX Gigs of my 10 Gig data plan with 19 days left in this billing cycle. I used the Shut it off instructions, but to cover my bases want to do this meter thing as well. I tried using wbn instead of wlan and it says “command not found”. So, now what?
Anand, Thanks for the article. I am running Windows 10 and have found that for the command prompt version that replacing “wlan” with “wbn” no longer works. I am using a MIFI for mobile broadband and have found I have to use “wlan” to display the setting and reset the cost setting to fixed.
I have also set this as a startup command to set the connection as Fixed as I have found some Microsoft updates lose this setting.
My daughter-in-law’s Windows 10 laptop had a virus on it, and so I’ve been working on it today. After resetting the system and saving the files, I am looking at the updates for Windows 10 Home, and I am just so disappointed with Windows. This system stinks on so many levels. It boggles my mind that a home version does not allow the ability to manually control when the updates are installed, let alone when the computer restarts. I use Amazon Turk for extra money; how frustrating it would be to have my laptop restart in the middle of a large survey or a good batch.
I should not have to set active hours. I should not have to set WiFi to metered. And I cannot even do that via the GUI in the Home version. I had to go into the machine portion of the registry, assume ownership of the folder for DefaultMediaCost, and set Ethernet and WiFi properties to 2 instead of 1 (metered).
There were so many solid advancements made in the Vista/7 era for this OS that seem to have gone down the tubes with this need to mirror a tablet format. Laptops, desktops are not tablets. It is OK for them to remain as such. It is crazy that a start menu is replaced by a search, for someone to have to look for a visible hierarchy.
This makes me look more lovingly at Kali every day.
Find the “DefaultMediaCost” folder in HKEY_LOCAL_MACHINE and modify the data to 2 instead of 1. This sets WiFi and Ethernet (and default, if you wish) to metered. Then you can do this manually.
the string provided (netsh wlan set profileparameter name=”Airtel-WRTR301GN-8897_1? cost=Fixed) is not working, need help please thanks!
the prompt says: “One or more parameters for the command are not correct or missing.”