This post will show you how to fix Account picture error code 0x80070520, 0x80190001, 0x800702ef, 0x88982f8b or 0xd0020017, accompanied my message This picture couldn’t be saved or Setting the account picture failed, in Windows 11 and Windows 10.
We all love to set up our pictures for the User accounts in our ways. Setting a picture for a User Account gives us a personalized feel, thus enhancing our experience while using Windows 11/10. But today, I came across an error while setting up my user account picture. The screen showed the following error:
Account picture error, This picture couldn’t be saved. Please try again

Alternatively, you may see this message:
Account picture error, This picture couldn’t be saved. Error Code 0x80070520, 0x80190001, 0x800702ef, 0x88982f8b OR 0xd0020017
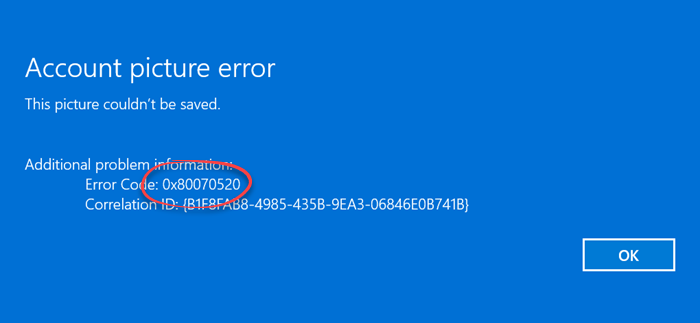
If you see this Account Picture Error, you will notice that no support link is provided to fix this issue. You have to try again and again until the problem gets sorted. But that’s not the way to fix it, as I tried to click OK repeatedly and restarted the system, but still no luck. In my case, I was sure that Windows is activated. Then, I tried the following method, and I was finally able to set my desired image as a user account picture.
Fix Account picture error, Setting the account picture failed error in Windows 11/10
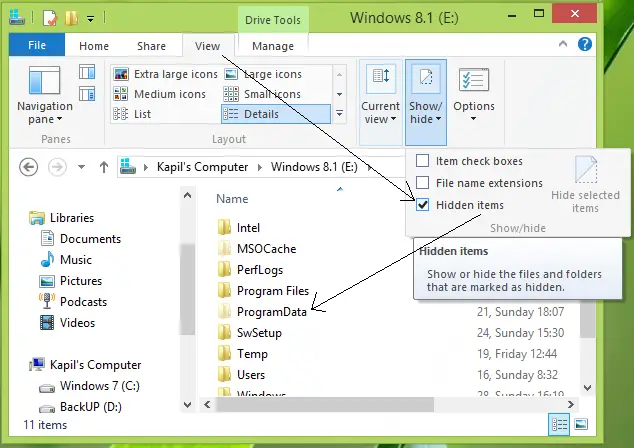
1. Go to the system root drive on which Windows is installed currently, which is usually C: drive (however, in my case, it was E: drive). In the ribbon options, click View, then check the Hidden items. Now click the ProgramData folder that appears – which was a hidden one.
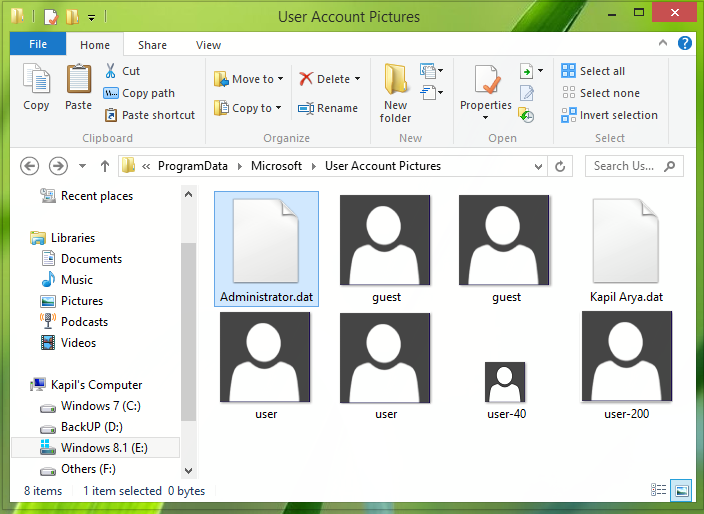
2. After clicking ProgramData, navigate to Microsoft\User Account Pictures.
In the User Accounts Pictures folder, you’ll see the default user account pictures.
You need to replace these pictures with your desired picture for the user account.
There are guest.bmp (448×448 px.), guest.png (448×448 px.), user.bmp (448×448 px.), user.png (448×448 px.), user-40.png (40×40 px.) and user-200.png (200×200 px.) pictures.
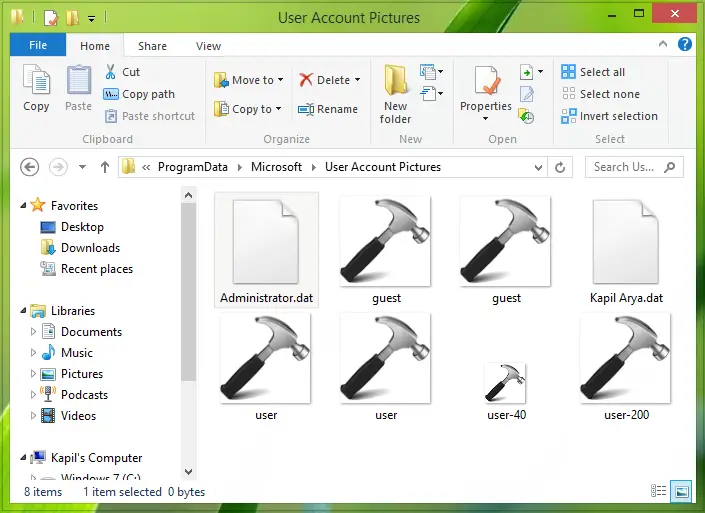
3. Manipulate your desired image for the User account picture in the same format and same size and replace the default ones.
So now the User Account Pictures folder looks like this:
Finally, reboot the system, and you’ll be able to set your desired image as the user account picture.
This picture couldn’t be saved, Error 0x80070520, 0x80190001, 0x800702ef, 0x88982f8b, 0xd0020017
If the above suggestion does not help, do this. Open the following folder location:
C:\Users\<username>\AppData\Roaming\Microsoft\Windows\AccountPictures
Now, press Ctrl+A to select all the contents, and delete all the pictures in this account, and then restart your PC and see if you can change the Profile picture.
I hope it helps, but if it does not, I suggest you create a new User profile account.
Read next: Profile Picture not showing up in Windows Settings.

i din’t understand this process please upload a video
How if I have 2 account in same computer ?
I had this problem when I tried to use a 100 x 100 pixel jpg. Windows 8.1 seems to want a 448 x 448 pixel image. Once I cropped/resized an image to 448 x 448, I could select the larger image without any trouble in the Windows account UI.
^^ Yep, you have to use 448 x 448 pixels image, not 100 x 100 pixels resolution :)
I followed these steps and it doesn’t effect anymore :(
Thank you for this tutorial. But the question I would have is: Why on earth is it this hard to change a bloody account picture? This really should just consist of, select file—> pres ok. Seems like a microsoft fail to me.
I’m having a little trouble… Do I replace all of the images with their original amount of pixels, or would I replace all of them with a 448×448 pixel image, Thanks!
^^ Replace all of them with corresponding images of same proportion :)
Hmm, it hasn’t seem to work, I’ve done everything in the instructions but I am using Windows 8.1… would Windows 8.1 make this in any way different? Any Suggestions? :O
I don’t even see User Account Folder. I searched for it too.
^^ These are hidden folders, make sure “hidden items” is checked in ribbon of Explorer.
open the “Command Prompt (Admin)” and then just input the following code to repair the corrupt system files from the installation disc.
dism /online /cleanup-image /restorehealth
I found doing a proper shutdown resolved the issue for me. On command line : shutdown /f /s /t 0
That is jugadu solution not permanent
Cann’t upload Acount Picture? or lock screen in win 8.1???
Follow-
C:ProgramDataMicrosoftWindows
righ click on SystemData go properties
security>advance
then click on change(owner-unable to display current user)
enter your user name(in case microsof accnt wite email id)
then chek name and press ok
now u can delete the SystemData folder and reboot… u can change lock screen or account picture
Subir Sengupta
I can’t find any folder named “User Account Pictures”. Instead,there is a folder named “Default Account Pictures”.
A far easier way is this-
Select the picture you want>Right click>Edit>Resize>resize to 448×448 pixels>Save
Now, simply go to settings>accounts>browse picture>set the resized picture.
Worked well for me. (I’m using windows 10)
This isn’t a fix, it’s very limited, flawed work-around. What you’ve just done is changed the DEFAULT image. That means that every windows account you create is going to use YOUR account image.
Thanks a lot
I got to stage#2 where you said just replace the pictures but you didn’t show how to replace it. I tried but I couldn’t do it. Help please. Thanks
you provide no instruction how to go from step 2 above to step 3 a complete waste of time
This dose not work with Windows 10. I tryed it and did nothing.
But when I click on browse, I cannot access the folder that contains the user account images.
I already open but i dont have User Account file
Why i dont have User Account Picture file???
Account Picture Error
How does one go from step 2 to step 3???
“Then a miracle occurs” is a caption from a cartoon where a math professor is explaining calculus to his students in front of 3 chalk boards. On the left board are lots of math calculations. On the right board… more math calculations. The center board is blank. The cartoon caption: “Then a miracle occurs..”
Step 2 – miracle – Step 3.
I’m in Windows 10. What can I do now? And do I replace all of my photo files? And if only one file.. Which one??? It won’t copy and paste. Why is everything so difficult in Windows 10?? Never had these problems before. Why didn’t my settings migrate when I upgraded to Win 10?? All my other upgrades went smoothly. Very frustrated.
Thanks for this. After a disaster trying out W10 (old game I like didn’t make the transition etc.) on SurfPro2 and then returning to W8.1, and the subsequent discovery that the Account Picture function had been broken in the process of returning to W8.1 (along with a few other additional annoying things – like an MS permanent window insisting I should schedule upgrading back to W10, with a Corporate Totalitarian style no option not to, but with an MS assistant’s help uninstalled the updates that forced this intrusive window – tiny little files with horribly long codes, nothing transparent about them at all) I eventually found your post.
What was even better was, using the info you gave here I was able to customize it more than previously. Originally the PNG I was using, which had been added just using the settings menu, a personally designed PNG with a transparent background, the image had only shown as having a black background. But when I replaced the User.png with my transparent background in the location you revealed, it now acts like a proper transparent background.
So, very much appreciated, thanks.
does it means remove all picture ones?
guest.bmp (448×448 px.), guest.png (448×448 px.), user.bmp (448×448 px.), user.png (448×448 px.), user-40.png (40×40 px.) and user-200.png (200×200 px.) pictures?
how do i replace the picture
And if you don’t have a User Account Pictures folder…??
Thanks man, it works! After trying out Windows 10, and going back to 8.1 due to PC not very compatible with it, had problems with account picture. Did exactly as you shown and it worked! Minor change: Mine was Program Data > Microsoft > Default Account Pictures (instead of User Account Pictures)
Try Default Account Pictures, as I had no User Account Pictures too.
I deleted everything in the user account pictures folder?? IM stuck what should i do now
i am on Windows 10 and the folder is not present on the system?
I’m changing the picture on multiple identical machines (Packard Bell laptops). The first 8 machines accepted my enormous 1920 x 1080 jpg without problems…giving me the image in the start menu as well as the logon screen. The 9th refuses. Your solution is not a solution, rather it’s a workaround. There is obviously a deeper issue here which should be solveable.
sir
i already change it but for admin i want to change guest also?
thank’s
Is it only working for win. 8.1?
This did not work for me at all as for I couldn’t even find me drive root on windows 8. This was not useful and it drove me crazy trying to figure this out.
I went through this process and it didn’t work for me. There is a sync across OneDrive to get all accounts to have the same information but there is no way to force the sync so the computer showing the error still shows no profile picture. It’s very frustrating when something this fundamental doesn’t function properly.