OneDrive Folder Protection will automatically back up your data, thus protecting you from Ransomware and other malware. In this post, we will show you how to enable and use Folder Protection in OneDrive.
Microsoft OneDrive is an extensively used cloud service to store documents online and exchange important files online at any time. OneDrive is a file hosting service for Microsoft users that allows users to store data online in the cloud, sync all kinds of files and share the files on the Web. Microsoft gives a user the benefit of storing the files on the OneDrive cloud, accessing the files from any device through OneDrive, sharing the data online and collaborating with the team by just sending a OneDrive data link via Facebook, Email, or iMessage.

How to setup OneDrive Folder Protection
Microsoft offers a folder protection feature for OneDrive users that would back up all the important files in the PC to the user’s OneDrive cloud service. The new OneDrive Folder Protection feature will protect documents, photos and desktop folders by automatically syncing them to OneDrive.
Generally, users have to explicitly locate and save the important files to the OneDrive folder. However, by enabling this new feature, the user can optionally prefer to protect the privacy and integrity of data which automatically syncs the standard PC files to OneDrive as if they were stored in OneDrive.
The new folder protection feature makes it super easy to save the contents in OneDrive and eventually gain the flexibility to access the files across any device while protecting their privacy. By enabling folder protection for a selected folder, Onedrive monitors all the folder protection-enabled folders and syncs all their contents to the cloud. Earlier, the OneDrive folder protection feature was only made available to business users, but Microsoft has changed its decision and is now available for all regular OneDrive users with personal accounts.
Additionally, if you are using multiple Windows computers, OneDrive automatically synchronizes all the important files in the PC to OneDrive so that you can access the files on all your PCs. Users can enable this new feature on different PC connected to the same account, and the protection-enabled files will be combined in the document folder. The new protection feature has a user-friendly interface, and in this article, we explain how to set up folder protection for OneDrive accounts.
Enable and Use Folder Protection for OneDrive account
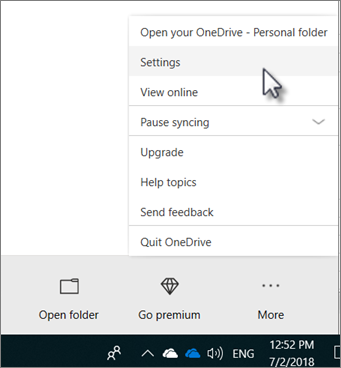
Open OneDrive and click on More. Now click on Settings from the drop-down menu to open Microsoft OneDrive window.

In the Microsoft OneDrive window, navigate to Auto Save tab. Click on Update folder.
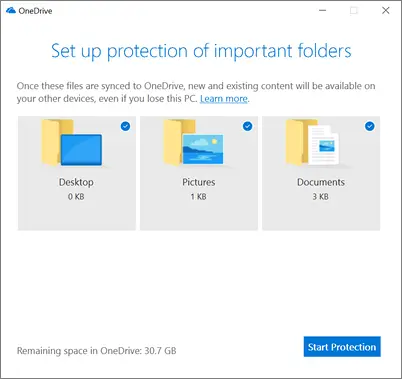
Set up the protection for all the important folders by selecting the PC folders that you want to synchronize with OneDrive automatically.

Click Start Protection to enable Folder protection.
Once the important files are synced, close the window.
It is important to note that this new folder protection is being rolled out slowly to all the users and if you don’t see an option for Update folder in the Auto Save tab, it only means that your PC is not yet eligible for folder protection. You may have to wait and check back again if you are eligible for this new OneDrive feature in the near future.
Also, just like the usual OneDrive folders, the protection-enabled PC folders will have syncing status indicators and all the data like Desktop, photos and documents folders will be seen on the main OneDrive storage folder.
Users using Microsoft Outlook and local OneNote Notebooks may get an error while syncing to their Microsoft account stating that the Onedrive cannot protect the PST files stored in your document folder. In this case, users may have to move all the PST files to another folder before enabling the protection of your Document folder.
That’s all.
Also read: How to protect Files or Folders from being deleted accidentally in Windows.
Leave a Reply