If you are looking for a centralized platform to probe and respond to advanced threats, you should go with Microsoft Defender ATP (Advanced Threat Protection). It secures endpoints like laptops, phones, and tablets against advanced cyber threats using threat analytics and behavioral sensors. In this post, we will see how you can setup Windows Advanced Threat Protection (ATP) on Windows Server.
Setup Windows Defender Advanced Threat Protection (ATP) on Windows Server
To use Windows Defender ATP (Advanced Threat Protection), onboard your devices to the platform using Configuration Manager, Microsoft Intune, or manual installation. Access the Microsoft Defender Security Center to monitor threats and alerts, investigate incidents with in-depth analysis tools, and configure security policies for enhanced protection and compliance. The Security Center provides a comprehensive environment for managing and responding to advanced threats effectively.
To setup Windows Defender Advanced Threat Protection (ATP) on Windows Server, follow the steps mentioned below.
- Configure Endpoint
- Download the onboarding script
- Onboard devices using the local script
Let us talk about them in detail.
1] Configure Endpoint

First of all, we need to configure the endpoint devices, set up alert emails, add devices, and apply security settings. To do all that, follow the steps mentioned below.
- Go to the Microsoft Defender portal (security.microsoft.com).
- Once you are on the Microsoft Defender portal, click on the hamburger icon, and click on Endpoints.
- You will get a “Welcome to Microsoft Defender for Business” screen, click on Get Started.
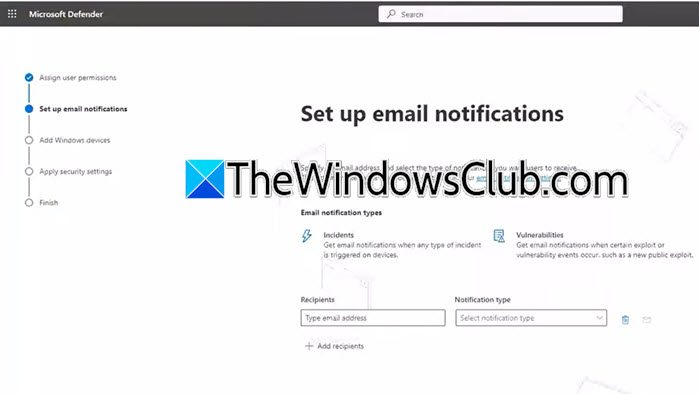
- On the Let’s give people the access screen, add users along with their respective roles.
- If you want to give email alerts to some recipients, you need to enter their email address in the Recipients field.
- Next up, we need to choose the onboarding method, you can choose any method of your choice, you can click on the down arrow and then select Download onboarding package and click on Continue.
- Finally, follow the on-screen instructions to complete the process.
Once you have configured the endpoint, go to the next step.
If you want to make any changes, you can go to Settings > Endpoints and then make the required changes to configure Endpoints as per your preference for example creating new notification rules, checking license, suppressing alerts, and more.
2] Download the onboarding script

In order to deploy, we need to download the onboarding script. To do so, you need to follow the steps mentioned below.
- Open a browser and navigate to admin.microsoft.com.
- Go to Show all > All admin centers.
- Navigate to Microsoft Defender ATP.
- Click on the cog icon to open Settings and then click on Endpoints.
- Go to Device Management > Onboarding.
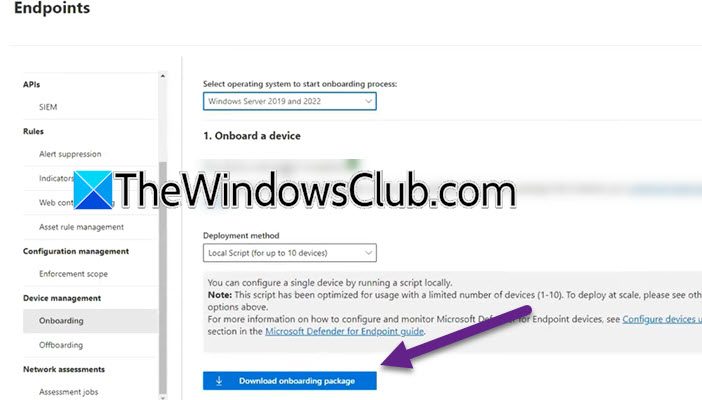
- Set the Select operating system to start the onboarding process to your preference.
- In the Deployment method, click on Local Script (for up to 10 devices).
- Click on Download onboarding package.
This will initiate the download process, do not close the window. This will download the ZIP file, once done, you need to right-click on it and select Extract all. Now, make sure to save it on an accessible location.
3] Onboard devices using the local script

Individual devices can now be manually onboarded to Defender for Endpoint. This method is particularly beneficial for organizations seeking to evaluate the service prior to committing to the onboarding of all devices within their network. Now, in order to onboard devices using the local script, you can follow the steps mentioned below.
- Open the Command Prompt as an administrator.
- Use CD or Change Directory command to go to the location where the file is stored, if it’s the Desktop, just run cd C:\Users\yusuf\OneDrive\Desktop.
- Now, run WindowsDefenderATPLocalOnboardingScript.cmd.
- If you are asked to give confirmation, type ‘Y’, and hit Enter.
- Now, go back to the Windows Security screen and we will continue from where we have left off.
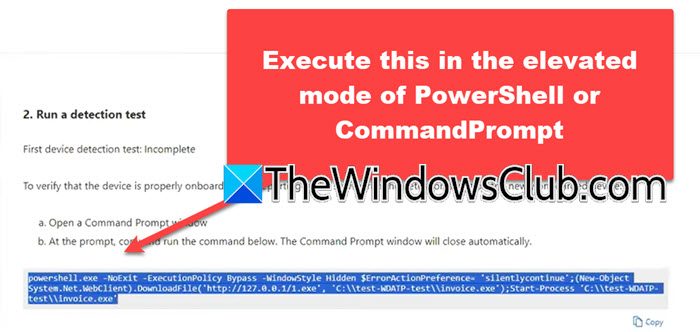
- Scroll down, copy the PowerShell script, open PowerShell as an administrator, and then execute the command from the Run a detection test section.
If you get a green signal after executing the command that Windows Defender Endpoint has been configured, you can start using the portal and monitoring alerts, events, and emails.
Hopefully, you can resolve the issue using the solutions mentioned in this post.
Read: How to enable or disable Windows Security Center
How do I know if Defender ATP is installed?
To verify the status of Defender ATP manually, open the Registry Editor and navigate to HKLM\SOFTWARE\Microsoft\ Windows Advanced Threat Protection\Status. You now have to check the status of OnboardingState, it should be set to 1.
Read: Windows Security says No Security Providers
How do I enable Windows Threat protection?
To enable Windows Threat Protection on the Windows Server, search “Windows Security” from the Start Menu, then go to Virus & threat protection, and then click on the Manage settings. Finally, enable the toggle for Virus & threat protection.
Also Read: Reset Windows Security Settings to default values.
Leave a Reply