HomeGroup, a feature introduced with Windows 7, continued to assist users in sharing files, folders, libraries, devices, etc. on smaller networks until it was finally removed in Windows 10 v1803. Microsoft didn’t state any specific reason justifying the removal of the feature, but their statement on the Microsoft support website makes it clear that the removal was intentional and based on the belief that a substitute already existed.
The real issue is for users who were dependent on HomeGroups for they would neither be able to create or join existing HomeGroups nor leave the ones they are already a member of. HomeGroup will neither appear in the File Explorer nor the Control Panel.
We cannot troubleshoot existing HomeGroups through systems that have updated to v1803 since the Troubleshoot option at Settings > Update & Security > Troubleshoot has been removed as well.
- The shared folders can be accessed from the File Explorer by typing the path \\homePC\SharedFolderName.
- Shared printers could still be accessed from the Print dialogue box.
How to share Printers & Files even though HomeGroup has been removed in Windows 11/10
This becomes a serious issue for those who were heavily dependant on HomeGroups. Microsoft has mentioned the following solutions for those who wish to continue sharing their files and printers. Let us see how you can share printers & files in Windows 11/10 even though HomeGroup has been removed.
1] Sharing a network printer
Connect the primary PC to the printer and system to the network. Two ways to share the printer after that are as follows:
Share the printer using Settings

1] Click on the Start button then on the gear-like symbol to open the Settings app.
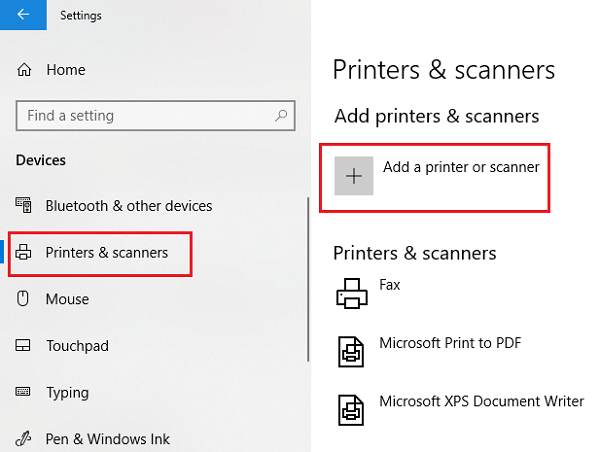
2] Go to Devices and then Printers and Scanners.
3] Check if your printer is listed there, or else add it.
4] Click on your printer and then select Manage. Select Printer Properties and then open the Sharing tab.
5] Click on Share this Printer and add or modify the Share name of the printer which is to be used while connecting to a secondary PC.
Share the printer using Control Panel
1] Type Control Panel in Search and find Control Panel. Open it.
2] Select Hardware and Sound and then View devices and printers.
3] Right-click and open Printer properties and hop on to the Sharing tab.
4] Click on Share the printer and edit the name and details as mentioned earlier.
In case you are adding the printer to a secondary PC, it won’t be listed by default, so you could click on Add a printer and type the name of the printer.
2] Sharing files in File Explorer
Sharing files on Windows is simple.
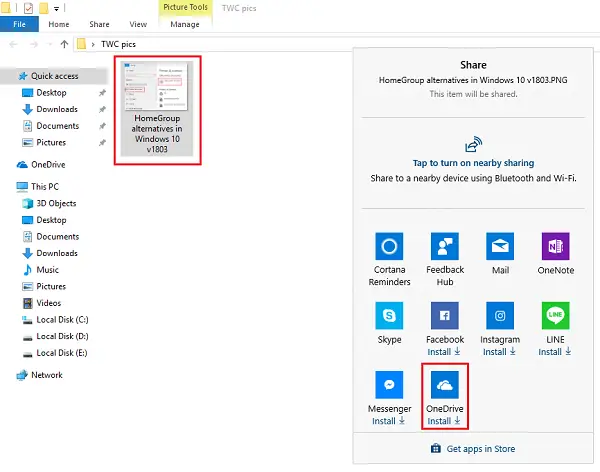
1] Open File Explorer and navigate to the file you wish to share.
2] Click on the Share tab and then on Share. Choose the app with which you wish to share that file.
Since we are using it as a replacement for HomeGroup, users might prefer to share their files using OneDrive.
We hope you find this useful.
Has anyone noticed that after the April 2018 update, network browsing and file and print sharing do not work? I am not speaking about the removal of the Homegroup feature. You cannot share files and printers, and try mapping a drive. You cannot.
If Network browsing does not appear to work after the Windows 10 1803 update (or even before) go to the computer that is “not visible” and go to “services” Go to the two services named “Function Discovery xxxx” and restart both. Also, make sure they are set to starting “automatically” The computer should be visible on the network.
There is an easy fix. If Network browsing does not appear to work after the Windows 10 1803 update (or even before) go to the computer that is “not visible” and go to “services” Go to the two services named “Function Discovery xxxx” and restart both. Also, make sure they are set to starting “automatically” The computer should be visible on the network.
Visibility and accessibility are two different things, I’m afraid… just because you can see something doesn’t mean Windows will let you access it. 1803 went to the desktop and laptop here on Friday, and we haven’t been able to access anything on the other one from either since then, even though you can “see” each on the network from the other. Changing the function discovery setting was one of the many suggested online fixes I have tried. Before, as members of the same homegroup, we could go into either from the other, especially helpful in my accessing school related stuff on the laptop from the desktop. At least we were able to get the laptop to recognize the printer attached to the desktop (after MUCH playing around with settings, and I can’t be sure which combination was the magic one that restored that connection).
Did you go to the properties for the folder and designate share with “everyone”? That should allow you to access folders on other computers on the network.
Yes. No dice, however :-(
Right click on the folder in question, go to properties, sharing tab, then if designating “everyone” on the main sharing tab does not work, click on “advanced sharing” and click the box to share the folder.
It seems like these software engineers don’t get what the average end-user actually needs. This is another example of how corporations think they know what’s best and roll it out, only to have us (regular people) fervently scramble for a work around. The suggestion to use OneDrive is not practical for users that have metered data plans and limited speeds. If I’m correct, that means that the file that I’m sharing is uploaded to OneDrive and then downloaded on my other home computer or laptop, so that’s multiple data exchanges. Not everyone has unlimited cable internet!
Did that already. Still no dice. :-( But thanks for trying.
Yes, it is ruining my small office setup and I’ve lost quite a bit of business as a result
I fully agree. I’m running Windows 10 Pro on 3 PCs. My Photoshop image files are usually 50Mb, sometimes a lot more. What use is OneDrive when my upload speed is very slow. It is much simpler to “see” the file on a local computer. I have even lost network access to my NAS box. Microsoft have mightily screwed up this time.