Often, we need to share the screen to enable support, collaboration, or other reasons. Both Microsoft Skype and Skype for Business make it easy to quickly share your screen during a call via the Skype Share Screen option. Here’s how to use it.

How to share Screen on Skype
The built-in feature is useful in many ways. For example, you can share your screen and give your grandpa a quick demo of how you use Skype, so he can start using it too. The following steps will guide you on this:

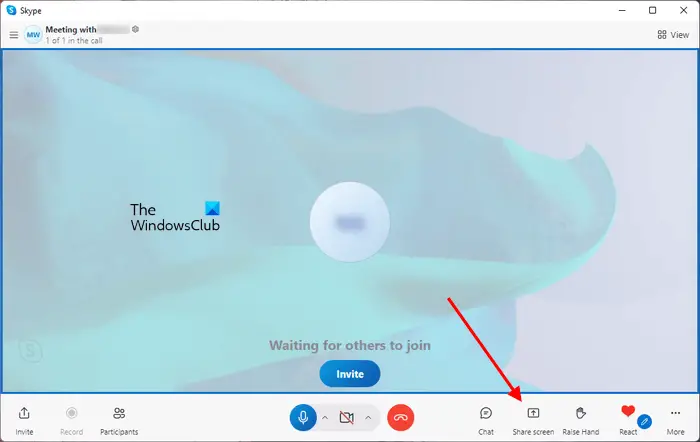
- Launch the Skype app and select a person from your contact list and hit the Video call or Audio call button to begin the conversation.
- You will see a Share screen button on the bottom right side of the interface. Click on it.
- As you click on the Share screen, Skype will show you all the opened windows (the applications that are running on your computer).
- Select the screen which you want to share.
Once you have completed the above steps, the other person can view your screen. You may also notice a yellow or red line around the screen, indicating that the feature is currently enabled. In Skype, users see only the screen you share. For example, if you share the Microsoft Word screen and open another application, users will not see the application that you launched.
To stop sharing the screen, Click “Stop sharing > Stop screen sharing.”
How to share Screen on Skype for Business
In Skype for Business, you can either choose to display your entire Windows 11/10 Desktop or just a program to everyone in a Skype for Business,
- Meeting
- Call
- Instant messaging (IM) conversation
Choose the Desktop when you need to switch between programs or work on files from different programs. Likewise, choose a program when you need to present specific programs or files but don’t want people to see anything else on your computer.
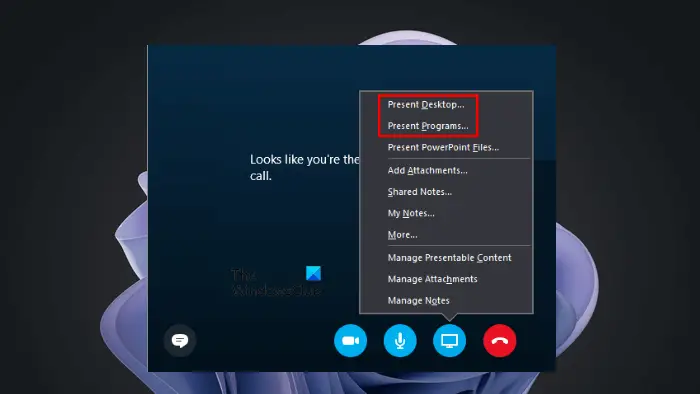
To begin, move the cursor over the presentation (monitor) icon. It can be located at the bottom of the conversation window. When found, click it and select the ‘Present’ tab. Then, do one of the following.
To share the content on your Desktop, click Present Desktop.
To share one or more program or file, click Present Programs, and then select the specific program(s) or file(s).

Use the sharing toolbar at the top of the screen to stop sharing or give control to participants. Please note that when you share the screen, your Skype for Business status changes to Presenting, and you won’t receive instant messages or calls.
Why can’t I share screen on Skype for Business?
You need to be in a voice or video call with the person you want to share your screen with. If you’re not in a call, you won’t have the option to share screens. Make sure that both of you are using the latest versions of Skype that support screen-sharing. Also, ensure that your connection has good connectivity & bandwidth.
If Share your desktop displays a black screen in Skype for Business, try the following:
To work around this issue, switch to a secondary monitor. To do this, follow these steps:
- Click Stop Sharing on the primary monitor.
- Click Share your desktop, and then select a secondary monitor
How do I share a presentation on Skype?
In Skype for Business, you can share your entire screen to share the PowerPont presentations. If you do not want to share your screen, you can also share only the PowerPoint presentation by uploading your presentation file on Skype for Business. Click “Share Content > Share PowerPoint Files” and select the PowerPoint file. If you are using Skype for personal use, you have to use the Screen Sharing option. In Skype, you can select a particular opened window while screen sharing. Click Share Screen and then select the PowerPoint window from the list of opened windows displayed by Skype. After that, participants will see only see your PowerPoint screen.
Read next: Skype SMS or Email Verification Code not received.
Leave a Reply