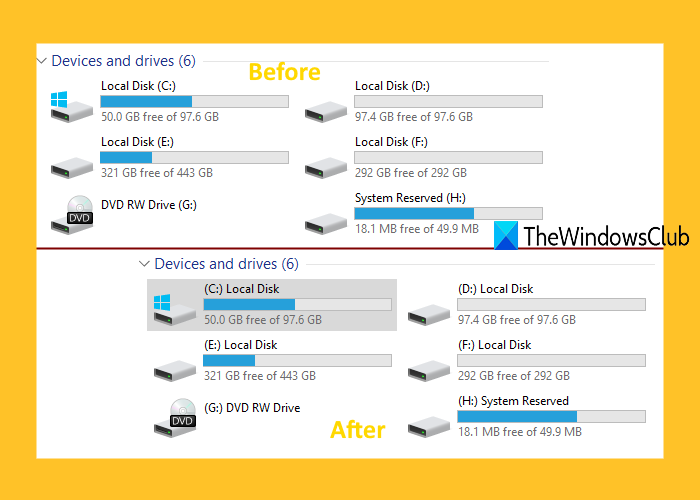
Drive names or volume labels appear before the drive letters in Windows OS by default. But, if you want, you can change this default behavior and show drive letters first before drive names in Windows 11/10. Whenever you will open File Explorer, you will see that letters (C, D, E, etc.) of all drives are visible before volume labels.

Show Drive Letters first before Drive Names in Explorer
Before you perform this Registry tweak, take Registry Editor backup. If something unwanted happens, you will able to use that backup to restore Registry Editor to the earlier state. After that, follow these steps:
- Open Registry Editor
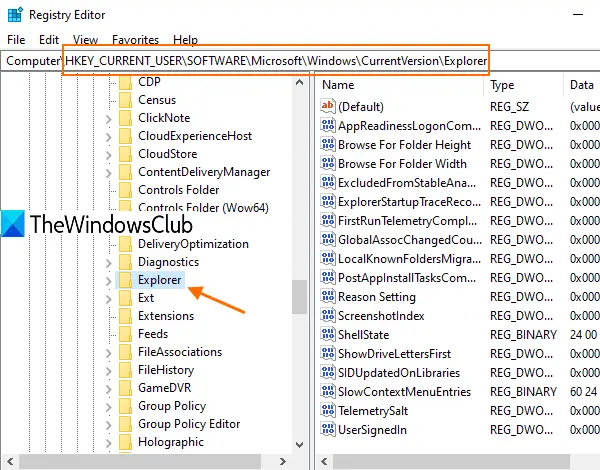
- Access Explorer key
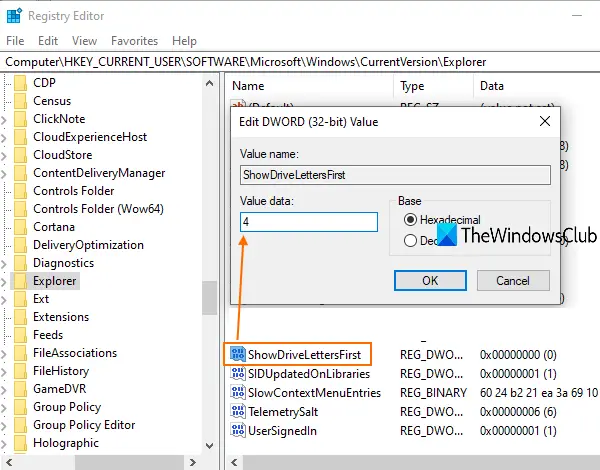
- Open ShowDriveLettersFirst DWORD value
- Set 4 in its Value data
- Press OK button
- Restart File Explorer.
Use the Search box of Windows 11/10, type regedit, and hit Enter to open Registry Editor.
Now access the Explorer Registry key. The path is:
HKEY_CURRENT_USER\SOFTWARE\Microsoft\Windows\CurrentVersion\Explorer

On the right-hand section, you will see multiple values.
You need to access and open the ShowDriveLettersFirst DWORD value by double-clicking on it.
If this value is not present, then you can create a new DWORD (32-bit) Value and rename it to ShowDriveLettersFirst. After that, double-click on that value, and a small window will pop up.

In that window, put 4 in the Value data field, and use the OK button. Now you can close Registry Editor.
Finally, restart File Explorer. Open File Explorer and you will see that drive or volume letters are visible first.
To undo the changes, use the above steps, put 0 in Value data of ShowDriveLettersFirst DWORD value, and hit the OK button.
Restart File Explorer and volume labels will appear before volume letters.
Fix: Disk Space Bar missing in This PC
Tweak Drive letters using Ultimate Windows Tweaker

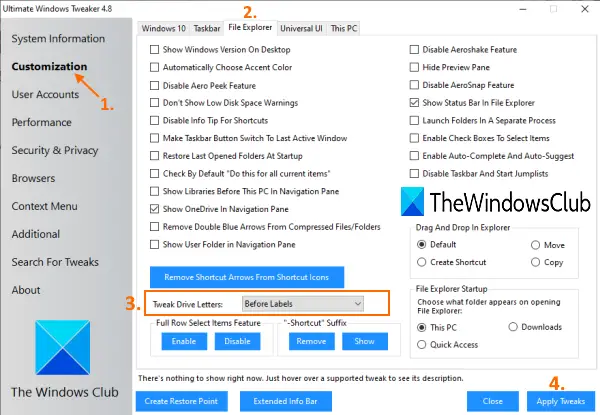
If you want a quicker way to show drive letters before drive names, then you can use our free Ultimate Windows Tweaker tool. There are more than 200 tweaks in UWT and showing drive letters first is one of those tweaks. Grab the zip file of this tool, extract it, and execute its EXE file. After that, use these steps:
- Access the Customization category on its interface
- Click on the File Explorer tab on the right section
- Select Before Labels option from the drop-down menu of Tweak Drive Letters menu
- Press the Apply Tweaks button.
After that, it will restart File Explorer automatically to apply the changes successfully.
To show drive names first again using this tool, follow the above steps, select the After Labels option from the drop-down menu of the Tweak Drive Letters menu, and click on Apply Tweaks button.
Read next: How to hide a drive in Windows.
Hope these two options are helpful.
Leave a Reply