On Windows 11 or Windows 10, PC users can customize File Explorer to their preference. You can show or hide Quick access and Favorites from navigation pane, show the Preview Pane for Explorer, show Details pane in File Explorer. In this post, we will show you how to Show or Hide File Explorer Navigation Pane in Windows 11/10.
Show or Hide File Explorer Navigation Pane
The navigation pane is the far left pane in File Explorer used to find files, folders, and drives on your Windows 11/10 PC or network. When you set the navigation pane to show or hide in File Explorer, the setting is applied to all folders, and you can drag the right border of the navigation pane left and right to reset or increase or decrease its width in File Explorer.
We can Show or Hide File Explorer Navigation Pane in Windows 11/10 in 2 quick and easy ways. We’ll explore this topic under the methods outlined below in this section as follows:
1] Show or Hide File Explorer Navigation Pane via File Explorer menu bar

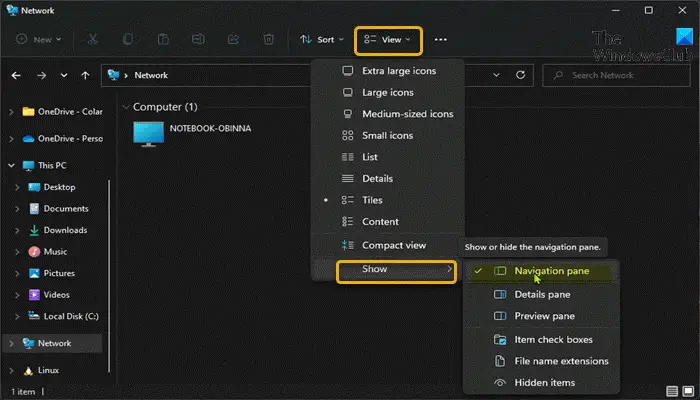
To Show or Hide File Explorer Navigation Pane via File Explorer menu bar, do the following:
- Press Windows key + E to open File Explorer.
- Click/tap on View on the menu bar.
- Click/tap on Show.
- Now, Check (show – default) or Uncheck (hide) Navigation pane option per your requirement.
- Exit File Explorer when done.
2] Show or Hide File Explorer Navigation Pane via Registry Editor

Since this is a registry operation, it is recommended that you back up the registry or create a system restore point as necessary precautionary measures.
To Show (default setting) File Explorer Navigation Pane via Registry Editor, do the following:
- Press Windows key + R to invoke the Run dialog.
- In the Run dialog box, type notepad and hit Enter to open Notepad.
- Copy and paste the code below into the text editor.
Windows Registry Editor Version 5.00

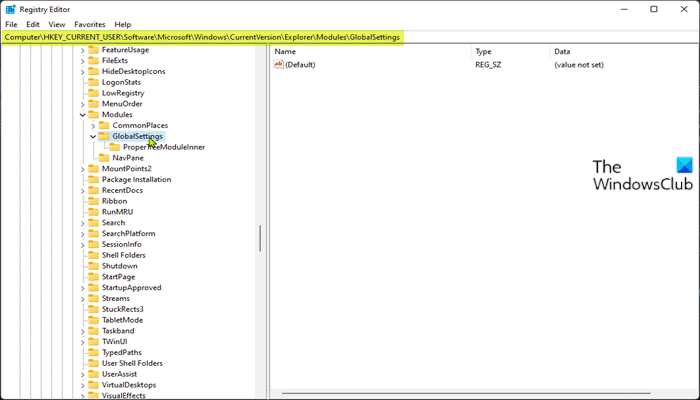
[HKEY_CURRENT_USER\SOFTWARE\Microsoft\Windows\CurrentVersion\Explorer\Modules\GlobalSettings\Sizer]
"PageSpaceControlSizer"=hex:a0,00,00,00,01,00,00,00,00,00,00,00,ec,03,00,00
- Now, click the File option from the menu and select Save As button.
- Choose a location (preferably desktop) where you want to save the file.
- Enter a name with .reg extension (eg; Show-FENP.reg).
- Choose All Files from the Save as type drop-down list.
- Double-click the saved .reg file to merge it.
- If prompted, click on Run > Yes (UAC) > Yes > OK to approve the merge.
- You can now delete the .reg file if you like.
To Hide File Explorer Navigation Pane via Registry Editor, do the following:
- Open Notepad.
- Copy and paste the code below into the text editor.
Windows Registry Editor Version 5.00

[HKEY_CURRENT_USER\SOFTWARE\Microsoft\Windows\CurrentVersion\Explorer\Modules\GlobalSettings\Sizer]
"PageSpaceControlSizer"=hex:a0,00,00,00,00,00,00,00,00,00,00,00,ec,03,00,00
- Repeat all the same steps as above, but this time, you can save the reg file with .reg extension (eg; Hide-FENP.reg).
That’s it on how to Show or Hide File Explorer Navigation Pane in Windows 11/10!
Related post: File Explorer Navigation Pane missing.
How do you show or hide the navigation pane?
To show or hide the Navigation Pane in Microsoft Office Access, do the following:
- To display the Navigation Pane in a desktop database, press F11.
- To hide the Navigation Pane, click along the top of the Navigation Pane, or press F11.
How do I show the navigation pane in File Explorer?
To show the navigation pane in File Explorer, follow these instructions: Press the Windows key + E hotkey to open Windows Explorer. Click the View tab, and then click the Navigation pane button in the ribbon. In the drop-down menu, you can click to check or uncheck the “Navigation pane” option. Once you uncheck, the navigation pane will be removed from Windows File Explorer.
TIP: If you want, you can also remove the OneDrive icon from Explorer, remove Dropbox from Explorer Navigation Pane, add or remove Network from Explorer Navigation Pane, add Recycle Bin to Explorer Navigation Pane.