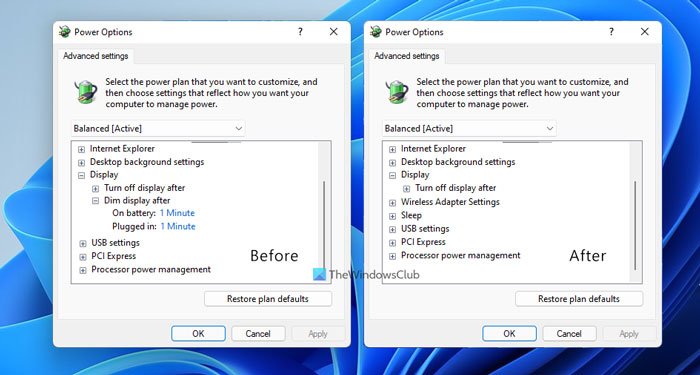
Dim display after in a Power Options setting allows users to dim their computer display after a specific time. However, if you do not like others to change this functionality, you can remove or hide the Dim display after setting from Power Options using Command Prompt and Registry Editor.

If you are using a Windows 11/10 laptop, saving the battery may be one of your priorities. For that, Windows offers several features, and one of them is Dim display after. It lets you dim your display brightness (instead of turning off the light) automatically after a predefined time. However, not all Windows laptops support this feature. If your computer supports it, but you do not want to let others mess with this setting, you can hide it from the Power Options panel.
There are two ways to do that – using Command Prompt and using Registry Editor. If you use the Registry Editor method, don’t forget to create a System Restore point before going forward. On the other hand, you are about to use the powercfg command, which helps you change or modify the Power configuration for performance.
Hide Dim display after from Power Options using Command Prompt.
To show or hide Dim display after from Power Options, follow these steps:
- Search for cmd in the Taskbar search box.
- Click on the Run as administrator option.
- Click the Yes button.
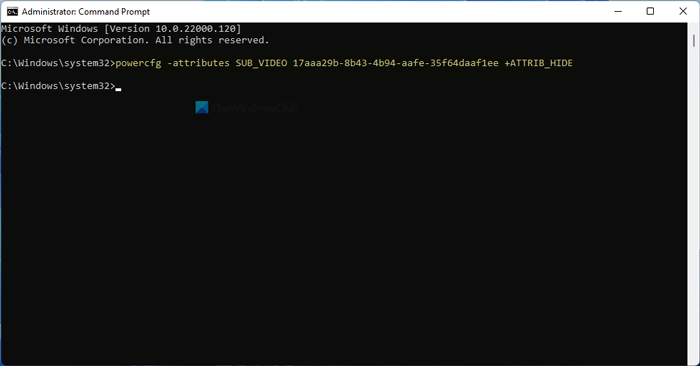
- Enter this command:
powercfg -attributes SUB_VIDEO 17aaa29b-8b43-4b94-aafe-35f64daaf1ee +ATTRIB_HIDE
At first, you have to open Command Prompt with administrator privilege. For that, you can search for cmd in the Taskbar search box, click on the Run as administrator option, and click the Yes button.
Next, enter the command following command to hide this option:
powercfg -attributes SUB_VIDEO 17aaa29b-8b43-4b94-aafe-35f64daaf1ee +ATTRIB_HIDE

If you want to re-add the Dim display after option in the Power Options panel, enter the following command:
powercfg -attributes SUB_VIDEO 17aaa29b-8b43-4b94-aafe-35f64daaf1ee -ATTRIB_HIDE
After that, you can check the Power Options window to find out the option.
How to turn off Dim display after from Power Options using Registry Editor
To turn on or off Dim display after from Power Options using Registry Editor, follow these steps:
- Press Win+R to open the Run dialog.
- Type regedit and hit the Enter button.
- Click on the Yes option.
- Navigate to
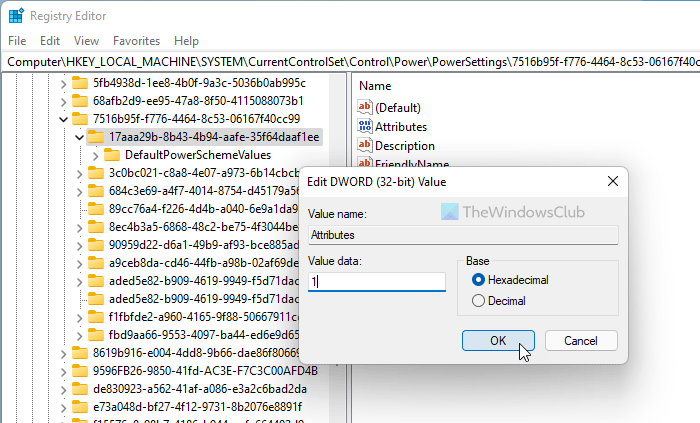
17aaa29b-8b43-4b94-aafe-35f64daaf1eein HKLM. - Double-click on the Attributes REG_DWORD value.
- Set the Value data as 1 to turn it off.
- Click the OK button.
- Restart your computer.
Let’s check out these steps in detail.
At first, you have to open the Registry Editor on your computer. For that, press Win+R, type regedit, and hit the Enter button. Next, click on the Yes option on the UAC prompt.
After opening the Registry Editor, navigate to this path:
HKEY_LOCAL_MACHINE\SYSTEM\CurrentControlSet\Control\Power\PowerSettings\7516b95f-f776-4464-8c53-06167f40cc99\17aaa29b-8b43-4b94-aafe-35f64daaf1ee
Here you can find a REG_DWORD value named Attributes. You need to double-click on it and set the Value data as 1 to turn off this feature.

Click the OK button and restart your computer to save the change.
If you want to add it again, navigate to the same path, double-click on the same REG_DWORD value, and enter the Value data as 2.
Why does my screen go dim after a while?
By default, Windows 11/10 dims the laptop’s display automatically after 1 minute. If your device supports this functionality, you need to check the aforementioned setting for possible changes.
What does dimmed display brightness mean?
Some laptops come with this feature, which lets you set the brightness level of the dimmed display that goes off automatically after a predefined time of inactivity. In other words, you can select the brightness level of your dimmed display on Windows 11/10.
That’s all! Hope this tutorial helped.
Read: How to show or hide Minimum and Maximum Processor State in Power Options in Windows 10
Leave a Reply