By default, the Network icon (or Wi-Fi icon) is visible on both the sign-in screen and the lock screen for all users in Windows 11/10. Any user can use that icon to disconnect a network and switch to some other network. If you don’t want anyone to do that, then you can simply hide or remove the network icon from the Login and Lock screen for everyone on your Windows 11/10 PC.
![]()
This can be done using two built-in options. This post will help you in doing so. Later, you can also show the network icon again.
Hide Network icon on Sign-in screen & Lock screen
There are two native features of Windows 11/10 to hide or remove the Network icon from the Login and Lock screen:
- Using Registry Editor
- Using Local Group Policy Editor.
Let’s check both the features separately.
How to disable Network icon on Login screen in Windows 11/10
1] Using Registry Editor
Before trying this feature, take a backup of Registry Editor, just in case. Now follow these steps:
- Open Registry Editor
- Go to Windows Registry key
- Create a System key
- Create DontDisplayNetworkSelectionUI DWORD value
- Add 1 in the Value data field of DWORD value
- Restart File Explorer.
In the first step, open the Registry Editor using the Run Command (Win+R) box or any of your preferred options.
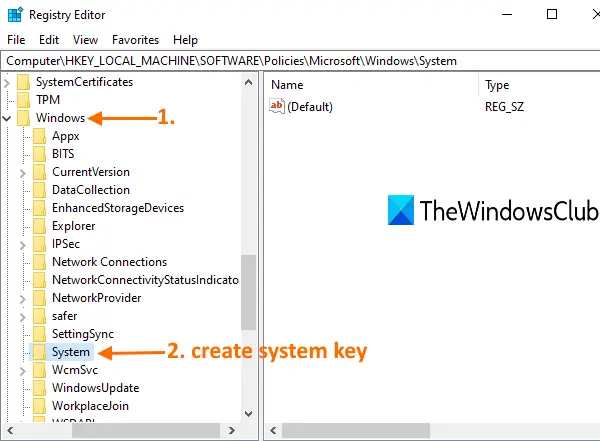
When Registry Editor is opened, navigate to the Windows key. Here is the path:
HKEY_LOCAL_MACHINE\SOFTWARE\Policies\Microsoft\Windows

After selecting the Windows key, create a new key under it, and set its name to System.
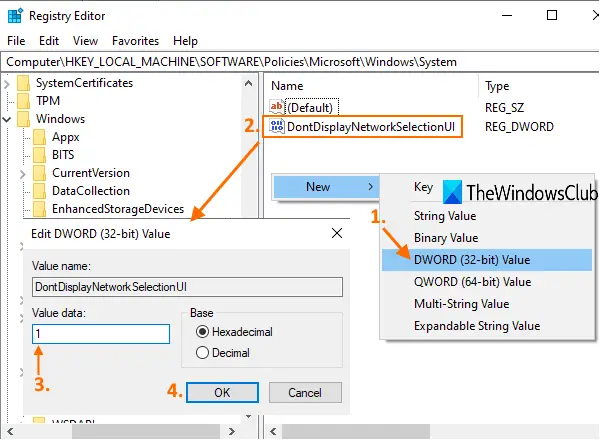
Once the System key is selected, open right-click menu on an empty area on the right-hand section, select the New menu and select Create DWORD (32-bit) Value.
Rename that new value to DontDisplayNetworkSelectionUI.

Double-click on that DWORD value and it will open a box. There, add 1 under the Value data field, and click on the OK button.
Now simply restart File Explorer to apply the changes. This will remove the Network icon from the lock screen as well as the Sign-in screen for all users.
To undo all the changes, follow the above steps, place 0 in the Value data box, and use the OK button. Restart File Explorer to add your changes.
2] Using Local Group Policy Editor
The Local Group Policy feature is available in all editions of Windows, except the Home edition. If you are using that edition, then either manually install Group Policy to Home edition of your Windows 10 OS, or you can use the first method. Here are the steps:
- Open Local Group Policy Editor
- Go to Logon folder or setting
- Access Do not display network selection UI setting
- Use Enabled option
- Press OK
- Restart File Explorer.
At first, open the Local Group Policy Editor window.
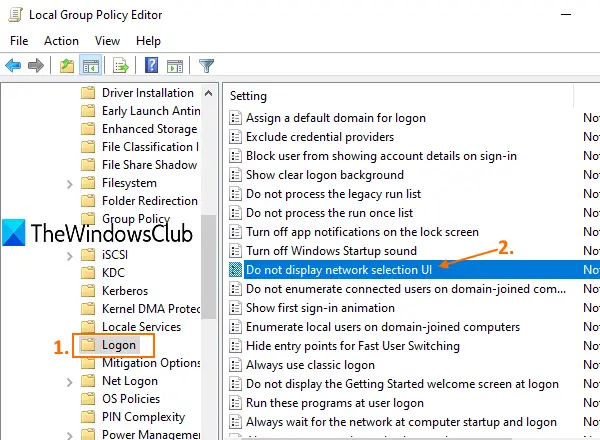
After that, access or go to the Logon folder. The path is here:
Computer Configuration > Administrative Templates > System > Logon

The list of all available settings for that folder will be visible in the right-hand section. Here, double-click on the Do not display network selection UI setting. You will see a new window.

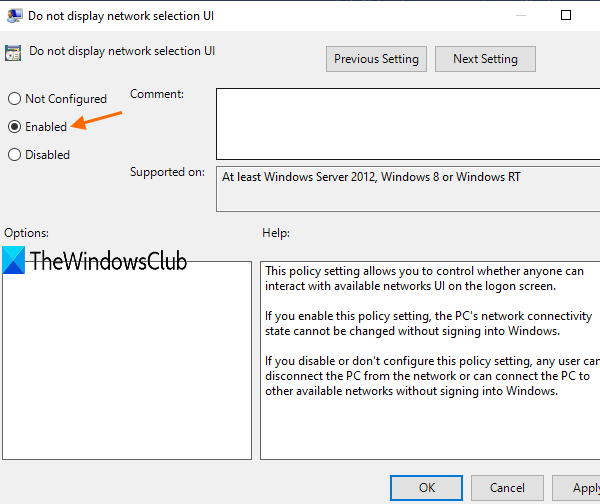
In that window, click on the Enabled radio button and use the OK button.
Now you have to restart File Explorer to make the changes.
To show the Network icon again on the Sign-in screen and lock screen, follow the steps mentioned above, use the Not Configured/Disabled radio button, and press OK. After that, restart File Explorer to add the changes.
I hope these two options will be helpful.
How to remove network icon from lock screen?
Access ‘Edit group policy’ via the Windows menu to remove the network icon from the lock screen. Navigate to ‘Computer Configuration > Administrative Templates > System > Logon’ and enable the setting ‘Do not display network selection UI’.
How do I remove the Internet icon?
To remove the Internet icon from the taskbar in Windows 11, right-click on the taskbar and select Taskbar settings. Scroll down to the Notification area and click on Turn system icons on or off. You can toggle off the Network option to hide the Internet icon.
Leave a Reply