The Pictures app tile on Windows 8.1 Start Screen displays pictures, photographs or images. In this post, we will see how to disable live tile, display one specific photo or show only selected images on Pictures app tile on Windows 8.1 Start Screen.
Disable Pictures Live Tile
If you do not like the pictures to be displayed there and would like to disable the live tile feature, you can always right-click on the tile and select Turn live tile off from the menu bar or command bar which appears at the bottom.
Set a specific photo to display on Pictures tile
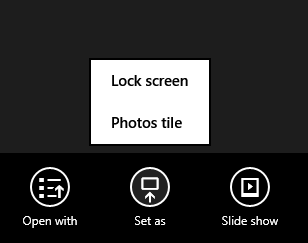
You may also set a specific photo to be displayed on the tile. To do so, open the Pictures app and photo you want to display. Right-click on the photo. You will, in the menu bar which appears at the bottom, see Set as. Click on it and then select Photos tile.

To switch back to the default settings, use the Shuffle photos on app tile option under Settings.
Show selected images on Pictures app tile
Now by default, the Pictures app displays the photos which are present in your Pictures library – not the Pictures folder – but the Pictures library. To control what gets displayed on the tile, you will have to select the folder/s to be included in the Pictures library. The app selects pictures from the Pictures library based on various factors like how frequently you access the pictures when was the last time you opened it, when was it taken and so on.
To show only selected pictures in the app tile on the Start Screen, you will have to remove default folders and add a folder to the Pictures library. To add or remove the folders in Pictures library, do the following in Windows 8.1.
Open your C:\Users\username\Pictures folder and create a new folder Next, open your C:\Users\username\Pictures\Tile Slideshow in it. Move the pictures you want to be displayed to this folder.
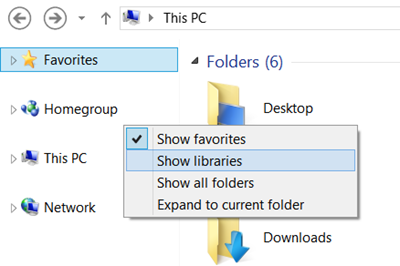
Now right-click a blank space in the Navigation Pane of the Windows 8.1 File Explorer and select Show Libraries.

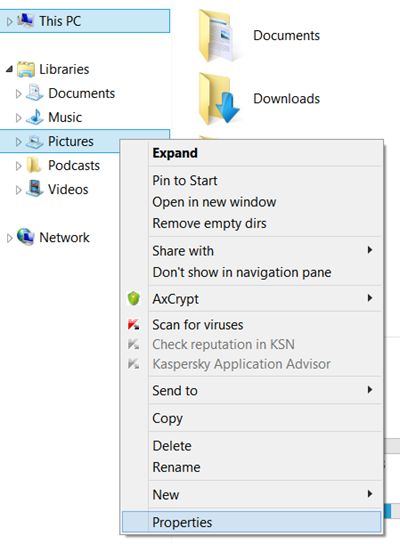
You will now see the Libraries displayed. Right-click on the Pictures library and select Properties.

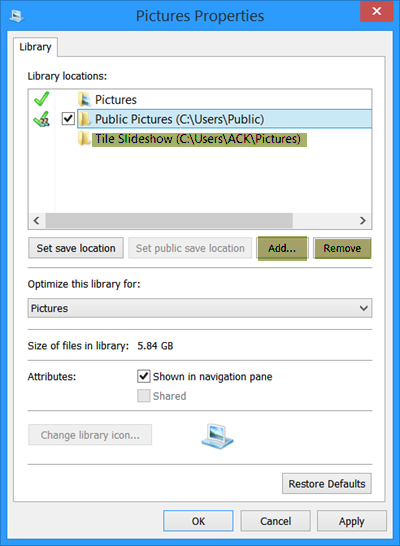
In the Properties box, you will see the default Pictures and Public Pictures folder included. Using the Add and Remove buttons, you will have to remove these two folders. Next add the newly created Tile Slideshow folder to the Pictures library.

So now the Pictures library will include only the Slideshow folder. Click Apply, OK and Exit.
Give it some time or maybe restart your computer and you should be all set to go.
Hope this works for you!
^^ Worked like a charm, restart essential for early results :)
:)
Man, it didn’t worked for me. After i made the procedure (with restart) only a few images (not the previous ones) were displayed. I made it a second time and now nothing is displayed (like the live tile was turned off)…
It’s back again. But i misunderstood the text. What i wanted is to show all the pictures that are in my folder. Is there a way to do it, or it’s a fixed parameter (only 5 per time)?
You may try to set specific photo to live tile and then turn on Shuffle photos in app tile. it’s worked for me.
Thanks! It worked!!!
can we change the tiles to bear custom images other than photos app
This really helped. Thank you so much! :)
Delete the pictures from OneDrive
C:Users[username]OneDrivePictures
I have been trying to figure this out for a while, calling MSFT , using MSFT forums. No one had an answer, just the canned troubleshooting nonsense. Let me give this a shot. The solution here looks complicated, but i hope it works. The last call in the MSFT, they said it doesnt show all the photos from photos app on the Tile. Well, mine currently shows none of the photos in the source location i provided. It showed 5 before. 5 out of many. Let me read thru this again and i will update later.
Not sure how to do this step..”Next, open your C:UsersusernamePicturesTile Slideshow in it.” I have WIndows 10. So you say open a folder in this location: C:UsersusernamePictures. So do we name it anything? i guess we dont. Now the next step is add Tile Slideshow to it. Where is this Tile Slideshow. I dont have that. Is Camera Roll the same thing? I need instructions for windows 10.
what re picture tiles. help
Is there a way to do this in Windows 10?
Brilliant! Thank you Mr. Khanse. You’ve saved me many more fruitless Web searches to accomplish exactly what you’ve concisely explained here. The folder/file images made the steps easy to follow. Now I can view my favorite H.R. Giger artwork in a live tile shuffle on my Win 8.1 personalized Start screen.