Do you know the exact spot with the maximum Wi-Fi signal strength in your house? Well, you can probably tell that by the number of solid bars in the Wi-Fi icon in the taskbar. But that might not be the best way for you. The solid bars give you an abstract idea about how the signal strength but will not give you an exact number or value. The exact value can help you in your analysis and will also provide you with results that can be used to improve Wi-Fi signal strength at your home or office.
Many a time even with excellent internet speed, consumers complain of speed issues. While they can connect, they don’t get the rate they should be getting based on their internet speed offered by their ISP. The problem can be because of thick walls, low signal, and others. In this post, we will share applications that can help you measure Wi-Fi signal strength.
The right way to check Wi-Fi Signal Strength
While it is easy to look at the number of bars on the Wi-Fi icon and understand if the signal is weak or strong, but that is not an accurate way to measure strength but an only approximation. Some of the advanced applications measure Wi-Fi strength in terms of dBm or milliwatt.
It is a negative measurement which spans from -30 to -90 and signifies the loss of signal strength. So if you get a signal strength of -30, it is the best you can get while -90 is terrible. That said, if you are wondering what would be the ideal strength for streaming or anything heavy on bandwidth, then its around -65 dBm.
How to measure Wi-Fi signal strength
You can use any of these free tools to measure Wi-Fi signal strength, but make sure to first go through all the features, limitations, and ease of use.
- Fing
- Wi-Fi Analyzer
- NirSoft’s WifiInfoView
- NetSh Command
- Vistumbler
- WirelessConnectionInfo.
Apart from dBm, RSSI is also another unit to measure the strength, but it’s not a standard way to do it. We have given the conversion formula if any of the software offers RSSI values.
1] Fing
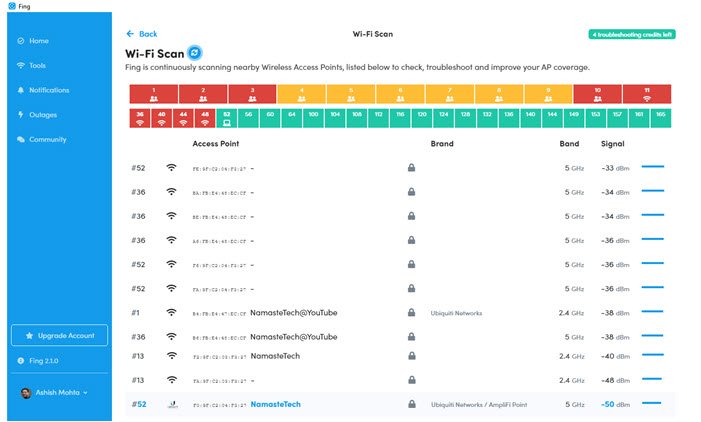
It is the best tool you can find right now to measure Signal strength, and also generate a full report if you have a Wi-Fi issue. Once you install the tool, switch to the tools section, and then start the Wi-Fi scan to troubleshoot and find the strength of every Wi-Fi device around you!
The only limitation using this tool is that you can try it five times a day, but since it keeps scanning the signal strength live, it is more than enough. Also, the application is free to use on Smartphones as well, and if you are trying to find out the signal strength at a particular place. Download Fing.
2] Wi-Fi Analyzer
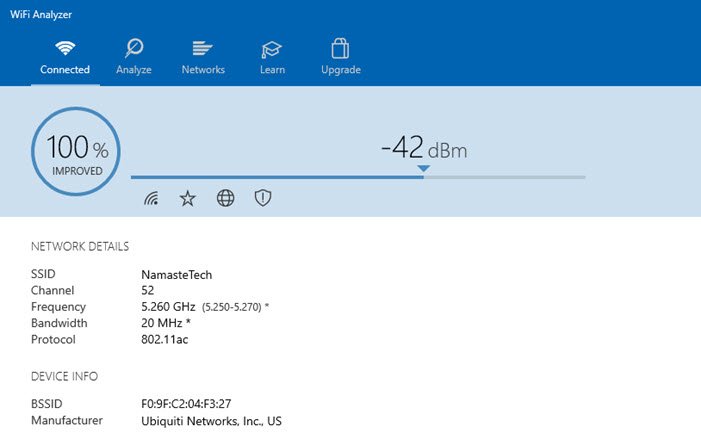
It’s a free tool that you can download from Microsoft Store. It can help you identify Wi-Fi problems, find the best channel, or the best place for your router/access-point by turning your PC/laptop, tablet, or mobile device into an analyzer for your wireless network. The best part of using this tool is that it serves the purpose without clicking anything else. Launch the tool, and it will ask for permission, and then get you the result.
It can also analyze and help you figure out issues with your network, but that comes under their premium segment. Since all we need is signal strength without any limit on how many times you can check, this works well. You can download from Microsoft Store
3] NirSoft’s WifiInfoView
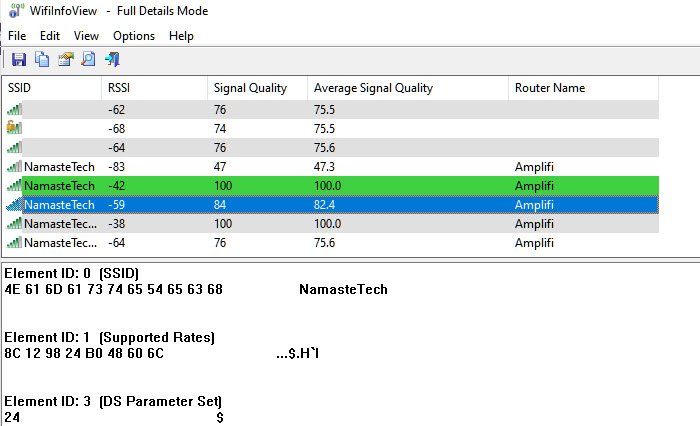
WifiInfoView uses the NetSh command in the background and then converts it into data that anybody can understand. Apart from it can also scan for other routers in the neighborhood and help you figure out if your router being closest to you is offering the right strength. Instead of using dBm, it uses RSSI to measure signal strength. RSSI stands for r Received Signal Strength Indicator. The formula to convert RSSI into DBM is as follows
RSSI - 95 = signal strength in dBm
So in my scenario, RSSI, according to this tool, is -42, which equals -53dBm, which is close enough.
4] NetSh Command
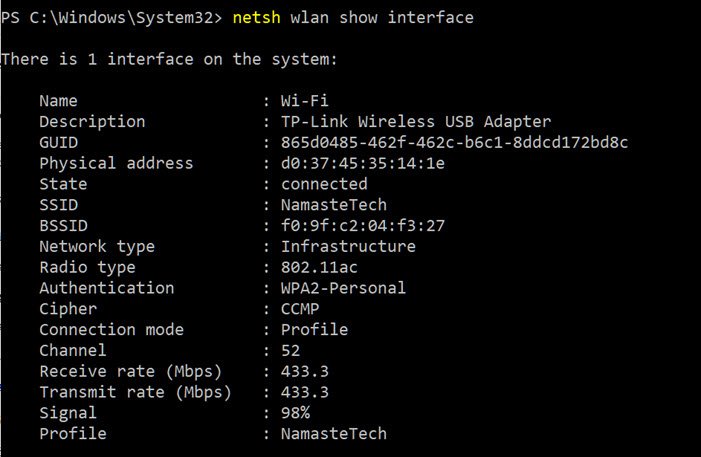
The simplest way of doing so will be by typing in some commands in a CMD window. This method does not require any software installation, it is simple and quick. Make sure you are connected to the Wi-Fi you want to run a signal test on.
Windows offers a built-in command that can show the signal strength. When you run the NETSH command, it will display the signal strength in terms of percentage. Here is the command what it looks like.
netsh wlan show interface
This will give you detailed information about the wireless network. This type of information is not available in the network and sharing center or even the settings app. You can view GUID, Physical Address, State, SSID, BSSID, Network Type, Radio Type, Authentication, Cipher, Channel, Receive/Transmit rate, and most importantly the signal. The signal is represented as a percentage value and is the most accurate measure of strength. You can run this command as many times and you will notice the change in signal values every time you move around your device a little bit.
As you can see in the image that 98% looks promising, but if you convert it into dBm, it will tell a different story. Here is the formula for converting a signal percentage into dBm.
dBm = (quality / 2) – 100
So the 98% signal strength (quality) will convert into 98/2-100 = -51. This matches the Fling tool report, which evaluated -50dBm.
5] Vistumbler

It’s free software that can scan for all AP around you, and then display the signal strength, channel, mac address, and other details. It is similar to Nirsoft’s software, but it comes with a twist. You can also use GPS as one of the factors which help you generate a map. However, using it for anything apart from what displays on the list means you will have to put in a bit of effort. So unless you are into technical stuff, skip it or use it for only what you need.
Download from Vistumbler and let us know what you think of it.
6] WirelessConnectionInfo
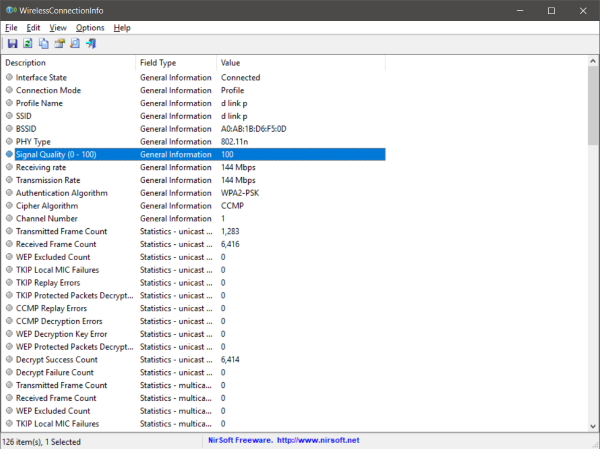
If you are not fond of these black box terminal windows, then there is a GUI based solution for you. WirelessConnectionInfo is a freeware application that lets you view all the details about the wireless network you are connected to. Well, it gives you a lot more details that the command line method gave you and one of them is the signal strength. You can also export the data as an HTML report and later use it for sharing purposes.
WirelessConnectionInfo like any other Nirsoft tool offers a variety of visual customizations. It supports most of the common keyboard shortcuts and you can easily refresh the stats and signal strength by pressing F5 on your keyboard.
Click here to download WirelessConnectionInfo.
How to improve Wi-Fi Signal Strength
That covered, if you are wondering how you can improve the strength, then it’s a vast topic, but here are some basic rules to follow.
- Connect to a 5 GHz access point as it offers the best strength.
- If your router doesn’t support 5 GHz mode, it is best to get a new one. Most of the modern routers support it.
- If you cannot get close to your primary router and have too many blind spots, you may want to upgrade to a mesh router such as AmpliFi Mesh routers.
There is no silver bullet to get the best strength, but these should help. Ethernet always serves the purpose of getting you the best speed, but then it may not be possible to have it all the time. I hope the software in the post was able to help you figure out the Wi-Fi signal strength.
So this was how you can view the exact signal strength of a Wi-Fi connection. You can use the above methods to find the best spot in your home or office. Or these methods can be used to find out the best place to install a new Wi-Fi router. You can keep your computer static and move the router around and see how the signal changes. There are endless possibilities for how you want to use these methods for your rescue.
TIP: Homedale for Windows lets you manage your WiFi strength.
A proper credit would be much appreciated.