In Microsoft Word and Excel on desktop, the Signature Line is a native feature that allows us to e-sign a document or worksheet and let reviewers and approvers of the document sign it. A signature line with an X is added to the document, where you can add your name or insert a handwritten signature. The feature works fine but some users have complained that when they try to add a digital signature (also known as digital ID) to their document, they find that the Signature Line option is greyed out or disabled. If you also face this issue, the working solutions covered in this post will be helpful.
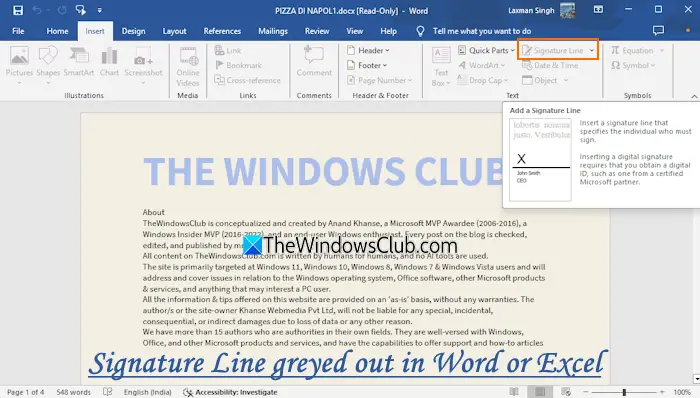
Why is there no Signature Line in my Word?
If the editing restrictions are applied to a document or the document is marked as final, you will find that the Signature Line is greyed out in Word. Third-party add-ins installed on Word can also interfere with document formatting and cause issues while adding a signature line.
Signature Line greyed out in Word or Excel
If the Signature Line option is greyed out in Excel or Word on your Windows PC, use these fixes:
- Remove editing restrictions from the document
- Disable add-ins
- Add an invisible digital signature
- Insert a handwritten signature
- Add a signature line manually
- Repair Office.
Let’s check these options.
1] Remove editing restrictions from the document
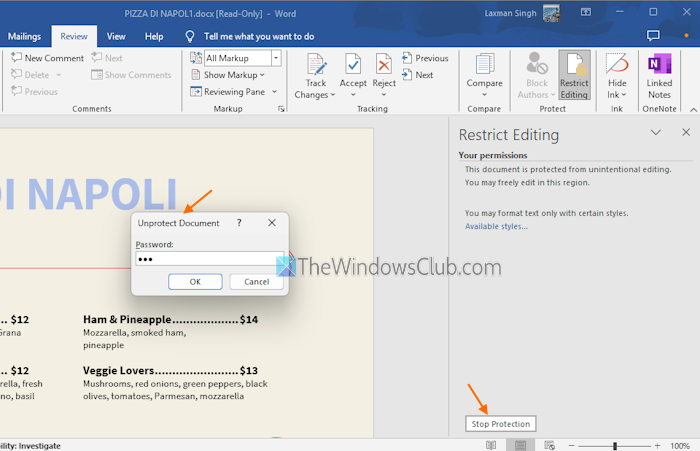
If a Word document is protected and the editing restrictions are set to No changes (Read only) mode, then the Signature Line option is greyed out in Word including many other options. So, you have to remove editing restrictions from the document or stop the document protection. For this:
- Open your Word document
- Switch to the Review tab
- Select the Restrict Editing option
- In the Restrict Editing panel, press the Stop Protection button
- Enter the password (if set) to unprotect the document.
You can restrict editing in Word anytime and limit the Editing restrictions to Tracked changes, Comments, or No changes.
Similarly, if the protection is enabled on one or more sheets in an Excel workbook, the Signature Line option will be disabled on all those sheets while it will remain enabled on other sheets.
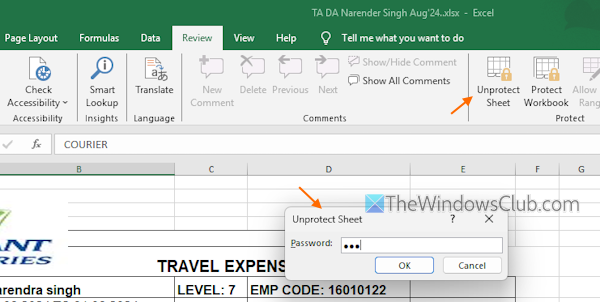
To remove protection from an Excel sheet, use these steps:
- Open your Excel workbook
- Access the sheet where the protection is enabled
- Select the Review tab
- Press the Unprotect Sheet button
- Enter the unlock password that was used to protect the sheet
- Press OK.
Repeat these steps to unprotect other sheets in your Excel workbook.
2] Disable add-ins
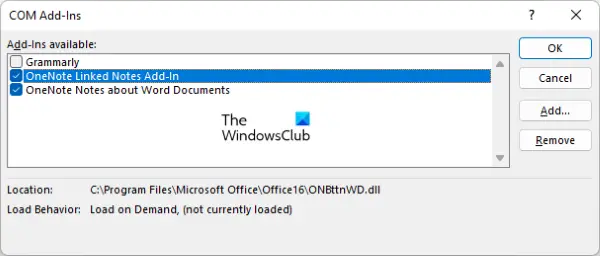
If the problem is caused by a third-party add-in available in Word or Excel, you need to disable them one by one to find the problematic add-in. First, launch Word or Excel in safe mode on your Windows 11/10 PC. Now open a document and see if the Signature Line is disabled. If yes, then there should be some add-in causing this issue. To solve the issue:
- Exit Word from safe mode and open it with normal mode
- Navigate to File > More… > Options
- Word Options box will open. Select the Add-ins category from the left section
- In the Manage drop-down box, select COM Add-ins, and press OK
- A separate box will open. There, uncheck an add-in
- Press OK
- Now check if the Signature Line option is enabled or turned on. If not, repeat these steps until you find that add-in, and then remove it.
Read: View, manage, install, and remove Add-ins from Office programs
3] Add an invisible signature
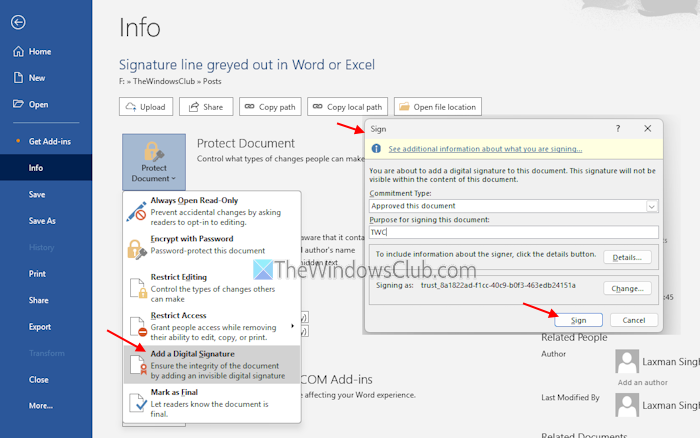
If the Signature Line option is inaccessible, you can still add a digital signature to your Word or Excel file. MS Word and Excel have an invisible signature feature that can be used to sign a document to assure the authenticity and integrity of the document. The signature is not visible within the content but you can view signature information whenever needed. Note that if you perform editing to that document, the signature will become invalid. Here are the steps to add an invisible signature to a Word document or Excel file:
- Open your Word document
- Navigate to File > Info > Protect Document > Add a Digital Signature
- A Sign box will open
- In that box, select Commitment Type to Created and approved this document, Approved this document, Created this document, or None. You can also leave this field blank
- Add purpose for signing this document or leave it blank
- Press the Details button to include additional signing information such as Signer Role/Title, Product Place Address, City, etc.
- Select a certificate using the Change button or use the default certificate
- Press the Sign button and the signature will be added to the document. Your document will become read-only.
This way, you can add additional invisible signatures.
To view signature details, click the Signatures button on the bottom left part of the document. This will open the Signature pane on the right section. Select a signature, open the drop-down menu, and click the Signature Details option.
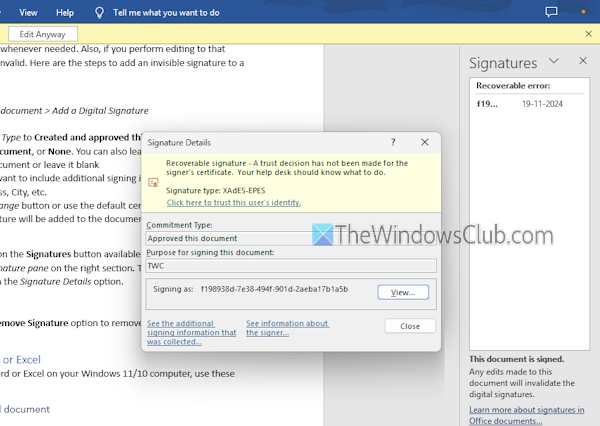
The drop-down menu also includes a Remove Signature option to remove that particular invisible signature from the document.
Related: How to Electronically Sign a Document in Windows PC
4] Insert a handwritten signature
You can also create and insert handwritten signatures into a Word document or Excel file. To do this, write your signature on a piece of paper, use a scanner to scan it, and save it in PNG, JPG, or BMP image format. Open that image in Word, crop it to the desired area, and save it. To insert the signature in the Word document, use the Insert tab > Pictures > This Device. After that, you can add the signature image.
5] Add a signature line manually
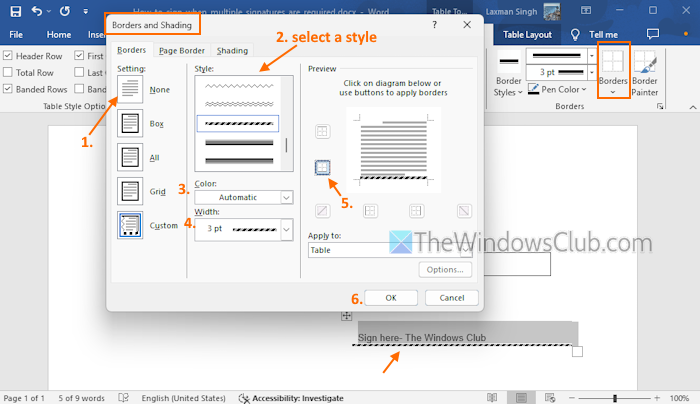
The Signature Line feature in Word adds a signature line with an X that works as a placeholder where the signee needs to sign the document. But we can also add a signature line without an X manually. This is not a direct but interesting option to add a signature line. Here are the steps:
- Open a Word document and click on a place where you want to add the signature line
- Go to Insert menu > Table > and select a 1*1 Table
- A table line will be added. Adjust the length of that line as per your requirement
- Navigate to Table Design tab > Borders drop-down menu (in Borders group) > and select Borders and Shading option
- In the Borders and Shading box, select the Borders tab, and click on the None option in Settings
- In the Style section, select line type, color, and line width for the signature line
- In the Preview section, select the bottom border icon
- Press OK.
Now you will see a customized signature line on your document where you can type your name or add a handwritten signature.
Read: Your signature could not be added to the document Excel error
6] Repair Office

You can also repair Office on your Windows PC if you face problems using Signature Line or other features of Word or other Office apps. Even if you want to repair only Word or Excel, the repair procedure works for the entire Office suite.
Read: Your signature could not be added to the document Excel error
How to add signature lines to a Word document
To create a signature line in Word, jump to the Insert menu, and click the Signature Line option (in Text group). This will open a Microsoft Office Signature Line setup box. Add a suggested signer name, title, and email address, and use other options. You can also enable/disable options to allow the signer to add comments and show the signing date in the signature line. Press the OK button. This way, you can add additional signature lines to your Word document.
How to add signature lines to an Excel sheet
Adding signature lines to an Excel sheet is the same as creating a signature line in a Word document. Open an Excel workbook and select a sheet where you want to add a digital signature. In the Insert menu, select the Signature Line option, and a Signature Setup box will pop up. Enter details like signer name, signer title (Manager, Author, etc.), instructions to the signer, etc., in the given fields, and press OK.
Read next: How to add a Digital Signature to Outlook.
Leave a Reply